Showing posts with label PanPastels. Show all posts

Friday, May 24, 2019

STAMPlorations Clear Stickers

Hi there,

the most talented Shery from STAMPlorations has added the new Clear Stickers to the shop. Here are some creations showcasing this fabulous product:

  • stamp three mugs from the STAMPlorations What's brewing set with Versafine Vintage Sepia onto a panel of watercolor paper
  • color the images and the background with Ecoline Brush Pens and a watercolor brush
  • add the sentiment from the STAMPlorations Just Caffeinate Clear Sticker set
  • add a strip of brown foiled cardstock and of striped patterned paper to the bottom of the panel before adhering it to the cardbase


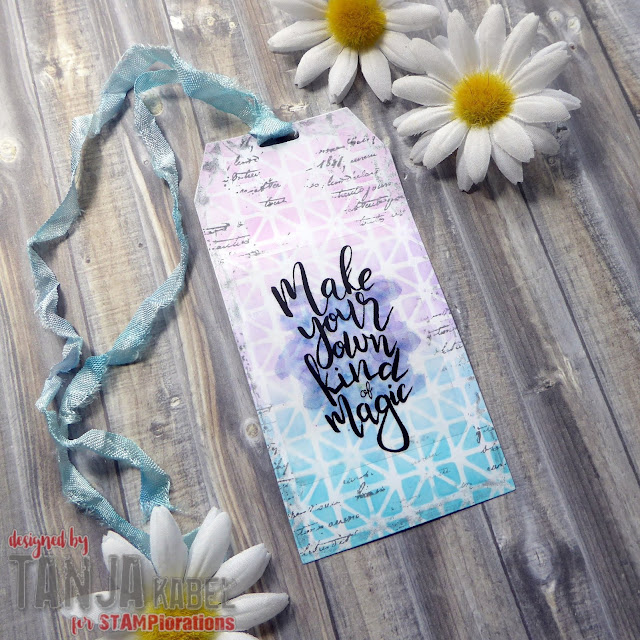
On my next project I used PanPastels on my Gelli Plate:

  • apply PanPastel through the ARTplorations Lattice stencil onto a Gelli Plate
  • use a brayer to coat that pastel layer with white acrylic paint and take your print
  • cut out a tag from the print using one of the CUTplorations Manila Tags
  • adhere a sticker from the STAMPlorations Free Spirit sticker set
  • add some more texture with the help of the scrip stamp from the STAMPlorations Mixed Media Elements set and Archival Ink Watering Can
  • grunge up the edges with Art Graf Aquarell-Grafit
  • dye a piece of torn seam binding with Distress Stain (Spun Sugar, Tumbled Glass, Shaded Lilac) and thread it through the hole of the tag


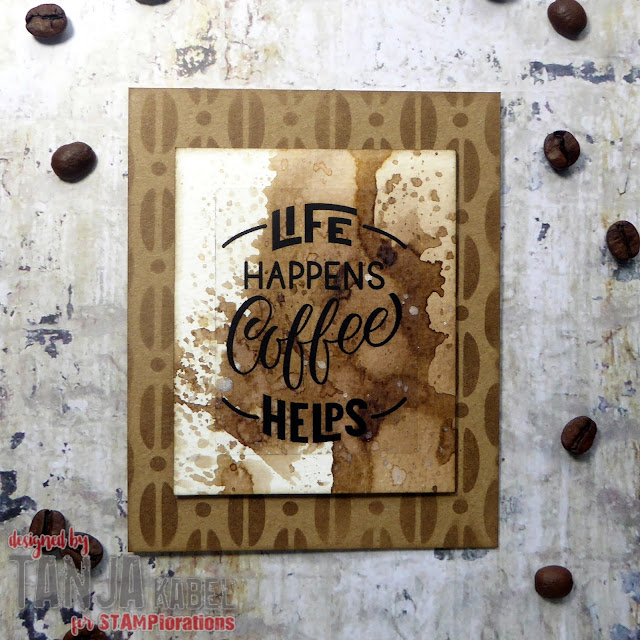
On my third project I used one of the STAMPlorations Coffee Time Stickers:

  • add color to a piece of watercolor paper with Distress Ink (Tea Dye, Ground Espresso) and water from a Mini Mister
  • add Pearlized Water droplets for extra shimmer
  • adhere a sticker from the STAMPlorations Coffee Time sticker set
  • use the ARTplorations Dots 'n' Beans stencil, Distress Ink Ground Espresso and a Mini Ink Blending Tool to create a background on a kraft cardbase


For my last project I used some pretty packaging to create an ATC:

  • cover a piece of ATC-sized Packaging with white gesso
  • grunge up the edges with Art Graf Aquarell-Grafit
  • adhere a sticker from the STAMPlorations Free Spirit sticker set
  • add some more texture using the dots from the STAMPlorations Mixed Media Grunge set and Archival Ink Watering Cam
  • as final embellishments add some of the Nuvo Dream Frops Love Potion


I hope you love this new product line as much as I do.

Hugs,


Saturday, September 29, 2018

Happy Fall Bear

Hi there,

since I always like to stretch my supplies I turned the Elizabeth Craft Designs Polar Bear into a little brown bear:

  • cut out the Elizabeth Craft Designs Polar Bear from white Soft Finish Cardstock
  • color the pieces with Delta, Touch Twin Brush and Copic Markers
  • add highlights with a white gel pen and a little smile with a black fineliner
  • let him sit on a strip of patterned paper from the ModaScrap Wood Effect 6x6 paper pad
  • create the sentiment with the help of a piece of watercolor paper, Distress Inks (Wild Honey, Peeled Paint, Frayed Burlap), Mister Huey's Spray Gold and the Elizabeth Craft Designs Blackboard Alphabet
  • add some golden splatters to a Neenah Desert Storm kraft cardbase as well
  • cut out some leaves from the Elizabeth Craft Designs Woodland Leaves die set from white Soft Finish Cardstock
  • add color with Alcohol Markers and PanPastel and shape the leaves with the help of the Susan's Garden Tool Set
  • tuck the leaves behind the adorable little bear


Have the most wonderful day.

Hugs,


Monday, August 13, 2018

Christmas in August

Hi there,

did you see the fabulous new Joset dies and stamps over on Elizabeth Craft Designs? If not, we prepared a blog hop full of ideas and inspiration for you:

  • cut out one of the brand new Elizabeth Craft Designs Winter Ornaments and the Elizabeth Craft Designs Small Poinsettia from Elizabeth Craft Designs white Soft Finish Cardstock
  • color all the elements with Delta, Touch Twin Brush and Copic Markers
  • add extra shading to the petals with PanPastels
  • use the Susan's Garden Tool Set to shape the flower
  • thread natural twine through the hole of the ornament
  • cut out a stitched panel from watercolor paper using one of the Elizabeth Craft Designs Stitched Rectangles
  • create a background using Distress Paints (Weathered Wood, Evergreen Bough) and Crackle Paste Platinum
  • stamp the sentiment from the Elizabeth Craft Designs Classic Christmas Sentiments with Archival Ink Watering Can
  • mat the panel onto a kraft cardbase


And this is my second project:

  • cut out the Elizabeth Craft Designs Santa Claus and the presents from the Elizabeth Craft Designs Santa's Sleigh die set from white Soft Finish Cardstock
  • color all the elements with Delta, Touch Twin Brush and Copic Markers
  • add the eyes with a black gel pen and highlights with a white gel pen
  • cut out one of the Elizabeth Craft Designs Frame it Stitched Circles from Neenah Desert Storm kraft cardstock
  • stamp the sentiment and some snowflakes form the Elizabeth Craft Designs Cute Winter Sentiments set with Versamark and heat-emboss them with WOW! Bright White Super Fine embossing powder
  • create a sky background on watercolor paper with the help of Distress Oxide Inks (Tumbled Glass, Stormy Sky) and a Mini Ink Blending Tool
  • add some water droplets for more texture
  • cut out a hill shape using one of the Elizabeth Craft Designs Adventure Edges
  • cover the opening with a piece of acetate and create a shaker element using a double layer of foam adhesive
  • fill the shaker element with sequins 
  • close the shaker with the background panel and adhere everything to a dark kraft cardbase


I hope you got inspired and enjoy the rest of the hop.

Hugs,


Monday, July 2, 2018

Rose Box

Hi there,

I created this triangle box with a beautiful rose and baby's breath from Elizabeth Craft Designs:

  • cut out the ModaScrap Triangle Box from patterned paper from the ModaScrap Wood Effect 12x12 paper pad
  • cut out the Elizabeth Craft Designs Rose 1 and the Elizabeth Craft Designs Baby's Breath from Elizabeth Craft Designs white Smooth Soft Finish cardstock
  • color all the elements with Delta, Touch Twin Brush and Copic Markers
  • add extra shading with PanPastels
  • use the Susan's Garden Tool Set to shape the flowers


Have a wonderful day.

Hugs,


Monday, June 18, 2018

Collect beautiful Moments

Hi there,

I would like to show you how I created this Mixed Media Flower Tag over on the Elizabeth Craft Designs Blog:

  • cover a sturdy white tag with gesso
  • add color with Distress Paint (Spun Sugar, Dusty Concord)
  • create some texture by applying gesso through the ARTplorations Leaves 2 stencil and by stamping script from the STAMPlorations Mixed Media Elements set and a dot pattern from the STAMPlorations Mixed Media Grunge set with Archival Ink Watering Can
  • spread some crackle paste over random spots and let everything dry thoroughly
  • to create the Lilac use the Elizabeth Craft Designs Garden Notes Lilac 2 die set
  • cut the base once from very sturdy craft cardstock and once from 270gr Elizabeth Craft Designs white Soft Finish Cardstock
  • cut five leaves, the plate with the larger flowers four times and the smaller flowers twice - use the Elizabeth Craft Designs Soft Finish Cardstock as well
  • add color to the white cardstock using Alcohol Markers
  • shape the elements with the help of the fabulous Elizabeth Craft Designs Susan's Garden Tool Kit
  • create the flower right on the tag
  • add green prills to the center of the little flowers and shading using purple and green Pan Pastels
  • add two sentiment stickers and dye a piece of torn seam binding with Distress Ink Dusty Concord
  • cut out a ladybug from the Elizabeth Craft Designs Susan's Garden Bugs & Butterflies die set, color it, shape it and adhere it to one of the leaves - to achieve a shiny, more realistic look add a thick coat of Nuvo Crystal Glaze on top
Hugs,


Tuesday, May 22, 2018

Grateful Heart

Hi there,

today, is going to be just fabulous because Elizabeth Craft Designs is releasing new dies in the Susan's Garden series.

Here is my first creation using the new Susan's Garden Forget me not and the Baby's Breath:

  • cut out all the elements needed for the Elizabeth Craft Designs Susan's Garden Forget me not and Baby's Breath from white Soft Finish Cardstock
  • color them with Alcohol Markers 
  • shape them with the help of the Elizabeth Craft Designs Susan's Garden Tool Set and add shading with PanPastels
  • cover a tag with an old gelli print using gel medium
  • grunge up the edges with a black Stabilo All pencil
  • stamp some elements from the STAMPlorations Mixed Media Grunge set with Archival Ink Watering Can
  • adhere the flowers to the tag
  • cut out a ladybug from the Elizabeth Craft Designs Susan's Garden Bugs & Butterflies die set, color it, shape it and adhere it to one of the leaves - to achieve a shiny, more realistic look add a thick coat of Nuvo Crystal Glaze on top
  • dye a piece of seam binding with Distress Ink Hickory Smoke and thread it through the hole of the tag
  • add a sentiment sticker


On my second project I used the new Elizabeth Craft Designs Susan's Garden Poppy:

  • cut out the Elizabeth Craft Designs Susan's Garden Poppy from white Soft Finish Cardstock
  • color the flower with Delta, Touch Twin Brush and Copic Markers and add shading with PanPastels
  • shape all the elements with the help of the Elizabeth Craft Designs Susan's Garden Tool Set and add Prills to the flower center
  • cut out a ladybug from the Elizabeth Craft Designs Susan's Garden Bugs & Butterflies die set, color it, shape it and adhere it to one of the leaves - to achieve a shiny, more realistic look add a thick coat of Nuvo Crystal Glaze on top
  • create the backdrop with the help of a gelli plate, tissue paper, Dina Wakley Heavy Body Acrylic Paints, Dina Wakley Scribble Sticks, bubblewrap and a brayer
  • cut out a frame using patterned paper from the ModaScrap Wood Effect 6x6 paper pad and two of the Elizabeth Craft Designs Stitched Rectangles
  • cut out a stitched panel from kraft cardstock with one of the bigger Elizabeth Craft Designs Stitched Rectangles 
  • create the sentiment with the help of the Elizabeth Craft Designs Thanks die and rose gold foil

I hope you got inspired.

Hugs,


Monday, April 16, 2018

Hello little Lion

Hi there,

I created this sweet Tag Card for Elizabeth Craft Designs:

  • stamp the sweet little lion from the ModaScrap Puppies Boy set with My Favorite Things Extreme Black and color the image with Derwent Drawing Pencils
  • add highlights with a white gel pen
  • cut out one ModaScrap Love, Life Tag from watercolor paper and one from patterned paper from the ModaScrap Color of Puppies Boy 6x6 paper pad
  • add color to the watercolor tag by applying Distress Ink (Frayed Burlap, Forest Moss, Crushed Olive) with a Mini Ink Blending Tool
  • cut out the larger Elizabeth Craft Designs Maidenhair Fern from Elizabeth Craft Designs Soft Finish Cardstock and color it with a Touch Twin Brush Marker
  • use the Susan's Garden Tool Set and PanPastels to achieve a realistic finish
  • speckle a white cardbase with watered-down Distress Ink Forest Moss, add the fern and glue the tags on top
  • cut out the "hello" from the Elizabeth Craft Designs Thinking of you die set from Elizabeth Craft Designs Olive Twist Soft Finish Cardstock twice and layer them both on top of each other
  • thread two strands of natural twine through the holes of the tag


I hope you got inspired.

Yours,


Monday, April 2, 2018

Tulip Basket

Hi there,

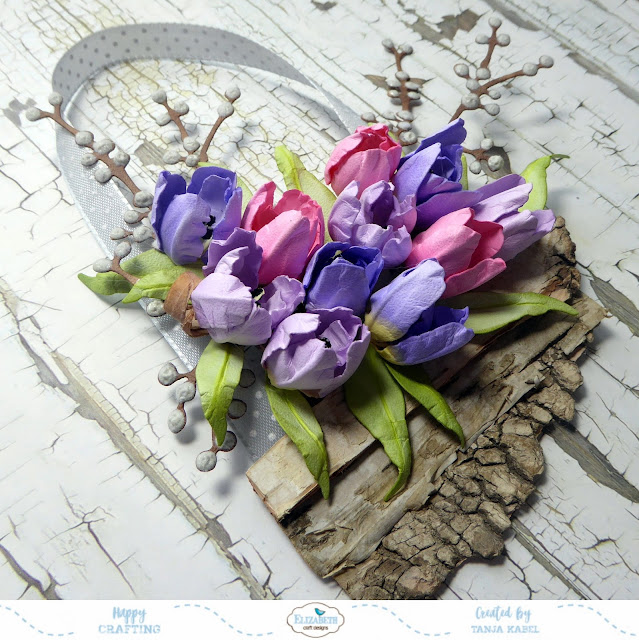
I would like to show you this Spring Tulip Basket that I created for Elizabeth Craft Designs:

  • create 11 tulips and some leaves using the Elizabeth Craft Designs Garden Notes Tulip 2 dies and Elizabeth Craft Designs white Soft Finish Cardstock
  • add color with Delta, Touch Twin Brush and Copic Markers and shading with Distress Ink (Peeled Paint) and PanPastels
  • shape all the elements using the wonderful Elizabeth Craft Designs Susan's Garden Tool Set
  • since I didn't have black Prills I used black embossing powder instead
  • cut out two of the Elizabeth Craft Designs Berry Sprays from Elizabeth Craft Designs white Soft Finish Cardstock
  • use Nuvo Crystal Drops Oyster Grey and white flocking powder to create pussy willow
  • form a basket from birch bark and add a piece of grey ribbon


I hope you got inspired.

Hugs,


Tuesday, March 27, 2018

Have an egg-stra special Day

Hi there,

here is another Easter Creation using the wonderful new Gerda Steiner Designs Peeking Easter Friends stamp set:

  • color the adorable little bunny from the Gerda Steiner Designs Peeking Easter Friends stamp set with Derwent Drawing Pencils
  • add highlights with a white gel pen
  • cut out a panel with the help of one of the Elizabeth Craft Designs Dashing Rectangles 
  • add clouds using the My Favorite Things Cloud stencil and PanPastel Phthalo Blue Tint
  • cut out a grass border using green cardstock and one of the Lawn Fawn Meadow Borders - add shading with PanPastel Permanent Green
  • use the sentiment from the same stamps set and cut out a banner shape around it

Have a wonderful Easter Time.

Yours,