Thursday, December 28, 2023

Christmas Holidays

Hi there,

I created this sweet Christmas Card for Menny's Bastelshop:

  • create a window scene with the help of the Tim Holtz Tree Line die, the Clearly Besotted Stamps Window die, Distress Ink Tumbled Glass and watered-down white gouache
  • create a background using Distress Ink Pumice Stone, the Clearly Besotted Stamps Build it stencil, the Hero Arts Designer Woodgrain stamp and Distress Oxide Ink Pumice Stone
  • stamp all the elements from the Lawn Fawn Christmas Dreams set with Gina K. Obsidian, cut them out and color them with Schmincke Horadam Watercolors
  • add strips of patterned paper to the top and bottom of the panel before adhering it to a cardbase

I hope you had wonderful Christmas Days.

Hugs,


Monday, December 25, 2023

Christmas Penguins

Hi there,

this Christmas I have a very special treat for you. My daughter and I created this lovely Christmas Project for the Karten-Kunst Blog:


  • cover the card front with patterned paper and cut out three Karten-Kunst 1/8 Inch Circles
  • stamp the Karten-Kunst Penguins with Versafine Onyx Black and color them with Derwent Coloursoft pencils
  • stamp some stars from the Karten-Kunst Zaubersterne set with Hero Arts Shadow Ink Silver
  • stamp the sentiment from the Karten-Kunst Weihnachten Modern set with Versamark onto a strips of dark blue/black cardstock and heat-emboss them with WOW! Bright White Super Fine embossing powder

Can you guess which one is hers and which one is the one I made? Hard to tell, right? She is just so talented. 

Hugs,


Sunday, December 24, 2023

Merry Christmas Santa

Hi there,

I created this vintage Christmas Card using one of the adorable Anjas Basteltraum Weihnachtsmänner:

  • cut out a circle from watercolor cardstock
  • stamp one of the Anjas Basteltraum Weihnachtsmänner with InkOn3 Fadeout Ink 
  • color the image with watercolors and add extra shading with Faber-Castell Polychromos pencils
  • cut out the Sunny Studio Stamps Mini Mat 2 from patterned paper
  • create a background on Neenah Desert Storm kraft cardstock using snowflakes from the Anjas Basteltraum Weihnachtssprüche set, white pigment ink, white gouache and Distress Ink Walnut Stain
  • cut out a poinsettia and some leaves from the Spellbinders Christmas Bird Poinsettia die set and add extra shading with Distress Ink (Forest Moss, Aged Mahogany)
Have a wonderful Christmas Time.

Hugs,


Thursday, December 21, 2023

All I want for Christmas

Hi there,

I created this cute Christmas Card using the adorable Newton's Nook Slothy Christmas for Mennys Bastelshop:

  • stamp the sleeping sloth from the Newton's Nook Slothy Christmas set with Lawn Fawn Crunchy Leaf
  • color the image with Spectrum Noir Triblend Markers
  • add extra shading with Faber-Castell Polychromos pencils, some highlights with a white gel pen and some glitter glue to the rim of the hat
  • stamp the sentiment from the same set with Versafine Clair Nocturne
  • cut a decorative border to the panel and add some patterned paper to the cardbase

Have a wonderful day.

Hugs,


Monday, December 18, 2023

Winter Village

Hi there,

I created this Christmas Card for the Karten-Kunst Blog:

  • ink up a card panel with Distress Oxide Ink Evergreen Bough and Uncharted Mariner
  • stamp the Karten-Kunst Skyline Winter Village and the sentiment from the Schriftzug-Set Feiertage with Versafine Clair Nocturne
  • add some golden and white splatters
  • before adhering the panel to a cardbase add strips of black and foiled cardstock to the left and right side of it

Thanks for stopping by.

Hugs,


Sunday, December 17, 2023

Christmas Beaver

Hi there,

today is the 3rd Advent Sunday and I would like to show you this cute Forest Scene created with the Anjas Basteltraum Weihnachtsbiber stamp set:

  • stamp the adorable beaver and the little bow from the Anjas Basteltraum Weihnachtsbiber set with Gina K. Designs Obsidian
  • color the images with Spectrum Noir Triblend Markers and add highlights with a white gel pen
  • cut out the Memory Box Evergreen Window from dark green cardstock
  • add Distress Oxide Ink Chipped Sapphire to the background
  • stamp the sentiment from the same set with Versamark and heat-emboss it with WOW! Bright White Super Fine embossing powder
  • splatter the whole card with watered-down white gouache and Finetec Mica Watercolors Tibet Gold
Thanks for joining me on this Advent Sunday.

Hugs,


Saturday, December 16, 2023

Classic Christmas

Hi there,

I created this Classic Christmas Card for the Karten-Kunst Blog:

  • stamp Karten-Kunst Weihnachtsmann-Helferlein with Lawn Fawn Crunchy Leaf
  • color the image with Spectrum Noir Triblend Markers, add extra shading with Faber-Castell Polychromos pencils and highlights with a white gel pen
  • cut out a background from patterned paper using the Karten-Kunst Rectangles A6 and the Karten-Kunst Torn Borders
  • add a swirl of silver thread behind the image

Thanks for stopping by.

Hugs,


Thursday, December 14, 2023

Time for Us

Hi there,

I created this fun Christmas Card using the Avery Elle Mr. and Mrs. Claus stamp set for Mennys Bastelshop:

  • stamp the main image and some accessories from the Avery Elle Mr. and Mrs. Claus set and the North Pole sign from the Lawn Fawn Penguin Party set with Lawn Fawn Jet Black
  • ink up the edges of the panel with some left-over blue and grey ink
  • color the image with Spectrum Noir Triblend Markers and add extra shading with Faber-Castell Polychromos pencils
  • stamp the sentiment from the Create a Smile Stamps Kleine Weihnachtsgrüße set with Versamark onto a strip of blue cardstock and heat-emboss it with WOW! Bright White Super Fine embossing powder
  • layer that blue strip onto a slightly wider strip of pink cardstock
  • add some clear sequins with Nuvo Glitter Drops White Blizzard in their centers as final embellishments

Have a wonderful day.

Hugs,


Monday, December 11, 2023

Winter Greetings Snowflakes

Hi there,

this is another card using one of the new Karten-Kunst Das Rockt die sets:

  • create a background using Distress Oxide Ink Stormy Sky and Shabby Shutters and stamp some snowflakes from the Karten-Kunst Zauberhafte Schneeflocken set with that same ink colors
  • add some droplets with watered-down white gouache
  • cut out the Karten-Kunst Das rockt Wintergrüße outline from vellum and the sentiment from white cardstock
  • add color to the white sentiment with Distress Oxide Ink Spun Sugar and Worn Lipstick

Have a wonderful Christmas Time.


Sunday, December 10, 2023

Santa's Little Helpers

Hi there,

I created this sweet Rooftop Scene using images from the Anjas Basteltraum Weihnachten bei Katz und Maus and the Anjas Basteltraum Weihnachtsmänner stamp sets:

  • stamp some mice from the Anjas Basteltraum Weihnachten bei Katz und Maus set and the chimney and the presents from the Anjas Basteltraum Weihnachtsmänner set with Lawn Fawn River Rock
  • color the images with Spectrum Noir Triblend Markers, add extra shading with Faber-Castell Polychromos pencils and highlights with a white gel pen
  • use the Lawn Fawn Rooftop Border, grey cardstock and Distress Ink Pumice Stone to create a roof
  • for the sky background I used blue cardstock, the Spellbinders Sparkling Snow embossing folder, a brayer, white pigment ink, Distress Ink Faded Jeans and splatters of white gouache
  • cut out the Creative Expressions Merriest Christmas as a sentiment from the same grey cardstock that you already used on the roof
Have a wonderful Advent Sunday.

Hugs,


Saturday, December 9, 2023

Santa's Helper Shaker

Hi there,

I created this sweet Christmas Shaker for the Karten-Kunst Blog:

  • stamp the Karten-Kunst Weihnachtsmann-Helferlein onto a piece of watercolor paper
  • color the image and the background with watercolors
  • add highlights with a white gel pen
  • cut a circle from a piece of dark blue cardstock
  • create a background using the Hero Arts Magical, Background, Versamark and WOW! Vanilla Lustre embossing glitter
  • ink up the edges with Distress Ink Black Soot
  • use a piece of acetate and some double-sided foam adhesive to create a shaker element behind the cutout circle
  • fill the shaker with confetti
  • cut out the first part of the sentiment with the help of the Karten-Kunst Lucky Alphabet die set and silver foiled cardstock and use the Karten-Kunst Weihnachten Modern set, Versamark and WOW! Polished Silver Super Fine embossing powder for the second part

Have a wonderful Christmas Time.

Hugs,


Thursday, December 7, 2023

Happy Holidays Magic Picture Changer

Hi there,

I created this Christmas Magic Picture Changer using lots of Lawn Fawn goodies for the Mennys Bastelshop Inspiration Week and this time our topic is "Christmas":


  • stamp the changing picture by using the tree from the Lawn Fawn Christmas Dreams set, the gifts from the Lawn Fawn Toboggan Together set and the squirrels from the Lawn Fawn Cheery Christmas set - use the Masking Technique and Lawn Fawn Jet Black Ink
  • color the images and the background with Delta, Touch Twin Brush and Copic Markers and add extra shading with Faber-Castell Polychromos pencils
  • cut out all the necessary elements to create a Magic Picture Changer from the Lawn Fawn Magic Pícture Changer and the Lawn Fawn Magic Picture Changer Add-on Die Sets
  • add color with Distress Oxide Ink (Mermaid Lagoon, Chipped Sapphire) and some snow with watered-down white acrylic paint
  • stamp additional images to create a scene around the Magic Picture Changer - the bear and the train from the Lawn Fawn Holiday Helpers set, the sleigh, the present and the bag from the Lawn Fawn Ho Ho Holidays set, the deer from the Lawn Fawn Cheery Christmas set and the bird from the Lawn Fawn Making Frosty Friends set
  • color the rest of the images with Delta, Touch Twin Brush and Copic Markers and add extra shading with Faber-Castell Polychromos pencils
  • cut out two hills shapes and adhere them with double-sided foam adhesive and make sure to not get in the way of the picture changing mechanism
  • stamp the sentiment from the Clearly Besotted Stamps Sweet Little Sentiments set with Versamark onto a banner cut from kraft cardstock and heat-emboss it with WOW! Bright White Super Fine embossing powder

Have a christmasy day.

Hugs,


Monday, December 4, 2023

Candy-Striped Merry Christmas

Hi there,

here is another Christmas Card using the Karten-Kunst Das rockt Frohes Fest die set:

  • create your own striped cardstock using green, red and white cardstock stripes
  • cut out the background from the Karten-Kunst Das rockt Frohes Fest die set from this DIY paper
  • cut out the letters from Neenah Desert Storm kraft cardstock, stamp the Karten-Kunst Sternenschweif with Versamark and heat-emboss it with WOW! Bright White Super Fine embossing powder
  • cut out two green frames and two kraft circles using the Karten-Kunst Small Frames die set
  • stamp images from the Karten-Kunst Mini Frames Christmas into the circles and color them with Spectrum Noir Triblend Markers
  • add little snow dots with a white gel pen
  • cut out a background panel from Neenah Desert Storm kraft cardstock using one of the Karten-Kunst Stitched DIN lang dies
  • cover a cardbase with patterned paper and add the other layers on top
  • use watered-down white gouache to create some splatters


I hope you got inspired.

Hugs,


Sunday, December 3, 2023

Winter Stove

Hi there,

starting today I am going to show you an Anjas Basteltraum Project every Sunday in December. This first card features the stove from the Anjas Basteltraum Weihnachtszeit bei Katz und Maus stamp set:

  • stamp the stove from the Anjas Basteltraum Weihnachten bei Katz und Maus set with Distress Oxide Ink Pumice Stone 
  • color the image with watercolors
  • apply Distress Ink Speckled Egg through the Tim Holtz Nordic Layering Stencil
  • add some Distress Ink Gathered Twigs to the wooden floor
  • use a previously made sentiment strip
  • add turquoise foiled cardstock to the left and right side of the panel before adhering it to a cardbase

Have a wonderful Advent Sunday. 

Hugs,


Thursday, November 30, 2023

Be Jolly Gnomes

Hi there,

I created this fun Gnome Christmas Card for Mennys Bastelshop:

  • stamp three little gnomes form the Mama Elephant Little Gnome Agenda with Lawn Fawn Jet Black 
  • color the images with Spectrum Noir Triblend Markers and add extra shading with Faber-Castell Polychromos pencils 
  • use the My favorite Things Blueprints 20 die set and patterned paper form the My favorite Things Christmas Cheer 6x6 paper pack to create a backdrop
  • the sentiment is from the Lawn Fawn Winter Big Scripty Words set - stamped with Versamark, heat-embossed with WOW! Bright White Super Fine embossing powder and die cut
  • adhere all the elements to a kraft cardbase splattered with watered-down white acrylic paint
  • ink up the edges with Distress Ink Gathered Twigs
  • add three white snowflakes as final embellishments

I hope you got inspired.

Hugs,


Monday, November 27, 2023

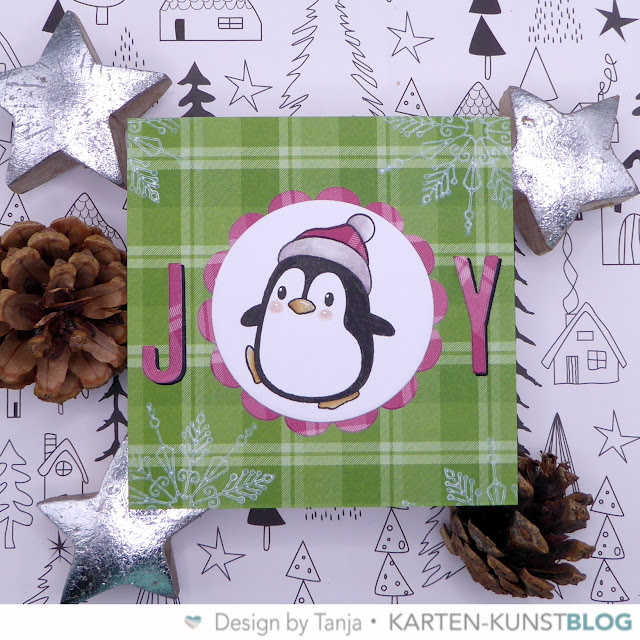
Joy Penguin

Hi there,

this is another card using the super cute Karten-Kunst penguins stamp set:

  • cut out a Karten-Kunst 1/8 Inch Circle from white cardstock and a 1/4 Inch Scalloped Circle from patterned paper
  • stamp one of the Karten-Kunst Penguins with Versafine Onyx Black and add color with paper piecing and Faber-Castell Polychromos pencils
  • cover a cardbase with patterned paper and stamp some snowflakes from the Karten-Kunst Zauberhafte Schneeflocken set with Hero Arts Unicorn pigment ink
  • cut out the letters "J" and "Y" from black cardstock and patterned paper with the help of the Karten-Kunst Joy Alphabet

Don't you just love the adorable Karten-Kunst Penguins stamp set, too?

Hugs,


Saturday, November 25, 2023

Pastel Santa

Hi there,

I created this Pastel Santa Watercolor Christmas Card for the Karten-Kunst Blog:

  • stamp the Karten-Kunst Santa with Distress Oxide Ink Hickory Smoke
  • color the image with watercolors
  • add splatters with watered-down lilac watercolor
  • stamp the sentiment from the same set with Versamark and heat-emboss it with WOW! Polished Silver Super Fine embossing powder
  • add strips of patterned paper to the left and right side of the panel before adhering it to a cardbase

Have a wonderful day.

Hugs,


Thursday, November 23, 2023

Be Merry Snowglobe Tag

Hi there, 

I created this sweet Christmas Snow Globe Tag using lots of Lawn Fawn Goodies for Mennys Bastelshop:


  • stamp the adorable little car form the Lawn Fawn Snow Globe Scenes with Lawn Fawn Jet Black
  • color the image with Spectrum Noir Triblend Markers 
  • add Nuvo Crystal Glaze to the windows and to the lights and a little beam with Distress Oxide Ink Fossilized Amber
  • cut out all the elements for the Lawn Fawn Snow Globe Gift Tag
  • stamp the sentiment from the above mentioned stamp set with Versafine Clair Fallen Leaves 
  • thread two strands of twine through the hole of the tag


Have a wonderful Christmas.

Hugs,


Monday, November 20, 2023

Happy Holidays

Hi there,

I created this candy-striped Christmas Card for the Karten-Kunst Blog:

  • create your custom-made striped cardstock using colored cardstock
  • cut out the Karten-Kunst Das rockt Frohes Fest from this cardstock and the outline from kraft cardstock with a woodgrain texture
  • cover the cardbase with patterned paper and ink up the edges with Distress Ink Evergreen Bough
  • add splatters of watered-down white gouache and some glittery snowflakes as final embellishments


Have a wonderful Christmas Time.

Hugs,


Sunday, November 19, 2023

Christmas Mouse Tag

Hi there,

I created this sweet Christmas Tag using an image from the Anjas Basteltraum Weihnachtsmaeuse stamp set:

  • cut out a tag from watercolor paper
  • stamp the adorable little mouse from the Anjas Basteltraum Weihnachtsmaeuse set with Versafine Vintage Sepia
  • color the image and the background with Frau von Bommel Boho watercolors
  • add extra shading with Pitt Pastel pencils and highlights with a white gel pen
  • stamp the sentiment from the Anjas Basteltraum Weihnachtssprueche set with Versafine Clair Nocturne
  • dye a piece of torn seam binding with watered-down Distress Ink Peacock Feathers and thread it together with a strand of twine through the hole of the tag
  • add some star sequins a s final embellishments

Have a wonderful day.

Hugs,


Saturday, November 18, 2023

Joyful Christmas Trees

Hi there,

I created this pastel Christmas Card for the Karten-Kunst Blog:

  • cut out three Christmas trees
  • create a background using the Karten-Kunst Card Designer A6 die set, Distress Oxide Ink Tumbled Glass and the Memory Box Tiny Snowflakes stencil
  • cut out the sentiment using turquoise cardstock and the Karten-Kunst Stencil Alphabet die set
  • add star sequins as final embellishments

Hope to see you again next week.

Hugs,


Thursday, November 16, 2023

Merry little Christmas Bears

Hi there,

I created this lovely Christmas Card for Mennys Bastelshop:

  • stamp the sweet bear couple from the Mama Elephant Fuzzy Hugs set with Lawn Fawn Crunchy Leaf Ink
  • color the image with Delta, Touch Twin Brush and Copic Markers and add extra shading with Faber-Castell Polychromos pencils
  • cut out a heart from patterned paper and a slightly bigger one from red textured cardstock
  • cut out a panel from kraft cardstock using one of the Tattered Lace Torn Edge Rectangles and create a background with small stamps from the Lawn Fawn Deck the Halls set
  • add splatters with golden spray
  • run another kraft panel through your Big Shot together with a woodgrain embossing folder - mist the panel slightly with water to avoid cracking
  • stamp the sentiment from the Memory Box Merry little Christmas with Versamark and heat-emboss it with WOW! Bright White Super Fine embossing powder
  • adhere all the layers to a kraft cardbase

Have a wonderful day.

Hugs,