Showing posts with label Touch Twin Brush Marker. Show all posts

Thursday, January 11, 2024

Thank you very much!

Hi there,

I created this sweet Thank you Card with the Lawn Fawn You're just my Type and Love Poems Stamp Sets for Mennys Bastelshop:

  • stamp the desk, the typewriter with the paper inside and the lamp from the Lawn Fawn You're Just my Type set with Lawn Fawn Crunchy Leaf 
  • cut out the whole image with your Brother ScanNCut
  • add the sentiment from the Lawn Fawn Love Poems set with Lawn Fawn Jet Black
  • stamp the mouse from the Lawn Fawn You're Just my Type set with Lawn Fawn Crunchy Leaf and cut it out as well
  • color the images with Delta, Touch Twin Brush and Copic Markers and add extra shading with Faber-Castell Polychromos pencils
  • cut out a scalloped background panel from Gmund Beer Paper Weizen
  • add a patterned paper floor and a strip of kraft cardstock as a baseboard
  • add some shimmer to the little heart on the typewriter and the light bulb

Thanks for stopping by.

Hugs,


Thursday, December 7, 2023

Happy Holidays Magic Picture Changer

Hi there,

I created this Christmas Magic Picture Changer using lots of Lawn Fawn goodies for the Mennys Bastelshop Inspiration Week and this time our topic is "Christmas":


  • stamp the changing picture by using the tree from the Lawn Fawn Christmas Dreams set, the gifts from the Lawn Fawn Toboggan Together set and the squirrels from the Lawn Fawn Cheery Christmas set - use the Masking Technique and Lawn Fawn Jet Black Ink
  • color the images and the background with Delta, Touch Twin Brush and Copic Markers and add extra shading with Faber-Castell Polychromos pencils
  • cut out all the necessary elements to create a Magic Picture Changer from the Lawn Fawn Magic Pícture Changer and the Lawn Fawn Magic Picture Changer Add-on Die Sets
  • add color with Distress Oxide Ink (Mermaid Lagoon, Chipped Sapphire) and some snow with watered-down white acrylic paint
  • stamp additional images to create a scene around the Magic Picture Changer - the bear and the train from the Lawn Fawn Holiday Helpers set, the sleigh, the present and the bag from the Lawn Fawn Ho Ho Holidays set, the deer from the Lawn Fawn Cheery Christmas set and the bird from the Lawn Fawn Making Frosty Friends set
  • color the rest of the images with Delta, Touch Twin Brush and Copic Markers and add extra shading with Faber-Castell Polychromos pencils
  • cut out two hills shapes and adhere them with double-sided foam adhesive and make sure to not get in the way of the picture changing mechanism
  • stamp the sentiment from the Clearly Besotted Stamps Sweet Little Sentiments set with Versamark onto a banner cut from kraft cardstock and heat-emboss it with WOW! Bright White Super Fine embossing powder

Have a christmasy day.

Hugs,


Thursday, November 16, 2023

Merry little Christmas Bears

Hi there,

I created this lovely Christmas Card for Mennys Bastelshop:

  • stamp the sweet bear couple from the Mama Elephant Fuzzy Hugs set with Lawn Fawn Crunchy Leaf Ink
  • color the image with Delta, Touch Twin Brush and Copic Markers and add extra shading with Faber-Castell Polychromos pencils
  • cut out a heart from patterned paper and a slightly bigger one from red textured cardstock
  • cut out a panel from kraft cardstock using one of the Tattered Lace Torn Edge Rectangles and create a background with small stamps from the Lawn Fawn Deck the Halls set
  • add splatters with golden spray
  • run another kraft panel through your Big Shot together with a woodgrain embossing folder - mist the panel slightly with water to avoid cracking
  • stamp the sentiment from the Memory Box Merry little Christmas with Versamark and heat-emboss it with WOW! Bright White Super Fine embossing powder
  • adhere all the layers to a kraft cardbase

Have a wonderful day.

Hugs,


Monday, March 8, 2021

Believe in Magic

Hi there,

we are showing you all kinds of Spring Projects over on the Elizabeth Craft Designs Blog and I created this cute Fairy Card using the Elizabeth Craft Designs Fairy 2 and Leaf Pattern Background die sets:

  • cut out all the elements for the fairy from Elizabeth Craft Designs white Soft Finish Cardstock
  • color the elements with Alcohol Markers and add extra shading with Distress Ink (Tattered Rose, Peacock Feathers) and a Blending Brush
  • cut out a panel and cover it with clear double-sided adhesive and Elizabeth Craft Designs Dark Mint Silk Microfine Glitter
  • cut out the Elizabeth Craft Designs Leaf Pattern Background from green cardstock
  • stamp the sentiment from the Elizabeth Craft Designs Once upon a Time Sentiments set with Versamark onto a kraft banner and heat-emboss it with WOW! Bright White Super Fine embossing powder


Have a wonderful day.


Sunday, December 13, 2020

Merry & Bright Snowman Box Card

Hi there,

since everybody is busy with Christmas preparations we decided to skip this month's ECD Group Post but instead I have this super cute dimensional box card project for you:

  • cut out the Elizabeth Craft Designs Snow Globe background from dark blue cardstock - add three more pieces to create some kind of a shadow box
  • ink up the edges with Distress Ink Chipped Sapphire and add some splatters with white acrylic paint
  • stamp the star and snow flake background from the Elizabeth Craft Designs Oh the Joy of Christmas set with Versamark and heat-emboss it with WOW! Bright White Super Fine embossing powder
  • insert some mountains, trees and a log cabin in the background
  • cut out the most adorable Elizabeth Craft Designs Jack Frost and a matching cap from the Elizabeth Craft Designs Winter Accessories die set
  • color the elements with Alcohol Markers and add some shading with Distress Oxide Ink Iced Spruce
  • stamp the sentiment from the Elizabeth Craft Designs Classic Christmas Sentiments set with Versamark and heat-emboss it with WOW! Bright White Super Fine embossing powder


Have a wonderful Christmas Time.

Hugs,


Sunday, November 15, 2020

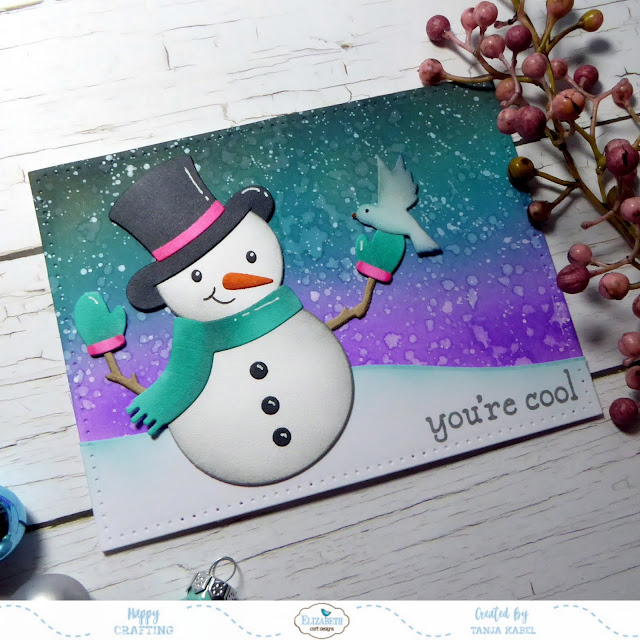
You're Cool Snowman

Hi there,

you can find all kinds of Christmas and Winter projects over on the Elizabeth Craft Designs Blog:

  • cut out all the elements for the Elizabeth Craft Designs Jack Frost snowman from white Elizabeth Craft Designs Soft Finish Cardstock
  • color the elements with Alcohol Markers and add extra shading with Distress Ink and highlights with a white gel pen
  • cut out the little bird from the Elizabeth Craft Designs Holiday Birdhouse die set
  • add color to a stitched panel of watercolor paper with Distress Oxide Ink (Black Soot, Peacock Feathers, Shaded Lilac)
  • splatters of water and watered-down white acrylic paint add more texture
  • cut out a hill shape from smooth white cardstock using one of the dies from the Elizabeth Craft Designs Adventure Edges 2 set
  • stamp the sentiment from the Elizabeth Craft Designs Cute Winter Sentiments with Versafine Clair Nocturne Morning Mist


I hope you got inspired.

Hugs,


Monday, October 12, 2020

Boo Witch

Hi there,

we are featuring all kinds of Halloween projects over on the Elizabeth Craft Designs Blog:

  • cut out the Elizabeth Craft Designs Princess from white Soft Finish Cardstock and from some patterned paper
  • add color with Alcohol Markers and Distress Ink (tattered Rose, Gathered Twigs)
  • cut out the Elizabeth Craft Designs Spiderweb and some Elizabeth Craft Designs Halloween Accessories from black and kraft cardstock
  • add Wink of Stella Clear Glitter to the hat and the bats
  • add some texture to the patterned paper background by stamping one of the Elizabeth Craft Designs Background Stamps 1 with Versafine Toffee and Vintage Sepia
  • cut out a hill shape from kraft cardstock using one of the Elizabeth Craft Designs Adventure Edges 2
  • stamp the sentiment from the Elizabeth Craft Designs Halloween Party set with Versafine Clair Fallen Leaves
  • assemble the card 

I hope you got inspired.

Hugs,


Reindeer Tag

Hi there,

I created this Christmas Tag using the brand new Karten-Kunst Mini Reindeer die set:

  • cut out all the elements to create a reindeer from smooth white and kraft cardstock with the help of the Karten-Kunst Mini Reindeer die set
  • add color with Alcohol Markers and Distress Ink Gathered Twigs
  • cut out a tag with the largest Karten-Kunst Tags die from white cardstock
  • stamp the brushed stripe from the Karten-Kunst Splatters Create set with Distress Oxide Ink (Pine Needles, Festive Berries)
  • stamp the sentiment from the Karten-Kunst Aus der Schreibmaschine 2 set with Versafine Onyx Black
  • thread a strand of green, red and white twine through the hole of the tag


I hope you got inspired.

Hugs,


Sunday, September 13, 2020

Thank you berry much

Hi there,

you can find all kinds of flower projects over on the Elizabeth Craft Designs Blog:

  • cut out all the elements for the Elizabeth Craft Designs Strawberries from white Soft Finish Cardstock
  • color the pieces with Delta, Touch Twin Brush and Copic Markers and add highlights with a white gel pen
  • stamp the sentiment from the Clearly Besotted Stamps Simply Scrumptious set with Versamark onto a strip of kraft cardstock and heat-emboss it with WOW! Bright White Super Fine embossing powder
  • add Elizabeth Craft Designs transparent Craft Drops to the flower centers for more dimension


I hope you got inspired.

Hugs,


Sunday, August 16, 2020

Happy Birthday Lion

Hi there,

I created this cute little birthday card using some brand new stamp sets from Clearly Besotted Stamps:

  • stamp the little lion from the Clearly Besotted Stamps Pop up Plushies set, the parcel form the Clearly Besotted Stamps Pop up Props set and the speech bubble with the sentiment from the Clearly Besotted Stamps Pop up Psst set with Memento Tuxedo Black 
  • color the images with Delta, Touch Twin Brush and Copic Markers - add extra shading with Faber-Castell Polychromos pencils and highlights with a white gel pen
  • cut out an Elizabeth Craft Designs Stitched Rounded Square around it
  • cut out an Elizabeth Craft Designs Stitched Rounded Rectangle from smooth white cardstock
  • create a background using the Studio L2E Bokeh Builder set and Altenew Crisp Ink (Aqualicious, Hydrangea)
  • mount the stitched panels onto a piece of violet cardstock before adhering it to a white cardbase


I hope you got inspired.

Hugs,


Friday, August 14, 2020

Mixed Media Miss you

Hi there,

do you remember the Colorful Miss you Card I showed you last week? For this card I used the same Elizabeth Craft Designs supplies but with a totally different outcome:

  • cut out the Elizabeth Craft Designs from Elizabeth Craft Designs white Soft Finish Cardstock
  • color the outline with a grey Alcohol Marker
  • create a background on a piece of watercolor paper using gel medium, tissue paper and Distress Paint Seedless Preserves
  • ink up the edges with Distress Oxide Ink Black Soot
  • stamp the sentiment using the Elizabeth Craft Designs Morning Letters with Versamark onto a strip of black cardstock and heat-emboss them with WOW! Metallic Platinum embossing powder
  • add a strip of patterned paper to the left and right side of the panel before adhering it to the cardbase


Have a wonderful day.

Hugs,


Sunday, August 2, 2020

Ocean of Love

Hi there,

I created this sweet dimensional window card using mainly Clearly Besotted Stamps and Lawn Fawn images:


  • stamp all the images from the Clearly Besotted Stamps Seal of Approval, the Clearly Besotted Stamps Make a Splash, the Lawn Fawn Fintastic Friends, the Lawn Fawn Life is good and the Lawn Fawn Butterfly Kisses sets
  • color the images with Delta, Touch Twin Brush and Copic Markers and add extra shading with Faber-Castell Polychromos pencils
  • cut out all the elements for the dimensional window card from smooth white cardstock
  • add color to the waves with Distress Inks Salty Ocean and Mermaid Lagoon - add water droplets for extra texture
  • add color to the sand dunes with Distress Ink Tea Dye - add splatter with watered-down Distress Ink Gathered Twigs and white Ecoline Liquid Watercolor
  • use the My Favorite Things Mini Clouds stencil, Distress Oxide Ink Tumbled Glass and a Blending Brush to create the cloud backgrounds
  • assemble the card
  • stamp the sentiment from the My Favorite Things Friends with Fins set with Versamark onto a strip of turquoise cardstock and heat-emboss it with WOW! Bright White Super Fine embossing powder
I hope you got inspired.

Hugs,


Sunday, June 28, 2020

Celebrate

Hi there,

and this is another pastel summer card using several of Lawn Fawn goodies:

  • cut out all the necessary elements from the Lawn Fawn Stitched Cupcake and the I scream, you scream die sets from Elizabeth Craft Designs white Soft Finish Cardstock
  • color the parts with Delta, Touch Twin Brush and Copic Markers
  • add Nuvo Crystal Glaze to the flame and Nuvo Glitter Accents to the little heart
  • create the panel using the Lawn Fawn Stitched Journaling Card cut from light turquoise cardstock and some woodgrain cardstock
  • stamp a background with the Lawn Fawn Teeny Tiny Backdrops and Versamark - heat-emboss the little hearts with WOW! Neutral Ultra Shimmer embossing glitter
  • on the cardpanel use a piece of dark kraft cardstock and cover it with a piece of light kraft cardstock cut with the help of a leafy background die
  • cut the the CUTplorations Celebrate sentiment from dark turquoise cardstock and from dark kraft cardstock and layer them on top of each other - cover the sentiment with Nuvo Crystal Glaze


Have a wonderful day.

Hugs,


Sunday, June 21, 2020

You're the sweetest

Hi there,

I created this pastel ice cream card using lots of Lawn Fawn goodies:

  • cut out all the necessary elements from the Lawn Fawn I scream, you scream die set from Elizabeth Craft Designs white Soft Finish Cardstock
  • color the parts with Delta, Touch Twin Brush and Copic Markers
  • add a highlight with a white gel pen and Nuvo Crystal Glaze to the cherry and Wink of Stella Clear Glitter to the pistachio ice cream
  • create a panel using a scalloped frame, patterned paper, woodgrain paper and a piece of vellum
  • adhere the ice cream to the panel with double-sided foam adhesive
  • on the cardpanel use a piece of dark turquoise cardstock and cover it with a piece of light turquoise cardstock cut with the help of the Lawn Fawn Quilted backdrop
  • stamp the sentiment from the Lawn Fawn Sweetest Flavor set on one of the Lawn Fawn Fancy Wavy Banners with Versamark and heat-emboss it with WOW! Bright White Super Fine embossing powder


I hope you got inspired.

Hugs,