Showing posts with label Stencil. Show all posts

Thursday, July 10, 2025

Underwater Hello

Hi there,

it's time for the Inspiration Week over at Mennys Bastelshop and this week our topic is "Underwater/Unterwasser". I used the Gerda Steiner Designs Deeply stamp set on my project:

  • stamp the submarine and the bear from the Gerda Steiner Designs Deeply set with Gina K. Designs Obsidian
  • color the image with Spectrum Noir Triblend Markers and add extra shading with Faber-Castell Polychromos pencils
  • create a background on blue colored cardstock with the help of the Create a Smile Ocean Wave stamp, Distress Oxide Ink Chipped Sapphire, the Create a Smile Focal Point stencil and white pigment ink
  • add some fish and jellyfish from the Gerda Steiner Designs Deeply set with Distress Oxide Ink Chipped Sapphire
  • cut out the Hello from the CUTplorations Skinny Sentiments from dark blue cardstock and vellum

I hope you got inspired.

Hugs,


Monday, July 7, 2025

Bloom with Happiness

Hi there,

I created this sweet card using the adorable little bunny from the Anjas Basteltraum Gartenzeit stamp set:

  • stamp the bunny from the Anjas Basteltraum Gartenzeit set with Gina K. Designs Obsidian
  • color the image with Ohuhu Markers, add extra shading with Faber-Castell Polychromos pencils and highlights with a white gel pen
  • stamp the fence from the same set into the background and color it as well
  • mask the fence and create a background with the help of the My Favorite Things Cloud and Grassy Edges stencils and Distress Ink (Tumbled Glass, Bundled Sage)
  • cut out the sentiment from grass cardstock using one of the the Spellbinders Fresh Picked Sentiments dies 
  • add color to the bottom of the sentiment with Distress Ink Gathered Twigs
  • stamp the second part of the sentiment from the Lawn Fawn Garden Before 'n Afters set with Versamark onto a strip of kraft cardstock and heat-emboss it with WOW! Bright White Super Fine embossing powder
  • add strips of patterned paper to the left and right side of the panel before adhering it to a cardbase
I hope you got inspired.

Hugs,


Thursday, July 3, 2025

Sweet Cat Tag

Hi there,

I created this sweet tag for Mennys Bastelshop using the Impronte d'Autore Harumi stamp set:

  • cut out the Heffy Doodle Tag along from smooth white and kraft cardstock
  • stamp the cat and the bunny from the Impronte d'Autore Harumi set with Gina K. Designs Obsidian - use the masking technique
  • color the image with Ohuhu Markers, add extra shading with Faber-Castell Polychromos pencils and highlights with a white gel pen
  • create a background with the help of the My Favorite Things Cloud stencil and Distress Ink Tumbled Glass
  • stamp the sentiment with Distress Oxide Ink Tumbled Glass
  • thread two strands of twine through the hole of the tag and add some glitter droplets as final embellishments

Have a wonderful day.

Hugs,


Thursday, June 26, 2025

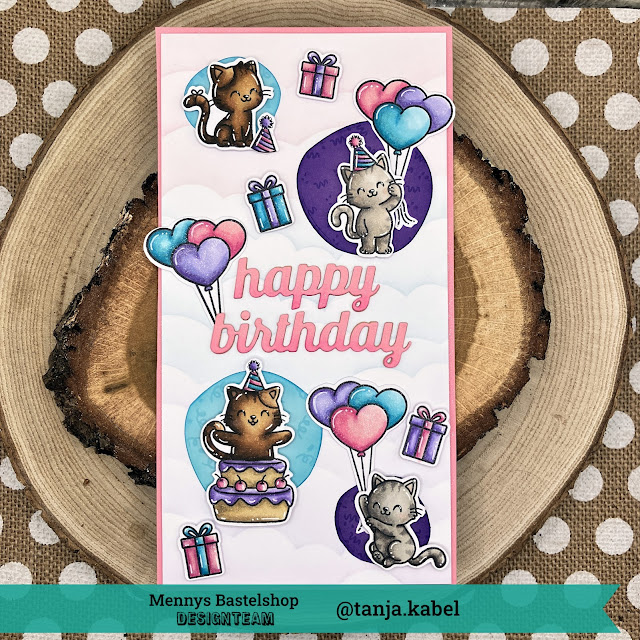
Happy Birthday Party Cats

Hi there,

I created this sweet birthday card for Mennys Bastelshop using images from the Sunny Studio Stamps Party Pets set:

  • stamp several images from the Sunny Studio Stamps Party Pets set with Gina K. Designs Obsidian
  • color the images with Ohuhu Markers, add extra shading with Faber-Castell Polychromos pencils and highlights with a white gel pen
  • cut out some Whimsy Stamps Boho Circles from colored cardstock and add some confetti with Versamark
  • create a background using the My Favorite Things Cloud stencil and Distress Ink (Spun Sugar, Tumbled Glass, Shaded Lilac)
  • cut out the sentiment from colored cardstock with the help of the Spellbinders Everyday Sentiments die set and add Distress Ink Kitsch Flamingo the the bottom of the letters
Thanks for stopping by.

Hugs,


Monday, June 2, 2025

Botanical Shaker

Hi there,

I created this botanical Shaker Card for the Karten-Kunst Blog using the Karten-Kunst Mojito Cutout Alles Liebe:

  • cut out the Karten-Kunst Mojito Cutout Alles Liebe from smooth white cardstock
  • mask off the cutout
  • apply Distress Ink (Rustic Wilderness, Peeled Paint, Shabby Shutters) through the STAMPlorations Emanations stencil
  • create a shaker element underneath the cutout using acetate and double-sided foam adhesive - fill the shaker with green and yellow sequins
  • add strips of colored cardstock to the left and right side of the panel before adhering it to a cardbase
  • add some clear and yellow gemstones as final embellishments

Have a wonderful day.

Hugs,


Thursday, May 29, 2025

Memorydex Lighthouse

Hi there,

here is another Memorydex Card Set that I created with my daughter Emily for Mennys Bastelshop. Our inspiration this time was Christy's wonderful video.

  • stamp several critters and backgrounds elements from the following Lawn Fawn sets with Gina K. Designs Obsidian: It's a Bird, Life is Good, You are Sublime, Butterfly Kisses, Mermaid for You
  • color the images with Spectrum Noir Triblend Markers, add extra shading with Faber-Castell Polychromos pencils and highlights with a white gel pen
  • create a background using the My Favorite Things Cloud stencil and Distress Ink Speckled Egg
  • cut out some waves and sand dunes from colored cardstock
  • assemble the Memorydex Card to your liking

And this is Emily's creation:


I hope you got inspired.

Hugs,


Thursday, May 22, 2025

Memorydex Dinosaurs

Hi there,

this week and next week I would like to show you some Memorydex Cards that I created with my daughter Emily for Mennys Bastelshop using several Lawn Fawn stamp sets. We got inspired by Marine's wonderful You Tube Video. 

  • stamp several critters and background elements from the following Lawn Fawn sets with Gina K. Designs Obsidian: It's a Bird, Critters from the Past, Rawrsome
  • color the images with Spectrum Noir Triblend Markers, add extra shading with Faber-Castell Polychromos pencils and highlights with a white gel pen
  • create a background using the My Favorite Things Cloud stencil and Distress Ink Speckled Egg
  • cut out some Lawn Fawn Grass Borders from colored cardstock
  • assemble the Memorydex Card to your liking

And this is Emily's creation:


Thanks for stopping by.

Hugs,


Thursday, May 15, 2025

Vroom, Vroom - Part 2

Hi there,

here is another card for Mennys Bastelshop using the adorable Mama Elephant We Ride stamp set:

  • stamp the bunny and the bear from the Mama Elephant We Ride set with Gina K. Designs Obsidian
  • color the images with Spectrum Noir Triblend Markers, add extra shading with Faber-Castell Polychromos pencils and highlights with a white gel pen
  • create a background using the My Favorite Things Clouds stencil and Distress Ink (Spun Sugar, Tumbled Glass, Shaded Lilac)
  • cut out rounded rectangles from that background
  • stamp the sentiment from the same set several times with Versamark onto a strip of colored cardstock and heat-emboss it with WOW! Bright White Super Fine embossing powder
  • create a background with patterned paper and colored cardstock and add little silver stars as final embellishments
Have a wonderful day.

Hugs,


Thursday, May 8, 2025

You are Magical

Hi there,

it's time for the Inspiration Week over at Mennys Bastelshop and this week our topic is "Regenbogen/Rainbow". I used the Paperie Ink Magical Unicorn stamp set on my project:


  • stamp one of the unicorns from the Paperie Ink Magical Unicorn set with Gina K. Designs Obsidian
  • color the image with Spectrum Noir Triblend Markers, add extra shading with Faber-Castell Polychromos pencils and highlights with a white gel pen
  • add some sparkle with a Stardust gel pen
  • stamp the sentiment from the same set with Brilliance Pearlescent Orchid
  • create a background using the Clearly Besotted Stamps Splat it stencil and leftover ink on your Blending Brushes
  • use an Action Wobbler to adhere the unicorn to the panel
  • add strips of patterned paper to the left and right side of the panel before adhering it to a cardbase

I hope you got inspired.

Hugs,


Thursday, April 10, 2025

Postage Bunnies

Hi there,

it's time for the Inspiration Week over at Mennys Bastelshop and this week our topic is "Use the Waffle Flower Postage Collage Die". I used the Avery Elle Bunnies stamp set on my project:

  • cut out the Waffle Flower Postage Collage A6 from smooth white cardstock
  • create a background with the help of the Waffle Flower Postage Collage A6 Blocks stencil, Masking Tape and Distress Ink (Antique Linen, Tumbled Glass)
  • stamp several images from the Avery Elle Bunnies set with Gina K. Designs Obsidian 
  • color the images with Spectrum Noir Triblend Markers, add extra shading with Faber-Castell Polychromos pencils and highlights with a white gel pen
  • stamp some elements from the Waffle Flower Postage Collage set with Distress Oxide Ink (Antique Linen, Tattered Rose)
  • stamp the sentiment from the Avery Elle Bunnies set with Distress Oxide Ink Tattered Rose

I hope you got inspired.

Hugs,


Monday, December 30, 2024

Winter Greetings

Hi there,

I created this Winter Card for the Karten-Kunst Blog:

  • create a DIY stencil using some tree dies
  • add Distress Ink (Rustic Wilderness, Pine Needles) through the stencil
  • ink up the edges with that same green inks
  • add some splatters with watered-down white gouache and some golden watercolor
  • create some DIY striped cardstock
  • cut the Karten-Kunst Das rockt Winter Grüße from vellum and that striped cardstock

Have a wonderful day.

Hugs,


Monday, October 7, 2024

On my Way to You

Hi there,

I created this card for Anjas Basteltraum using the Happy Camper and Kleine Post Sprüche stamp sets:

  • create an oval background with Distress Oxide Ink (Prize Ribbon, Ripe Persimmon, Mustard Seed) - use a DIY stencil or mask
  • ink up the edges of the panel with those same ink colors
  • stamp the palm tree from the Anjas Basteltraum Happy Camper set with Versafine Clair Fallen Leaves
  • add some depth and shadow to the palm tree with Faber-Castell Polychromos pencils 
  • stamp the sentiment from the Anjas Basteltraum Kleine Post Sprüche set onto a Lawn Fawn Wavy Banner with that same dark brown ink
  • add some highlights with a glitter gel pen

Thanks for stopping by.

Hugs,


Thursday, August 8, 2024

Dog Tag

Hi there,

it's Inspiration Week over at Mennys Bastelshop and this time the topic is "Stencil":

  • cut out a tag from kraft cardstock and cover it with crumpled tissue paper - use gel medium to glue it on
  • apply Hero Wax White through a script stencil
  • add woodgrain cardstock to the bottom of the tag
  • ink up the edges with Distress Ink Ground Espresso
  • stamp the little dog in the box from the My Favorite Things You rescued me set with Versafine Clair Sand Dune and color the image with Spectrum Noir Triblend Markers
  • add extra shading with Faber-Castell Polychromos and highlights with a white gel pen
  • thread two strands of twine through the hole of the tag

I hope you got inspired.

Hugs,


Monday, July 29, 2024

Have a wonderful Day

Hi there,

I created this sweet flower card for the Karten-Kunst Blog:

  • mask off the edges of the cardbase or use a stencil
  • create a background using Distress Oxide Ink (Uncharted Mariner, Speckled Egg, Saltwater Taffy)
  • stamp one of the flowers from the Karten-Kunst Blooming Plants set with Versafine Clair Nocturne
  • stamp the sentiment from the Karten-Kunst Aus der Schreibmaschine 3 set with that same black ink
  • add a Karten-Kunst Torn Border to the left side of the image

I hope you got inspired.

Hugs,


Thursday, June 27, 2024

Hello, Baby Chick!

Hi there,

this is my third and final project using the Impronte d'Autore Baby Chick stamp set created for Mennys Bastelshop:

  • stamp another one of the adorable chicks from the Impronte d'Autore Baby Chick set with Gina K. Designs Obsidian
  • color the image with Spectrum Noir Triblend Markers, add extra shading with Faber-Castell Polychromos pencils and highlights with a white gel pen
  • create a background using the Hero Arts Tulip Pattern stencils and Distress Ink (Milled Lavender, Victorian Velvet, Bundled Sage, Peeled Paint)
  • layer the panel on light purple cardstock before adding it to the cardbase
  • add the Gummiapan Hallo as a sentiment cut three times from white cardstock

Have a wonderful day.

Hugs,


Friday, June 7, 2024

Coastal Greetings

Hi there,

isn't the little fox from the Anjas Basteltraum Küstengrüße stamp set just adorable?

  • stamp the fox, the message in a bottle and two sea gulls from the Anjas Basteltraum Küstengrüße set with Gina K. Designs Obsidian
  • color the images with Spectrum Noir Triblend Markers, add extra shading with Faber-Castell Polychromos pencils and highlights with a white gel pen
  • create a background using Distress Oxide Ink (Tumbled Glass, Faded Jeans) and the My Favorite Things Cloud Stencil for the clouds, blue Cardstock and the Taylored Expressions Rolling Waves for the Waves and the Mama Elephant Landscape Trio die set, Neenah Desert Storm Kraft Cardstock, white Gouache and Distress Ink Gathered Twigs for the beach sand
  • stamp the sentiment from the Anjas Basteltraum Kleine Sprüche Meerzeit with Versafine Clair Paradise

Thanks for stopping by.

Hugs,


Tuesday, May 7, 2024

Little Beaver

Hi there,

this Clean and Simple Card was created with the Anjas Basteltraum Lustige Floßfahrt stamp set:

  • stamp the beaver and the rocks from the Anjas Basteltraum Lustige Floßfahrt set set with Gina K. Designs Obsidian - use the masking technique
  • leave the masks on and create a hillshape using the My Favorite Things Drifts & Hills stencil and Distress Ink Bundled Sage
  • remove the masks
  • color the images with Spectrum Noir Triblend Markers, add extra shading with Faber-Castell Polychromos pencils and highlights with a white gel pen
  • stamp the sentiment from the Anjas Basteltraum Kleine Sprüche Blumengruß set with Versafine Clair Fallen Leaves
  • add a strip of patterned paper to the left and right side of the panel before adhering it to the cardbase

Thanks for stopping by.

Hugs,


Sunday, April 7, 2024

Unicorn Shaker Box

Hi there,

I created this cute little Shaker Box for Anjas Basteltraum using one of the adorable stamps from the Anjas Basteltraum Geburtstagsfreunde set:

  • stamp the unicorn from the Anjas Basteltraum Geburtstagsfreunde set - still one of my absolute favorites - with Gina K. Designs Obsidian
  • color the image with Spectrum Noir Triblend Markers, add extra shading with Faber-Castell Polychromos pencils and highlights with a white gel pen
  • cut out the My Favorite Things Everyday Gift Box from kraft cardstock and patterned paper
  • create a shaker element in the lid using acetate, double-sided foam adhesive and sequins
  • for the cloud background I used Distress Oxide Ink (Tumbled Glass, Shaded Lilac, Spun Sugar) and the My Favorite Things Micro Cloud Edges stencil
  • stamp the sentiment from the Anjas Basteltraum Glückwünsche set with VersaMagic Sea Breeze

I hope you got inspired.

Hugs,


Thursday, March 28, 2024

You are Great!

Hi there,

I used the My Favorite Things Squish Friends stamp set to create this adorable card for Mennys Bastelshop:

  • stamp the cat and the bunny from the My Favorite Things Squish Friends set with Gina K. Designs Obsidian
  • color the image with Spectrum Noir Triblend Markers, add extra shading with Faber-Castell Polychromos pencils and highlights with a white gel pen
  • create a background using the Heffy Doodle Layering Hearts stencils, Distress Oxide Ink (Spun Sugar, Worn Lipstick) and Dylusions Shimmer Paint White Linen
  • cut out the Create A Smile Du bist Toll from vellum and colored cardstock
  • add a strip of foiled cardstock to the left and right side of the panel before adhering it to a cardbase

I hope you got inspired.

Hugs,


Thursday, February 22, 2024

Lovely Penguins

Hi there.

I created this sweet card using the Pixi Dust Designs Be Mine set for Mennys Bastelshop:

  • stamp the adorable penguins from the Pixi Dust Designs Be Mine set with Gina K. Designs Obsidian
  • color the image with Spectrum Noir Triblend Markers, add extra shading with Faber-Castell Polychromos pencils and highlights with a white gel pen
  • mask off the image
  • create a background with the help of Distress Ink (Saltwater Taffy, Hickory Smoke), masking tape and the Clearly Besotted Stamps Lots of Love stencil
  • add color to a cardbase with Distress Oxide Ink Saltwater Taffy
  • add a Sunny Studio Stamps Eyelet Lace Border to the top and bottom of the panel before adhering it to the cardbase

Thanks for stopping by today.

Hugs,