Showing posts with label Blending Brush. Show all posts

Thursday, May 8, 2025

You are Magical

Hi there,

it's time for the Inspiration Week over at Mennys Bastelshop and this week our topic is "Regenbogen/Rainbow". I used the Paperie Ink Magical Unicorn stamp set on my project:


  • stamp one of the unicorns from the Paperie Ink Magical Unicorn set with Gina K. Designs Obsidian
  • color the image with Spectrum Noir Triblend Markers, add extra shading with Faber-Castell Polychromos pencils and highlights with a white gel pen
  • add some sparkle with a Stardust gel pen
  • stamp the sentiment from the same set with Brilliance Pearlescent Orchid
  • create a background using the Clearly Besotted Stamps Splat it stencil and leftover ink on your Blending Brushes
  • use an Action Wobbler to adhere the unicorn to the panel
  • add strips of patterned paper to the left and right side of the panel before adhering it to a cardbase

I hope you got inspired.

Hugs,


Thursday, June 6, 2024

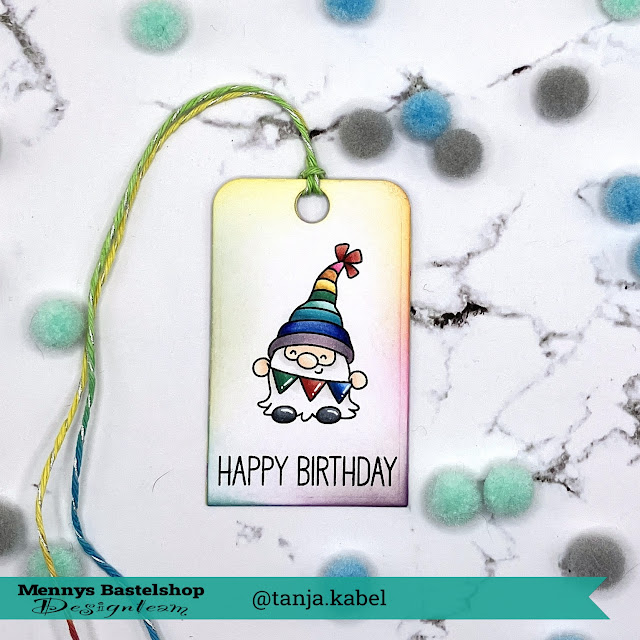
Gnome Tag

Hi there,

it's Inspiration Week over at Mennys Bastelshop and this week we agreed on creating a tag:

  • cut out a tag from Bristol Smooth Cardstock
  • stamp one of the adorable gnomes and the sentiment from the My Favorite Things Happy Birthday to my Favorite Gnomie set with Gina K. Designs Obsidian
  • color the image with Spectrum Noir Triblend Markers, add extra shading with Faber-Castell Polychromos pencils and highlights with a white gel pen
  • ink up the edges of the tag with all colors of the rainbow (I just used the leftover ink on my blending brushes)
  • add a strand of twine through the hole of the tag


I hope you got inspired.

Hugs,


Friday, April 1, 2022

Live like someone left the gate open

Hi there,


it is time for a new Stencil Challenge over on the STAMPlorations Blog

  • stamp the horse outline from the STAMPlorations Live Love Ride set with Versamark onto a piece of vellum and heat-emboss it with WOW! Bright White Super Fine embossing powder
  • create a background on a piece of watercolor paper with the help of watered-down Distress Ink (Picked Raspberry, Kitsch Flamingo) and a piece of acetate
  • for more texture apply Distress Ink Picked Raspberry through the ARTplorations Hearts all over mini stencil with a Blending Brush
  • stamp the sentiment from the same set with Versamark onto a strip of black cardstock and heat-emboss it with that same white embossing powder
  • add a strip of patterned paper to the left side of the panel before adhering it to a cardbase


Have a wonderful day.

Hugs,


Tuesday, December 14, 2021

Little Snowman Tag

Hi there,

I created this adorable Christmas Tag using the Gerda Steiner Designs Little Snowman stamp set:

  • cut out the Clearly Besotted Stamps Rounded Tag from smooth white cardstock
  • stamp the cute snowman from the Gerda Steiner Designs Little Snowman set with Lawn Fawn Jet Black
  • add some snowflakes from the same set with Altenew Crisp Ink Sea Glass
  • color the image with Spectrum Noir Triblend Markers and add extra shading with Faber-Castell Polychromos pencils
  • add highlights with a white gel pen
  • ink up the edges with Distress Ink Victorian Velvet and a blending brush
  • dye a piece of torn seam binding with Distress Ink Peacock Feathers and thread it through the hole of the tag


Thanks for stopping by,

Hugs,


Wednesday, December 8, 2021

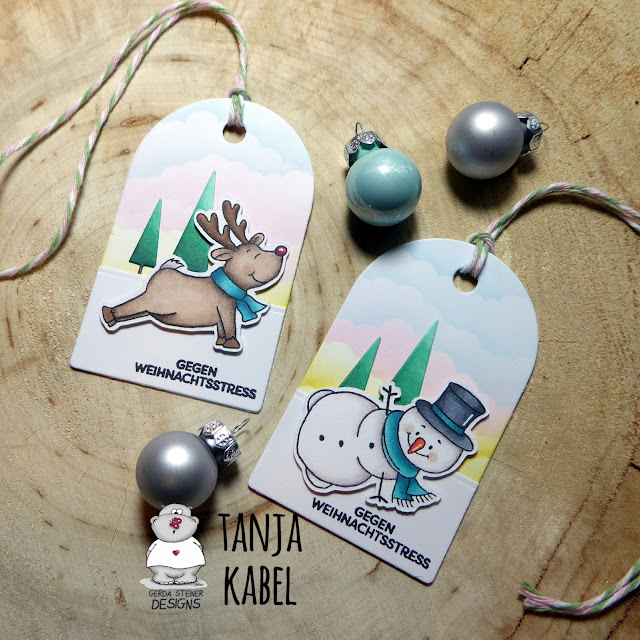
Against Holiday Stress

Hi there,

I created this tag duo using the adorable Gerda Steiner Designs Namasleigh stamp set:

  • stamp the reindeer and the snowman from the Gerda Steiner Designs Namasleigh set with Lawn Fawn Jet Black
  • color the images with Spectrum Noir Triblend Markers 
  • cut two Clearly Besotted Stamps Rounded Tags from smooth white cardstock and create a background with Distress Ink (Tumbled Glass, Spun Sugar, Scattered Straw), the My Favorite Things Micro Cloud Edges stencil and Blending Brushes
  • cut out the Clearly Besotted On the Line tress and add color with Alcohol Markers as well
  • stamp the sentiment from the Create a Smile Stamps Kleine Weihnachtsgrüße set with Versafine Clair Nocturne 
  • thread twine through the holes of the tags


I hope you got inspired.

Hugs,


Tuesday, November 30, 2021

No Peeking!

Hi there,

I created this sweet Christmas Tag using the Gerda Steiner Designs Peeking Friends stamp set:

  • cut out the Clearly Besotted Stamps Rounded Tag from smooth white cardstock
  • stamp the adorable little penguin from the Gerda Steiner Designs Peeking Friends set with Lawn Fawn Jet Black
  • color the image with Spectrum Noir Triblend Markers and add extra shading with Faber-Castell Polychromos pencils
  • add highlights with a white gel pen
  • ink up the edges with some left-over blue ink from a blending brush
  • stamp the sentiment from the same set with Versafine Clair Nocturne
  • dye a piece of torn seam binding with Distress Ink Peacock Feathers and thread it through the hole of the tag


Have you started creating your Christmas Projects, yet?

Hugs,


Tuesday, November 23, 2021

Sending you Love and Blessings

Hi there,

I created this Thanksgiving Card using the Gerda Steiner Designs Fall Mice stamp set:

  • stamp the cart and the pumpkins from the Gerda Steiner Designs Fall Mice set with Lawn Fawn Crunchy Leaf - use the masking technique
  • stamp one of the mice from the same set with that same brown ink
  • color the images with Spectrum Noir Triblend Markers and add extra shading with Faber-Castell Polychromos pencils
  • add highlights with a white gel pen
  • stamp the sentiment from the same set with Versafine Clair Pinecone
  • ink up the edges of the top part of the panel with some left-over blue ink from your Blending Brush
  • die cut a decorative edge and adhere the panel to a cardbase covered with burlap


Have a wonderful Thanksgiving.

Hugs,


Friday, November 12, 2021

Joy in a Cup

Hi there,

today I am part of the Fall/Winter Coffee Lovers Blog Hop for STAMPlorations and this is my creation:


  • stamp the coffee cup, bag and donut from the STAMPlorations Coffee Petites set with Lawn Fawn Jet Black - use the masking technique
  • leave the masks on and stamp the present from the STAMPlorations Hello Christmas set
  • color the images with Spectrum Noir Triblend Markers
  • add highlights with a white gel pen
  • create a background with Distress Ink (Salvaged Patina, Pumice Stone) and a Blending Brush
  • for extra-texture in the background apply some more Distress Ink Salvaged Patina through the ARTplorations Oh my Stars! mini stencil 
  • add the sentiment from the STAMPlorations Just Caffeinate sticker set
  • add strips of black cardstock and patterned paper from the BoBunny Candy Cane Lane 6x6 paper pad to the top and bottom of the panel before adhering it to a cardbase

As a super sponsor STAMPlorations is offering a $25 prize code +  2 flash prizes: $10 prize code and the choice of any 2 coffee-themed paper goods.

I'm keeping my fingers crossed for you.

Hugs,


Monday, May 17, 2021

Good Night

Hi there,

I created this sweet card using the Karten-Kunst Mini Sheep die set:

  • cut out the Karten-Kunst Mini Sheep from white cardstock
  • add color with Spectrum Noir Triblend Markers
  • cut out the fur from felt and adhere it to the cardstock
  • create a background using Distress Oxide Ink Speckled Egg, a Blending Brush and a cloud stencil
  • cut out the sentiment from kraft cardstock using the Karten-Kunst Stencil Alphabet
  • stamp some stars from the Karten-Kunst Kränze & Kreise set with Versafine Onyx Black


Have a wonderful day.

Hugs,


Monday, March 22, 2021

Make a Difference

Hi there,

I created this pastel tag for the Karten-Kunst Blog:


  • cut out two tags using the Karten-Kunst Tags dies - one from smooth white cardstock and one from patterned paper
  • add color to the white tag with the help of Blending Brushes and Distress Oxide Inks (Spun Sugar, Shaded Lilac, Peacock Feathers)
  • stamp several Karten-Kunst Doddle Plants with Versamark and heat-emboss them with WOW! Bright White Super Fine embossing powder
  • add a sticker
  • stamp the sentiment from the Karten-Kunst Tag-Sprüche with Versafine Clair Nocturne on the patterned paper tag
  • glue both tags together
  • thread two strands of twine through the hole of the tag


I hope you got inspired.

Hugs,


Monday, March 8, 2021

Believe in Magic

Hi there,

we are showing you all kinds of Spring Projects over on the Elizabeth Craft Designs Blog and I created this cute Fairy Card using the Elizabeth Craft Designs Fairy 2 and Leaf Pattern Background die sets:

  • cut out all the elements for the fairy from Elizabeth Craft Designs white Soft Finish Cardstock
  • color the elements with Alcohol Markers and add extra shading with Distress Ink (Tattered Rose, Peacock Feathers) and a Blending Brush
  • cut out a panel and cover it with clear double-sided adhesive and Elizabeth Craft Designs Dark Mint Silk Microfine Glitter
  • cut out the Elizabeth Craft Designs Leaf Pattern Background from green cardstock
  • stamp the sentiment from the Elizabeth Craft Designs Once upon a Time Sentiments set with Versamark onto a kraft banner and heat-emboss it with WOW! Bright White Super Fine embossing powder


Have a wonderful day.


Monday, January 11, 2021

Mogli

Hi there,

today, we would like to show you all kinds of Scrapbook Projects over on the Elizabeth Craft Designs Blog

My Scrapbook Page shows our newest family member - Mogli. We found him at the roadside all alone only weighing 700 grams. He has been with us since October and is a really lovely little fellow now weighing almost 3 kilos.

  • use a kraft page as a background and add some dots and splatters with Distress Stain Tarnished Brass
  • ink up the edges of the kraft background with Distress Oxide Ink Black Soot
  • take one of the wonderful papers from the Elizabeth Craft Designs Rusty Weathered paper pack and cut of a strip on the right
  • draw some circles with the Derwent Onyx Dark pencil
  • stamp some greenery from the Elizabeth Craft Designs Spring Fling set with Versafine Clair Fallen Leaves and heat-emboss them with WOW! Midas Touch embossing glitter
  • mount the photo onto a piece of Neenah Desert Storm kraft cardstock
  • add two paper clips cut from black cardstock using a die from the Elizabeth Craft Designs Snowy Windows die set
  • cut out three leaves from the Elizabeth Craft Designs Snowy Windows set from vellum and add some color with left-over blue and green Distress Oxide Ink from a Blending Brush
  • cut out the word Mogli from black cardstock with the help of the Elizabeth Craft Designs Blackboard Alphabet die set


I hope you got inspired.

Hugs,


Wednesday, October 21, 2020

Stitched Hello Circles

Hi there,

I created this stitched card for the STAMPlorations Birthday:

  • use the CUTplorations Dots all over cover plate on a piece of Confetti White Cardstock
  • use the pattern for stitching
  • ink up the edges of the panel with Distress Oxide Ink Peacock Feathers and a Blending Brush
  • cut out the CUTplorations Hello from dark teal cardstock and add Wink of Stella Clear Glitter on top
  • adhere the panel to a dark teal cardbase

I hope you got inspired.

Hugs,