Showing posts with label Vellum. Show all posts

Monday, September 8, 2025

Rainbow Sunflower

Hi there,

as promised, today I would like to show you another project that I created using the Karten-Kunst Scribble Sunflowers stamp set:

  • stamp the Karten-Kunst Scribble Sunflowers with Lawn Fawn Jet Black and color the image with Spectrum Noir Triblend Markers
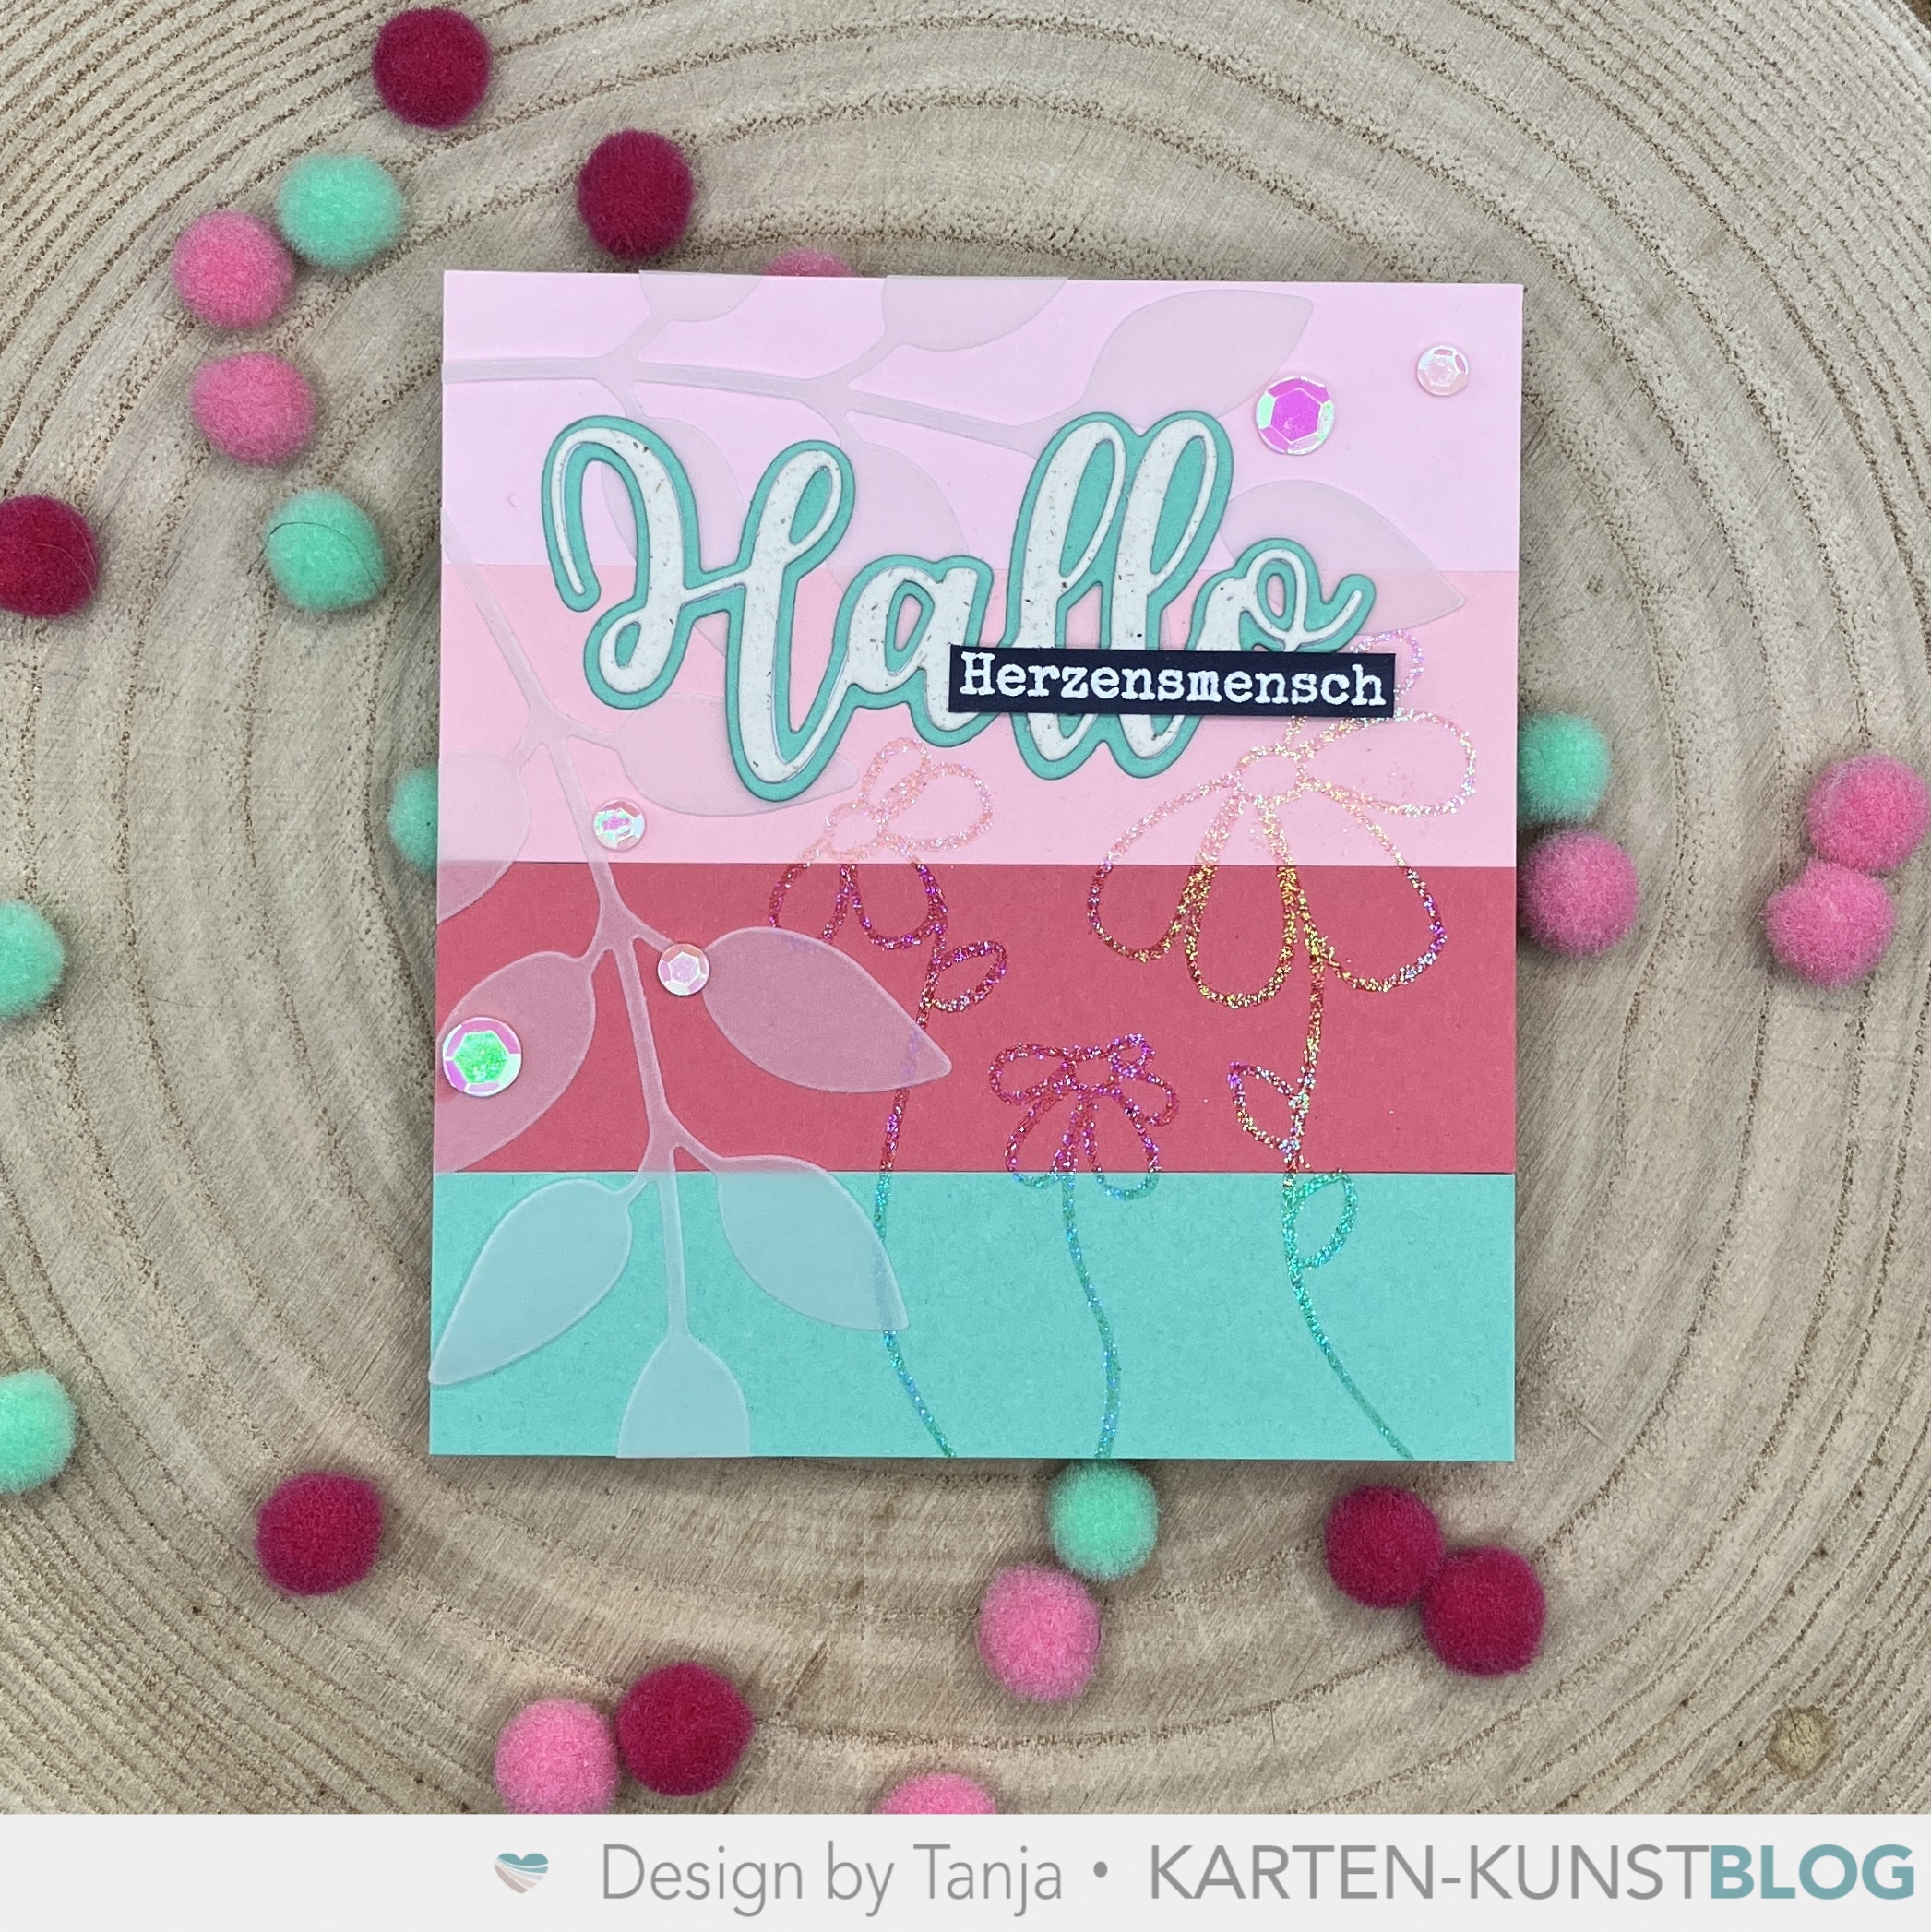
  • create a background with the help of patterned paper and a piece of vellum with texture from the Honeybee Stamps Eyelet Lace embossing folder
  • cut a strip of kraft cardstock using one of the dies from Karten-Kunst DIN A6 Card Designer Nr. 2 set
  • stamp the sentiment from the Karten-Kunst Aus der Schreibmaschine set with Versamark and heat-emboss it with WOW! Bright White Super Fine embossing powder

Thanks for stopping by.

Hugs,


Thursday, September 4, 2025

Summer Vibes

Hi there,

it's time for the Inspiration Week over at Mennys Bastelshop and this week our topic is "Cute Cards". I used the Mama Elephant Deliver Summer Vibes stamp set on my project:

  • stamp one of the images from the Mama Elephant Deliver Summer Vibes set with Gina K. Designs Obsidian
  • color the image with Ohuhu Markers, add extra shading with Faber-Castell Polychromos pencils and highlights with a white gel pen
  • create a background with the help of kraft cardstock, a pineapple embossing folder and Distress Ink Gathered Twigs
  • tear tissue paper and layer the strips on top of the embossed background
  • stamp the sentiment from the same set with Versamark onto a piece of vellum and heat-emboss it with WOW! Bright White Super Fine embossing powder
  • adhere the focal image onto a nest of thread

Have a wonderful day.

Hugs,


Thursday, August 7, 2025

Milkshake

Hi there,

it's time for the Inspiration Week over at Mennys Bastelshop and this week our topic is "Vellum". I used the Mama Elephant Milkshake stamp set on my project:

  • cut out one of the tags from the Masterpiece Design Memory Planner set from watercolors paper and a second one from patterned paper
  • stamp one of the images from the adorable Mama Elephant Milkshake set with Distress Oxide Ink Lost Shadow onto the watercolor tag
  • color the image with watercolors and add highlights with a white gel pen
  • add little dots with Nuvo Crystal Drops
  • ink up the edges of the tags with Distress Ink Spun Sugar
  • add a string of twine to the holes of the tags and tie it into a bow
  • stamp the sentiment and a strawberry from the same set with Distress Oxide Ink Spun Sugar
  • color the strawberry with watercolors and add little dots with a white gel pen
  • emboss a piece of vellum with the Honey Bee Stamps Eyelet Lace embossing folder
  • adhere all the elements to a pink cardbase

I hope you got inspired.

Hugs,


Saturday, July 19, 2025

Hello Friend

Hi there,

I created this sweet summer card using the Anjas Basteltraum Strandausflug stamp set:

  • stamp the racoon from the Anjas Basteltraum Strandausflug set with Gina K. Designs Obsidian
  • color the image with Ohuhu Markers, add extra shading with Faber-Castell Polychromos pencils and highlights with a white gel pen
  • create a background with watercolors on watercolor paper
  • stamp the sentiment from the Mama Elephant Sunday Sentiments with Versamark on a strip of vellum and heat-emboss it with WOW! Bright White Super Fine embossing powder
  • add strips of patterned paper to the left and right side of the panel before adhering it to a cardbase

Have a lovely day.

Hugs,


Thursday, July 10, 2025

Underwater Hello

Hi there,

it's time for the Inspiration Week over at Mennys Bastelshop and this week our topic is "Underwater/Unterwasser". I used the Gerda Steiner Designs Deeply stamp set on my project:

  • stamp the submarine and the bear from the Gerda Steiner Designs Deeply set with Gina K. Designs Obsidian
  • color the image with Spectrum Noir Triblend Markers and add extra shading with Faber-Castell Polychromos pencils
  • create a background on blue colored cardstock with the help of the Create a Smile Ocean Wave stamp, Distress Oxide Ink Chipped Sapphire, the Create a Smile Focal Point stencil and white pigment ink
  • add some fish and jellyfish from the Gerda Steiner Designs Deeply set with Distress Oxide Ink Chipped Sapphire
  • cut out the Hello from the CUTplorations Skinny Sentiments from dark blue cardstock and vellum

I hope you got inspired.

Hugs,


Saturday, June 7, 2025

Lucky Day Toucan

Hi there,

I created this tropical card using the little toucan from the Anjas Basteltraum Strandbar stamp set:

  • stamp the toucan from the Anjas Basteltraum Strandbar set with Gina K. Designs Obsidian
  • color the image with Ohuhu Markers and add highlights with a white gel pen
  • cut out the My Favorite Things Rainbow Whimsy from colored cardstock
  • dye a piece of smooth white cardstock with Distress Ink Rustic Wilderness and Peeled Paint and run it through your Spellbinders Platinum Six in the Spellbinders Leafy embossing folder
  • add some splatters with watered-down white gouache
  • adhere the panel to a kraft cardbase
  • stamp the sentiment from the Anjas Basteltraum Glückwünsche set with Versamark onto a piece of vellum, heat-emboss it with WOW! Bright White Super Fine embossing powder and cut it out
  • adhere the sentiment with tiny pieces of double-sided foam adhesive

I hope you have a wonderful day.

Hugs,


Thursday, April 24, 2025

Celebrate Kitty

Hi there,

I created this Birthday Card for Mennys Bastelshop using the Sunny Studio Stamps Party Pets stamp set:

  • cut out a panel from smooth white cardstock using one of the ModaScrap Framed Rectangles
  • stamp the adorable little cat from the Sunny Studio Stamps Party Pets set with Gina K. Designs Obsidian
  • color the image with Spectrum Noir Triblend Markers, add extra shading with Faber-Castell Polychromos pencils and highlights with a white gel pen
  • add confetti with Distress Oxide Inks
  • cover the cardbase with patterned paper
  • cut out the Celebrate from the CUTplorations Skinny Sentiments from vellum and patterned paper
  • add Nuvo Jewel Drops to the cherries on the cake and some Pinkfresh Studio Glitter Drops as final embellishments

Thanks for stopping by.

Hugs,


Monday, April 14, 2025

Color Blocking 4 - Happy Easter

Hi there,

this time I would like to show you an Easter Card in my Color Blocking Series for the Karten-Kunst Blog:

  • stamp a background on a white card panel using Distress Oxide Ink Pumice Stone, the egg from the Karten-Kunst Mini Frames Spring and the heart from the Karten-Kunst Kränze und Kreise set
  • create two background strips with the help of Distress Oxide Ink Pumice Stone and the Karten-Kunst Script Background stamp
  • place those strips above and below a strip of pink glitter paper
  • cut out the Karten-Kunst Das rockt Frohe Ostern from vellum and DIY striped cardstock 

Thanks for stopping by.

Hugs,


Monday, March 31, 2025

Color Blocking 2 - All my Love

Hi there,

it's Color Blocking Time again for the Karten-Kunst Blog. On this project I used the Karten-Kunst Delicate Plants:

  • cover a cardbase with four different-sized stripes of colored cardstock
  • stamp some of the Karten-Kunst Delicate Plants with Distress Oxide Ink Hickory Smoke
  • cut out the Karten-Kunst Das rockt Alles Liebe from Vellum and grass cardstock
  • add some sequins as final embellishments

Thanks for stopping by.

Hugs,


Monday, March 24, 2025

Color Blocking 1 - Hello Daisies

Hi there,

today, I am going to start a little series for the Karten-Kunst Blog. For the next 5 weeks it is going to be all about Color Blocking. This is my first creation using the Karten-Kunst Scribble Daisies:

  • cover a cardbase with four stripes of colored cardstock
  • stamp some of the Karten-Kunst Scribble Daisies with Versamark and heat-emboss them with holographic embossing powder
  • cut out two Karten-Kunst Ash Leaves from vellum
  • cut out the Karten-Kunst Riesiges Hallo from colored and grass cardstock
  • stamp the sub-sentiment from the Karten-Kunst Aus der Schreibmaschine 2 set with Versamark onto a strip of black cardstock and heat-emboss it with WOW! Bright White Super Fine embossing powder
  • add some sequins as final embellishments

I hope you got inspired.

Hugs,


Monday, March 3, 2025

Love Wreath

Hi there,

I created this lovely Wreath Card for the Karten-Kunst Blog using the Circulus12 Stamping Tool:

  • stamp a wreath on a kraft panel using the Circulus12 Stamping Tool, the Karten-Kunst Circulus Zweige set with Versamark and heat-emboss them with WOW! Polished Gold Super Fine embossing powder
  • cut the Karten-Kunst Small Flower Wreath from grass cardstock and kraft cardstock - ink up the kraft wreath and the edges of the panel with Distress Ink Walnut Stain
  • add some Stickles Platinum to the berries
  • cut out the Karten-Kunst Das rockt Alles Liebe from Vellum and pink pearlescent cardstock
  • add some dots to the letters with a white gel pen

Hope to see you again next week.

Hugs,


Monday, February 24, 2025

Winter

Hi there,

here is another Winter Card I created for the Karten-Kunst Blog using the Circulus12 Stamping Tool:

  • stamp a snowflake with the help of the Karten-Kunst Circulus12 Stamping Tool, the Karten-Kunst Circulus12 Schneeflocken set and Versafine Clair Arctic
  • cut out the Karten-Kunst Large Snowflake from pearlescent vellum and layer it on top
  • add some dark blue splatters and ink up the edges of the panel with Distress Ink Chipped Sapphire
  • color in the little starts with Finetec Mica Watercolors in Sterling Silver 
  • cut out the sentiment from pearlescent blue and silver foiled cardstock using the Karten-Kunst Lucky Alphabet set
  • add some snowflakes as final embellishment 

Have a wonderful day.

Hugs,


Wednesday, February 19, 2025

Happy Mail Fox

Hi there,

I used one of my favorite stamp sets from Anjas Basteltraum for this card - the Geburtstagsfreunde set:

  • stamp the little fox from the Anjas Basteltraum Geburtstagsfreunde set with Gina K. Designs Obsidian
  • color the image with Spectrum Noir Triblend Markers, add extra shading with Faber-Castell Polychromos pencils and highlights with a white gel pen
  • cut out a Paper Smooches Postage Stamp and add a background with the envelope from the same stamp set and extra shading with Distress Ink Pumice Stone
  • cover a cardbase with patterned paper
  • cut out the Memory Box Hello Daily Script from vellum and turquoise cardstock

I hope you got inspired.

Hugs,


Thursday, January 23, 2025

Toucan do it!

Hi there,

I created this colorful Card for Mennys Bastelshop using the Lawn Fawn Toucan do it stamp set. For my scene I got inspired by Audrey's Card from the Toucan do it Inspiration Post which was published in Summer 2021:

  • stamp the toucans, the butterflies and the branches from the Lawn Fawn Toucan do it set set with Gina K. Designs Obsidian
  • color the images with Spectrum Noir Triblend Markers, add extra shading with Faber-Castell Polychromos pencils and highlights with a white gel pen
  • cut out the Lawn Fawn Tropical Vine Borders and some extra leaves from green cardstock and some Lawn Fawn Tropical Leaves from vellum
  • add color to a masked off portion of the background with Distress Ink (Twisted Citron, Mowed Lawn, Rustic Wilderness)
  • arrange the scene
  • stamp the sentiment from the same set on a sentiment strip using Brilliance Thyme

Thanks for stopping by.


Hugs,


Monday, January 13, 2025

Just for You

Hi there,

I created this Vintage Project for the Karten-Kunst Blog:

  • create a background on a piece of watercolor paper using watered-down Distress Ink (Tea Dye, Walnut Stain, Salvaged Patina)
  • stamp elements from the Karten-Kunst Circulus Romantischer Kranz with Distress Oxide Ink Vintage Photo
  • cut out the Karten-Kunst Das rockt Nur für Dich from Vellum and brown cardstock
  • add some highlights to the letters with a golden gel pen
  • adhere the panel to a cardbase colored with Distress Ink (Tea Dye, Salvaged Patina)

I hope you got inspired.

Hugs,


Monday, December 30, 2024

Winter Greetings

Hi there,

I created this Winter Card for the Karten-Kunst Blog:

  • create a DIY stencil using some tree dies
  • add Distress Ink (Rustic Wilderness, Pine Needles) through the stencil
  • ink up the edges with that same green inks
  • add some splatters with watered-down white gouache and some golden watercolor
  • create some DIY striped cardstock
  • cut the Karten-Kunst Das rockt Winter Grüße from vellum and that striped cardstock

Have a wonderful day.

Hugs,


Monday, December 23, 2024

Mery Christmas Snowmen

Hi there,

I created this Christmas Card using the fabulous Karten-Kunst Circulus8 stamping tool:

  • stamp the snowman, the mittens and the snowflake from the Karten-Kunst Mini Frames Winter set with Lawn Fawn Jet Black and VersaMagic Sea Breeze
  • color the images with Spectrum Noir Triblend Markers and add highlights with a white gel pen
  • add some post marks and ink up the edges with Distress Oxide Ink Lost Shadow
  • cut out a square from vellum using one of the dies from the Karten-Kunst Square Card Designer set and layer the Karten-Kunst Mini-Rahmen Frohes Fest cut from grey cardstock on top
  • adhere the panel to a cardbase covered with patterned paper 

Have a wonderful Christmas.

Hugs,


Thursday, December 19, 2024

Merry & Bright Reindeer

Hi there,

I created this Christmas Card for Mennys Bastelshop using the Mama Elephant Holly's Reindeer stamp set:

  • stamp one of the cute critters from the Mama Elephant Holly's Reindeer set with Gina K. Designs Obsidian
  • color the image with Spectrum Noir Triblend Markers, add extra shading with Faber-Castell Polychromos pencils and highlights with a white gel pen
  • create a background with the help of patterned paper, the Spellbinders More Holiday Decorations die set, colored and foiled cardstock
  • place the focal image on a strip of torn vellum
  • add strips of colored cardstock to the left and right side of the panel before adhering it to a cardbase

Have a wonderful Christmas Time.

Hugs,


Monday, December 16, 2024

Shiny Snowflake

Hi there,

I created this Snowflake Card for the Karten-Kunst Blog:

  • cut out a square from watercolor paper with the help of the Karten-Kunst Square Card Designer die set
  • create a background using Distress Oxide Ink Uncharted Mariner
  • ink up the edges with Distress Oxide Ink Lost Shadow
  • cut out the Karten-Kunst Large Snowflake from silver foiled cardstock and from vellum
  • create another background with the help of the Karten-Kunst Zauberhafte Schneeflocken set, Distress Oxide Ink (Uncharted Mariner, Weathered Wood) and your Mini Mister
  • ink up the edges of that panel with Distress Oxide Ink Lost Shadow as well
  • stamp the sentiment from the same set with Versamark on a strip of colored cardstock and heat-emboss it with WOW! Polished Silver Super Fine embossing powder 
  • layer another colored cardstock strip underneath the sentiment
  • add some ink splatters with watered-down silver watercolor

I hope you got inspired.

Hugs,


Monday, December 2, 2024

Merry Christmas Snowman

Hi there,

I created this Watercolor Card for the Karten-Kunst Blog:

  • stamp the snowman from the Karten-Kunst Weihnachten fällt aus set with Distress Oxide Ink Lost Shadow
  • color the image with watercolors and add extra shading with Faber-Castell Polychromos pencils 
  • stamp the smaller snowflake from the Karten-Kunst Mega Weihnachten set with Distress Oxide Ink Tumbled Glass and Delicata Silvery Shimmer - use second generation stamping
  • add the Karten-Kunst Nyala Script Frohes Fest cut from vellum and grey cardstock
  • adhere the watercolor panel to a grey cardbase

Thanks for stopping by.

Hugs,