Showing posts with label Paper Smooches. Show all posts

Wednesday, February 19, 2025

Happy Mail Fox

Hi there,

I used one of my favorite stamp sets from Anjas Basteltraum for this card - the Geburtstagsfreunde set:

  • stamp the little fox from the Anjas Basteltraum Geburtstagsfreunde set with Gina K. Designs Obsidian
  • color the image with Spectrum Noir Triblend Markers, add extra shading with Faber-Castell Polychromos pencils and highlights with a white gel pen
  • cut out a Paper Smooches Postage Stamp and add a background with the envelope from the same stamp set and extra shading with Distress Ink Pumice Stone
  • cover a cardbase with patterned paper
  • cut out the Memory Box Hello Daily Script from vellum and turquoise cardstock

I hope you got inspired.

Hugs,


Saturday, September 7, 2024

Take Time for Yourself

Hi there,

I created this fun Summer Card for Anjas Basteltraum:

  • stamp the sweet racoon from the Anjas Basteltraum Strandausflug set with Gina K. Designs Obsidian
  • color the image with Spectrum Noir Triblend Markers, add extra shading with Faber-Castell Polychromos pencils and highlights with a white gel pen
  • cut out a Paper Smooches Postage Stamp around the image
  • add some postmarks with the help of the Waffle Flower Postage Collage stamp set and Distress Oxide Ink Pumice Stone - I used second generation stamping here
  • create a background using the Penny Black Noted embossing folder 
  • add color to the raised areas with that same grey ink
  • stamp the sentiment from the Anjas Basteltraum Kleine Sprüche Meerzeit set with Versafine Clair Warm Breeze onto some vellum and heat-emboss it with clear embossing powder

I hope you got inspired.

Hugs,


Saturday, August 19, 2023

Snail Mail

Hi there,

I just love the adorable little snail from the Anjas Basteltraum Rosengarten stamp set:

  • cut out one of the Paper Smooches Postage Stamps from smooth white cardstock
  • create a little scene using the mailbox from the Anjas Basteltraum Happy Mail set, the snail from the Anjas Basteltraum Rosengarten set and Gina K. Designs Obsidian - use the masking technique
  • color the images with Spectrum Noir Triblend Markers, add extra shading with Faber-Castell Polychromos pencils and highlights with a white gel pen
  • create a background using an embossing folder
  • stamp the sentiment from the Concord & 9th Perfectly Penned set with Versamark onto a strip of turquoise cardstock and heat-emboss it with WOW! Bright White Super Fine embossing powder
  • add strips of that same turquoise cardstock to the left and right side of the panel before adhering it to a cardbase

Thanks for stopping by.

Hugs,


Saturday, March 12, 2022

Sweet Easter

Hi there,

I created this sweet Easter Card using the Karten-Kunst Egg People stamp set:

  • stamp one of the Karten-Kunst Egg People with Lawn Fawn Jet Black
  • stamp the sentiment from the Karten-Kunst Riesige Wünsche Ostern with that same black ink
  • mask the image
  • create grass and a cloudy sky using Distress Ink (Mowed Lawn, Tumbled Glass) and some stencils
  • color the image with Spectrum Noir Triblend Markers and add extra shading with Faber-Castell Polychromos pencils
  • cut a bow from patterned paper using the Paper Smooches Baby Bow die set
  • add a strip of yellow cardstock to the left and right side of the panel before adhering it to a cardbase


Thanks for stopping by.

Hugs,


Tuesday, July 28, 2020

So Spout of you

Hi there, 

today I would like to show you a card that I created using the Gerda Steiner Designs A Whale of a Time stamp set:


  • stamp mama whale and baby whale from the Gerda Steiner Designs A Whale of a Time set with Lawn Fawn River Rock
  • color the images with Spectrum Noir Triblend Markers and add extra shading with Faber-Castell Polychromos pencils 
  • cut out a background panel from watercolor paper
  • add color with Distress Oxide Ink (Salty Ocean, Mermaid Lagoon) and texture with water droplets and the Paper Smooches Flourishes dies
  • stamp the sentiment from the same set with Versamark and heat-emboss it with WOW! Bright White Super Fine embossing powder
  • add strips of patterned paper on the top and bottom of the panel before adhering it to a light blue cardbase


I hope you got inspired.

Hugs,


Sunday, January 19, 2020

Get Well Soon Bunny

Hi there,

I created this sweet Get Well Soon Card using the super sweet Clearly Besotted Stamps Under the Weather set:

  • cut out the frame from the My Favorite Things Blueprints 29 die set from watercolor paper
  • cut out two Paper Smooches Gift Tags 2 - one from watercolor paper and one from patterned paper from the My Favorite Things Rainbow Stripes 6x6 paper pad
  • stamp images and the sentiment from the Clearly Besotted Stamps Under the Weather set with Versafine (Smokey Gray) onto the little panels
  • color the images with ZIG Cleancolor Real Brush Pens and a damp watercolor brush
  • color the frame with Distress Ink (Peacock Feathers) and add water droplets for some texture
  • use a silver gel pen to add random dots around the sentiment
  • thread a string of teal twine through the holes of the tags
  • mount the frame onto a stitched panel cut from light grey cardstock before adhering it to a white cardbase

I hope you got inspired.

Hugs,


Sunday, August 18, 2019

Happy Birthday Friends

Hi there,

I would like to share this sweet Birthday Card with you:

  • cut out an ATC from Stonehenge paper using the STAMPlorations ATC/Tag Builder 
  • stamp a scene with Memento (Gray Flannel) using images from the Clearly Besotted Best Friends and the Paper Smooches Promenade stamp sets
  • color the images with Derwent Coloursoft Pencils and Zest-it
  • add highlights to the eyes with a white gel pen
  • mat the main panel onto a piece of pink cardstock - create the perfect border with the Mini Perfect Layers Tool
  • mount the piece onto a scalloped piece of grey cardstock before adhering everything to a pink cardbase
  • cut out a sentiment strip from grey cardstock and stamp the sentiment from the Clearly Besotted Stamps Many Mini Messages set with Memento (Gray Flannel)

I hope you got inspired.

Yours,


Sunday, July 21, 2019

On your Wedding Day

Hi there,

today, I would like to show you this fun wedding card:


  • stamp the little scene using stamps from the Paper Smooches Get outta town set, the masking technique and various ink pads (Versafine Onyx Black, Altenew Crisp Ink Warm Sunshine, Pure Graphite, Industrial Diamond and Silver Stone)
  • color the images with ZIG Clean Color Real Brush Pens and a damp watercolor brush
  • stamp the sentiment from the Clearly Besotted Stamps Many Mini Messages set with Versafine (Onyx Black) and add Pretty Pink Posh sequins (4mm, 6mm Sparkling Clear) as final embellishment
  • mat the stitched panel onto blue cardstock before adhering it to the cardbase

I hope you got inspired.

Yours,


Thursday, August 23, 2018

You are mermazing

Hi there,

I created this mermazing card for the Stamping-Fairies Facebook Group:

  • stamp only the mermaid tail from one of the mermaids in the My Favorite Things Mermazing set with Versafine Smokey Gray
  • color the tail with Ecoline Brush Pens and a Glitter Pen - add scales with a grey fineliner
  • cut a frame into a smooth white cardstock panel with the help of one of the Elizabeth Craft Designs Frame it Stitched Squares
  • add some interest by adding strips cut using the Paper Smooches Snow Drifts
  • add color to the waves with Distress Oxide Ink Broken China and to the sky with Distress Oxide Ink Tumbled Glass and a Mini Ink Blending Tool
  • mist the sky and the waves with Pearlized Water and add some Cosmic Shimmer Gunmetal 
  • stamp the sentiment from the same stamp set with Altenew Crisp Ink Teal Cave
  • adhere all the layers to a dark grey cardbase


Have a wonderful day.

Hugs,


Sunday, July 8, 2018

Stamp Connection #39

Hi there,

connected through our love for card making, blogging and being from Germany we (Cornelia from Stempel Spass and I) decided to create a monthly project within predefined requirements. We are going to show you the result every 2nd Sunday of the month and this is our 39th transatlantic get-together!

Our requirement for this meet-up was:
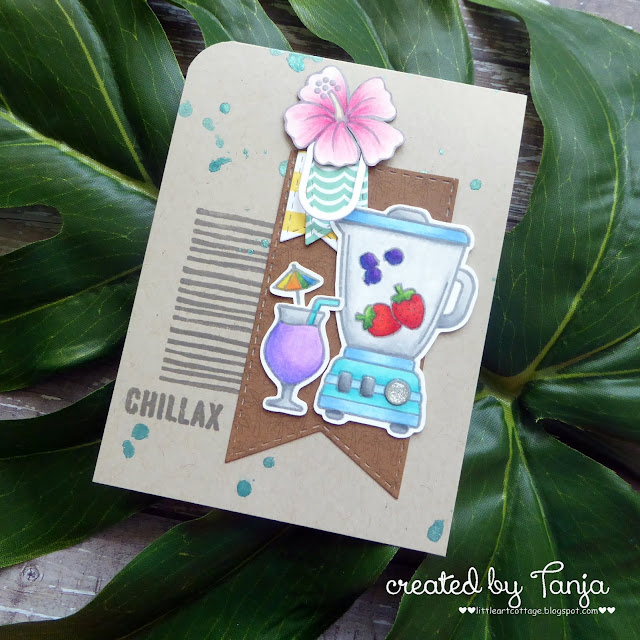
"Paper Clip"


  • stamp the blender and the cocktail glass from the Lawn Fawn So Smooth set and the hibiscus flower from the Paper Smooches Get outta Town set with Versafine Clair Morning Mist and color the images with Prismacolor Colored Pencils
  • add some shimmer and texture with Wink of Stella Clear Glitter, Nuvo Crystal Glaze and an enamel dot from the Doodlebug Design Sprinkles Silver Assortment
  • create a background on a Neenah Desert Storm cardbase with splatters of Heidi Swapp Color Shine Teal and stripes from the Flora & Fauna Texture Three set
  • cut out little fishtail banners from patterned paper from the Doodlebug Design Sweet Summer 6x6 paper pad
  • create a paper clip using a die from the My Favorite Things Hip Clips die set and add it to the upper left corner of the background banner to hold the little banners in place
  • stamp the sentiment from the STAMPlorations Beach Vibes set
  • round the top left corner with a 1'' corner rounder


Now make sure to hop over to see Cornelia's Creation.

Thanks for stopping by. We hope to see you again at the ...


Hugs,


Sunday, September 17, 2017

Stamp Connection #29

Hi there,

connected through our love for card making, blogging and being from Germany we (Cornelia from Stempel Spass and I) decided to create a monthly project within predefined requirements. We are going to show you the result every 3rd Sunday of the month and this is our 29th transatlantic get-together!

This time we have the wonderful TaeEun joining us as a guest. I am sure you already know her beautiful creations that she shares on her Rainbow in November Blog.

Our requirement for this meet-up was:
"decorate the back of your card"


... and this is what the card looks like when folded open


  • apply Distress Ink (Hickory Smoke) through the UmWowStudio Wheat stencil not only on the front but also on the back of the cardbase
  • glue a strip of patterned paper to the left side of the whole cardbase
  • from this step onwards I'll be only working on the front of the card
  • add some splatters with Distress Paint (Cracked Pistachio)
  • stamp the little dragon from the Sweet Stamp Shop Dragon set with Versafine (Smokey Gray) and color the image with Faber-Castell Polychromos Pencils and Zest-it
  • add a tiny dot detail with Staedtler Fineliners
  • stamp the sentiment from the same set with Versamark onto a strip of black cardstock and heat-emboss ii with WOW! Bright White Super Fine embossing powder
  • add a strip of DIY patterned paper underneath - I used the My Favorite Things Diagonal Stripes and Versafine Onyx Black to create this striped black-and-white paper
  • lay both strips over a torn strip of vellum
  • cut one of the leaves from the Paper Smooches Foliage 1 set from vellum as well and add the dragon on top of them
  • add some Pretty Pink Posh Sequins (Sparkling Clear 4mm and 6mm) as final embellishment


Now make sure to hop over to see Cornelia's Creation.


Thanks for stopping by. We hope to see you again at the ...


Yours,


Tuesday, August 15, 2017

Strawberry Mouse

Hi there,

I would like to show you how to create this quick and easy greeting card over on the Gerda Steiner Designs Blog:

  • color the Gerda Steiner Designs Strawberry Mouse with ZIG Clean Color Real Brush Pens, Distress Markers and a damp watercolor Brush
  • use one of the Avery Elle Wonky Stitches dies to cut put a stitched panel from watercolor paper
  • create a quick watercolor background using Kuretake Gansai Tambi watercolors
  • stamp the sentiment from the Paper Smooches Sugar Rush set with Versafine (Onyx Black)
  • use kraft cardstock as a base

Thanks for stopping by.

Yours,


Tuesday, May 23, 2017

Party!

Hi there,

here is another creation using the fun new Gerda Steiner Designs Pool Piggies stamp set:

  • color one of the adorable Gerda Steiner Designs Pool Piggies with Faber-Castell Albrecht Dürer Pencils and a damp watercolor brush
  • cut out a tag from watercolor paper and create a background with Distress Ink (Tumbled Glass) and Distress Oxide Ink (Broken China)
  • cut out a smaller piece with the same tag die and create a beach with the help of one of the My Favorite Things Stitched Snowdrifts dies - ink up the edges with Distress Ink (Gathered Twigs)
  • stamp the palm trees from the Paper Smooches Get outta Town set and the cocktail from the My Favorite Things Penguins in Paradise and color the images with watercolor pencils as well
  • stamp two sea gulls from the same Paper Smooches set with Versafine (Smokey Gray)
  • cut out a second tag from patterned paper from the Echo Park Summer Bliss 6x6 paper pad and layer it slightly offset behind the main tag
  • cut out a stitched panel from Neenah Desert Storm kraft cardstock and stamp a background with the help of the Judi Kins Papyrus stamp and Adirondack Dye Ink (Latte)
  • stamp the sentiment from the Market Street Stamps set Tikki Time with Versafine (Vintage Sepia)
  • thread blue and natural twine through the hole of the tag

Have a wonderful day.

Yours,


Tuesday, May 16, 2017

Enjoy the Summer

Hi there,

my next four posts on the Gerda Steiner Designs Blog will be all about the brand new Gerda Steiner Designs Pool Piggies:


  • color one of the adorable Gerda Steiner Designs Pool Piggies with ZIG Clean Color Real Brush Pens and a damp watercolor brush
  • cut out the Paper Smooches Palm Tree from watercolor paper and color it with Distress Inks (Mowed Lawn, Gathered Twigs)
  • cut out a tag from watercolor paper and create a background with Distress Ink (Tumbled Glass) and Distress Oxide Ink (Broken China)
  • cut out a smaller piece with the same tag die and create a beach with the help of one of the My Favorite Things Stitched Snowdrifts dies - ink up the edges with Distress Ink (Gathered Twigs)
  • use the sentiment from the same set
  • thread teal and natural twine through the hole of the tag

Thanks for stopping by today.

Yours,


Tuesday, February 28, 2017

Laundry Cat

Hi there,

the Gerda Steiner Designs February/March Digital Stamp Bundle is available and this is my first creation using one of the fabulous images:

  • color the adorable Cat on Laundry Basket which is available as part of the February/March Digital Stamp Bundle with Copic, Delta, DIY and Touch Twin Brush Markers
  • cut a stitched panel from watercolor paper and stamp a little scene using images from the Paper Smooches Squeaky Clean set and Versafine (Onyx Black)
  • color these background images with Stabilo Aquacolor Pencils and a damp watercolor brush
  • stamp the sentiment from the Gerda Steiner Designs Monster Fun set with Versafine (Imperial Purple)
  • add little tiles with the help of the Memory Box Distressed Grid stencil and Distress Ink (Pumice Stone)
  • add Glossy Accents to the washing machine door and add a little yellow enamel dot as its handle
  • mount the panel onto a kraft cardbase

Thanks for stopping by.

Yours,


Friday, January 27, 2017

Sweet Cupcake

Hi there,

I would like to show you a new creation for the A Day for Daisies Blog:

  • color the super sweet A Day for Daisies Blossom Cupcake with Zig Clean Color Real Brush Pens, Distress Markers and a damp watercolor brush
  • cut a stitched panel from watercolor cardstock and mask off a circle
  • add color to the circle with Distress Inks (Spun Sugar, Shaded Lilac) 
  • create a wreath around that circle using small images from the Lawn Fawn Penelope's Blossoms set and Memento Luxe (Rose Bud), Versacraft (Cerulean Blue) and VersaMagic (Pretty Petunia, Aloe Vera) 
  • stamp the sentiment from the Paper Smooches Sugar Rush set with Archival Ink (Watering Can) - I used my MISTI to get a crisp impression on the textured surface of the watercolor paper
  • add a strip of pink glitter cardstock to the left side of the panel before adhering it to a white cardbase

Have a day for daisies.

Yours,


    Friday, January 13, 2017

    Celebrate Clown

    Hi there,

    I created this colorful birthday card for the A Day for Daisies Blog. And I just realized that this is the perfect project for this post because it is time to celebrate my 1000th post ... can't believe I've shared so many projects already.

    • color the A Day for Daisies Sir Carl Clown image with ZIG Clean Color Real Bursh Pens, Distress Markers and a damp watercolor brush
    • cut out a scalloped stitched panel from watercolor paper and create a background with the help of small images from the Paper Smooches Twiggy Florets and Sugar Rush sets and Versafine (Onyx Black) 
    • color those flowers, circles and sweets with some of the same markers used on the clown
    • add a sentiment made with a Dymo Label Maker

    Have a day for daisies.

    Yours,


    Tuesday, December 20, 2016

    Merry Christmas Snowglobe

    Hi there,

    I would like to show you this cute Christmas Shaker Tag using the Bonus Image from the Gerda Steiner Designs November-December Digital-Stamp-Bundle:

    • color the sweet Gerda Steiner Designs Snowglobe image available as part of the November-December Digital-Stamp-Bundle with Derwent Inktense Pencils and a damp watercolor brush
    • cut two of the Paper Smooches Gift Tags 2 - once from a sturdy white base and once from patterned paper from the Crate Paper Snow & Cocoa 6x6 paper pad
    • cut out a circle window from the patterned paper tag and cover the opening with a piece of acetate
    • create a shaker element on the base tag around the colored image with the help of foam tape and fill it with Pretty Pink Posh Sequins (4mm Sparkling Clear)
    • thread teal and brown twine through the holes of the tags

    There is a new Stamp Bundle available for December and January and it also includes a lovely surprise image ... don't miss it.

    Have a christmassy day.

    Yours,