Showing posts with label Little Things from Lucy's Cards. Show all posts

Monday, May 3, 2021

Sending Sunshine

Hi there,

I created this easy to make greeting card using the Karten-Kunst Curved Borders:

  • cut several Karten-Kunst Curved Borders from patterned paper
  • glue them onto a kraft cardbase
  • stamp the sentiment from the Karten-Kunst Aus der Schreibmaschine 3 set with Versafine Clair Nocturne
  • add some matching Little Things from Lucy's Cards Pearls as final embellishments


I hope you got inspired.

Hugs,


Sunday, July 5, 2020

Sea you soon

Hi there,

I created this fun underwater scene for you using several Lawn Fawn stamp sets:

  • stamp an underwater scene with Versafine Clair Morning Mist using images from the following Lawn Fawn sets: Mermaid for you, Fintastic Friends, So Jelly, Critters in the Sea and Duh-nuh - use the masking technique
  • color the strip with Spectrum Noir pencils
  • stamp the sentiment with Versamark onto a strip of grey cardstock and heat-emboss it with WOW! Bright White Super Fine embossing powder
  • add some white highlights to the droplets with a white gel pen and add Nuvo Crystal Glaze on top
  • finish the project by adhering three clear droplets from the Little Things from Lucy's Cards Raindrops Mix as final embellishments


I hope you like my creation.

Hugs,


Sunday, May 3, 2020

With a Cherry on Top

Hi there,

I created this fun birthday card using the Clearly Besotted Stamps Super Cool II stamp set:

  • stamp the ice cream cone from the Clearly Besotted Stamps Super Cool II set with Versafine Clair Morning Mist - use the masking technique
  • color the image with Lyra Rembrandt Polycolor pencils and add a highlight to the cherry with a white gel pen
  • cut out a white circle with one of the My Favorite Things Wonky Stitched Circles and a white rectangle with one of the Elizabeth Craft Designs Stitched Rectangles
  • stamp the sentiment from that same set with the same grey ink
  • add a striped and a dotted piece of patterned paper to the left side of the panel before adhering it to a cardbase
  • add Little Things from Lucy's Cards Ice Crystal sequins as final embellishments


Have a wonderful day.

Hugs,


Tuesday, March 3, 2020

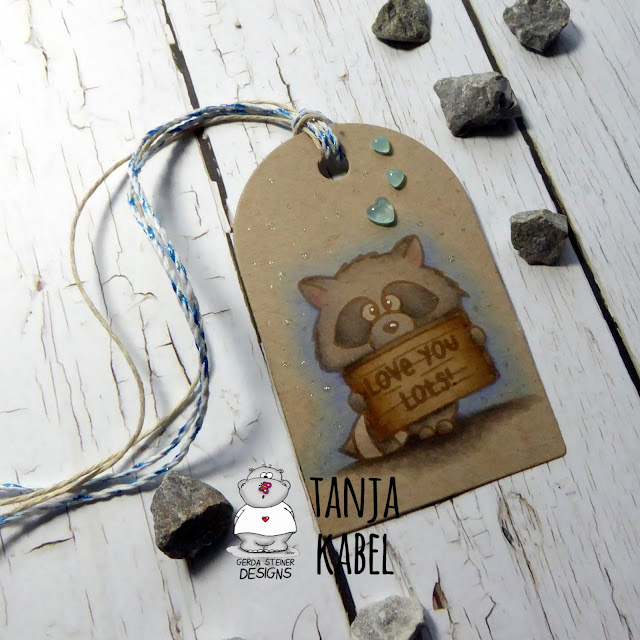
Love you lots!

Hi there,

take a look at this sweet racoon tag created with the Gerda Steiner Designs Sneaky Racoons stamp set:

  • stamp one of the Gerda Steiner Designs Sneaky Racoons and a matching sentiment with Lawn Fawn Crunchy Leaf ink onto a tag cut from Neenah Desert Storm kraft cardstock
  • color the image with Spectrum Noir Triblend Markers
  • add highlights with a white gel pen and extra shading with Faber-Castell Polychromos pencils
  • add glittery dots around the image and three little acrylic hearts as final embellishments
  • thread a strand of blue and a strand of natural twine through the hole of the tag


Have a wonderful day.

Hugs,


Monday, June 10, 2019

From the Heart - Von Herzen

Hi there,

I created this sparkly shaker card with the help of the new Karten-Kunst Wavy Heart:

  • cut out the Karten-Kunst Wavy Heart from a stitched panel of smooth white cardstock
  • stamp the sentiment from the Karten-Kunst Große Worte Überraschung set and some hearts from the Karten-Kunst Kränze & Kreise set with Altenew Crisp Ink (Heartbeat, Vineyard Berry)
  • cover the opening with acetate and create a shaker element with double-sided foam adhesive
  • fill the shaker with sequins and cover it with another layer of acetate
  • adhere the panel onto a cardbase


Have a colorful day.

Hugs,


Tuesday, June 4, 2019

Best Dad Tag

Hi there,

we are starting a new TAGplorations Challenge over on the STAMPlorations Blog and this month it is All about Dad and the Optional Twist is Stencils:

  • cut out one of the CUTplorations Manila Tags from watercolor paper
  • create a background using Distress Inks (Broken China, Rusty Hinge, Peeled Paint)
  • add some water droplets for more texture
  • apply some Distress Ink (Walnut Stain) through the ARTplorations Foiled again Mini stencil and ink up the edges of the tag with that same ink as well
  • cut out the base of the CUTplorations Shaker Balloon #1 Heart directly from the tag and cut the other elements for a shaker from acetate and foam rubber
  • before closing the shaker add some Little Things from Lucy's Cards Fairy Dust 
  • add a balloon string and a little bow from natural twine
  • create the sentiment with the help of a Dymo Laber Maker
  • thread a piece of beige Sari Silk Ribbon through the hole of the tag

I hope you got inspired.

Hugs,


Tuesday, May 21, 2019

Küsschen - Kisses

Hi there,

Gerda Steiner has released the fabulous new Frogs stamp set with English, Spanish and German sentiments and over the next three weeks I will show you my creations with the Gerda Steiner Designs German Froesche set. This little frog prince is my first creation:

  • color one of the frogs and the crown from the Gerda Steiner Designs Frogs set with Alcohol Markers - add extra shading with Faber-Castell Polychromos Pencils
  • use a white gel pen for highlights in the eyes and freckles on the cheeks
  • add Nuvo Aqua Shimmer Midas Touch for extra shimmer on the crown
  • color the sentiment strip with Distress Oxide Ink Lucky Clover
  • create a background on a stitched rectangular panel of smooth white cardstock using Distress Oxide Ink Salty Ocean, the Create a Smile Focal Point stencil and a Blending Brush
  • as final embellishment adhere three little Droplets Pool Hearts from Little Things from Lucy's Cards


Have a wonderful day.

Hugs,


Thursday, May 9, 2019

Make a Wish Bunny

Hi there,

I created this sparkly watercolor card for the Stamping-Fairies Blog:

  • cut out a wonky stitched rectangle from watercolor paper
  • stamp the bunny from the Lawn Fawn Upon a Star set with Versafine Smokey Gray
  • fill in a circle moon shape with Finetec Mica Watercolors
  • color the bunny and the hill with Derwent Inktense pencils and a damp watercolor brush
  • add color to the night sky with watered-down Distress Re-Inker Chipped Sapphire and Finetec Mica Watercolors
  • write the sentiment with a glass dip pen and white gouache
  • add tiny silver matte stars from Little Things from Lucy's Cards
  • adhere the watercolor panel to a grey cardbase


I hope you got inspired.

Hugs,


Thursday, April 18, 2019

Stay Unique

Hi there,

I fell in love with the unicorns from the Uniquely Creative Stay Unique stamp set and that is why I created another card using them for the Stamping-Fairies Facebook Group:

  • stamp two of the the adorable unicorns from the Uniquely Creative Stay Unique set with Versafine Onyx Black
  • color the images with Derwent Inktense Pencils and a damp watercolor brush
  • add some sparkle with Wink of Stella Clear Glitter and some dimension to the horns with Nuvo Crystal Drops Gold Coast
  • cut out some rainbows and clouds from glitter cardstock using dies from the Sizzix Magical Unicorn set
  • cut out a stitched panel and a cloud border from smooth white cardstock and add color with Distress Oxide Inks (Tumbled Glass, Spun Sugar, Milled Lavender) and a Blending Brush
  • apply Distress Oxide Ink Picked Raspberry on top off that background through a heart stencil
  • stamp the first and second part of the sentiment from that same stamp set with Versafine Clair Morning Mist
  • adhere all the layers to a white cardbase
  • add some Little Things from Lucy's Cards Itty Bitty Stars in Matt Silver


Leave a little sparkle wherever you go.

Hugs,


Thursday, April 4, 2019

Unicorn Invitations

Hi there,

I created this Invitation Set for my daughter's birthday for the Stamping-Fairies Facebook Group:


  • stamp the adorable unicorns from the Uniquely Creative Stay Unique set with Versafine Onyx Black
  • color the images with Derwent Inktense Pencils and a damp watercolor brush
  • add some sparkle with Wink of Stella Clear Glitter and some dimension to the horns with Nuvo Crystal Drops Gold Coast
  • cut out some rainbows and clouds from glitter cardstock using dies from the Sizzix Magical Unicorn set
  • create a frame with the help of the My Favorite Things Stitched Square Scallop Frame STAX, the My Favorite Things Stitched Mini Scallop Square STAX and patterned paper from the Avery Elle The Sorbet Collection 6x6 paper pad
  • cut out a stitched panel from Neenah Desert Storm kraft cardstock and run it through your Big Shot with a heart embossing folder
  • create the word "Einladung" (invitation) with a label maker
  • adhere all the layers to an off-white cardbase
  • add some Little Things from Lucy's Cards Itty Bitty Stars in Matt Silver


I hope you got inspired.

Hugs,


Thursday, September 13, 2018

You're cool

Hi there,

I would like to show you how to create this sweet penguin shaker card over on the Elizabeth Craft Designs Blog:

  • cut the penguin parts from Elizabeth Craft Designs Soft Finish Cardstock with the help of the Elizabeth Craft Designs Penguin die set
  • cut the shaker frame from patterned paper from the ModaScrap Let it snow 6x6 paper pad using one of the Elizabeth Craft Designs Frame it - Stitched Circles and one of the Elizabeth Craft Designs Stitched Rectangles
  • adhere a piece of acetate behind the shaker frame and use double-sided foam tape to create the shaker pocket
  • create a sky background with the help of watercolor cardstock, Distress Ink Weathered Wood and Pearlized Water - add snowflake splatters with watered-down white acrylic paint
  • fill the shaker pocket with Elizabeth Craft Designs Cool Diamond Glitter, some sequins from the Little Things from Lucy's Cards Sparkle and Shine set and snowflakes cut with the help of the little snowflake from the Elizabeth Craft Designs Penguin die set and silver glitter paper
  • color the penguin with Delta, Touch Twin Brush and Copic Markers and add highlights with a white gel pen
  • stamp the sentiment from the Elizabeth Craft Designs Cute Winter Sentiments set with Versamark onto a strip of kraft cardstock and heat-emboss it with WOW! Bright White Super Fine embossing powder
  • layer a strip of patterned paper from the ModaScrap Let it snow 6x6 paper pad behind it and adhere it to the card using clear double-sided adhesive


Those new critter die sets are just adorable, don't you think? Which one is your favorite?

Hugs,


Thursday, June 7, 2018

Birthday Wishes from all of us

Hi there,

I would like to show you this birthday card that I created for my son over in the Stamping-Fairies Facebook Group:

  • stamp the Avery Elle Critter Crew with Memento Tuxedo Black and color the image with Delta, Touch Twin Brush and Copic Markers - add extra shading with Faber-Castell Polychromos Pencils
  • stamp the triangle pattern from the Flora & Fauna Texture 2 stamp set with Versamark and heat-emboss it with Ranger Sticky embossing powder
  • rub IndigoBlu Mega Flakes Winter Dawn onto the pattern
  • stamp the sentiment from the same set with Versafine Onyx Black and Smokey Gray onto a piece of patterned paper from the My Favorite Things Graphic Grid Pastels 6x6 paper pad for an ombre look
  • add Little Things From Lucy's Cards Diamonds Rainbow Bright as final embellishments

Have a colorful day.

Hugs,


Tuesday, May 22, 2018

Have a ball!

Hi there,

I would like to show you another creation using the fabulous new Gerda Steiner Designs Dachshunds stamp set:

  • color one of the dogs and the ball from the Gerda Steiner Designs Dachshunds stamp set with ZIG Clean Color Real Brush Pens and a damp watercolor brush
  • add color to the sentiment strip with Distress Ink Salty Ocean
  • cut out a stitched window from a stitched panel cut from Gmund Beer Paper Weizen
  • create a shaker element behind the window with the help of acetate, double-sided foam adhesive and Little Things from Lucy's Cards Diamonds Rainbow Bright
  • for the background behind the window apply Distress Ink Salty Ocean through the Create a Smile Focal Point stencil
  • adhere the panel to a grey cardbase after arranging the elements in front of the shaker window

Thanks for stopping by.

Hugs,