Showing posts with label Dymo Label Maker. Show all posts

Thursday, October 12, 2023

You are Cute

Hi there,

I created this fun black and white bug tag with leftover pieces from two other projects:

  • I used some leftover stamped bugs from the A Really Bug Deal project and some leftover die cuts from the Love You Window Project
  • the bugs are from the Lawn Fawn A Bug Deal set and the dies cuts are from the Lawn Fawn Secret Garden Window set
  • adhere all the pieces to a white tag, create a sentiment using a Dymo Label Maker and thread a piece of ribbon through the hole of the tag
I hope you got encouraged to use your leftover pieces to create even more fun projects.

Have a wonderful day.

Hugs,


Tuesday, November 1, 2022

Happy Fall

Hi there,

I created this Fall Wreath Card using one of my all-time favorites - the Gerda Steiner Designs Foxes stamp set:

  • stamp one of the adorable little foxes from the Gerda Steiner Designs Foxes set with Lawn Fawn Jet Black
  • color the image with Spectrum Noir Triblend Markers, add extra shading with Faber-Castell Polychromos pencils and highlights with a white gel pen
  • ink up the edges of an off-white cardbase using Distress Ink Gathered Twigs and add some splatters with that same watered-down ink
  • create a wreath using die-cuts from the Spellbinders Mini Fall Blooms set cut out from colored cardstock
  • add a sentiment using the Dymo Label Maker 


Have a wonderful day.

Hugs,


Thursday, June 10, 2021

Gingerbread Ephemera Tiles

Hi there,

the wonderfully talented Shery has added some new products to the Paper Goods Section of the STAMPlorations Store and the Gingerbread - Ephemera Tiles is one of them:

  • choose two of the STAMPlorations Gingerbread - Ephemera Tiles and ink up the edges with Distress Ink Ground Espresso
  • adhere one of the STAMPlorations Good Tidings Stickers to a strip of kraft cardstock and ink up the edges with that same brown Distress Ink
  • create a background by applying Distress Oxide Ink (Festive Berries, Pine Needles) through the ARTplorations Holly Background stencil and ink up the edges of the panel with Distress Ink Ground Espresso
  • adhere the panel with all the elements onto a kraft cardbase


  • cut out three CUTplorations Manila Tags from kraft cardstock and ink up the edges with Distress Ink Ground Espresso
  • create three different background using text elements from the STAMPlorations Joyful set and Versafine Clair Fallen Leaves
  • choose three of the STAMPlorations Gingerbread - Ephemera Tiles and ink up the edges with Distress Ink Ground Espresso
  • create name tags with a Dymo Label Maker and adhere them to a strip of kraft cardstock
  • thread natural twine and golden thread through the holes of the tags


  • choose one of the STAMPlorations Gingerbread - Ephemera Tiles and ink up the edges with Distress Ink Ground Espresso
  • stamp the sentiment from the STAMPlorations Hello Christmas set with Versamark onto a rectangular panel cut from kraft cardstock and heat-emboss it with WOW! Gold Rich Paler Super Fine embossing powder
  • stamp the sentiment again - this time slightly offset - with Versafine Clair Fallen Leaves to create a drop-shadow
  • add splatters with watered-down white acrylic paint
  • wrap some natural twine around the panel before adhering it to a cardbase


I hope you got inspired for some early Christmas Projects.

Hugs,


Tuesday, June 4, 2019

Best Dad Tag

Hi there,

we are starting a new TAGplorations Challenge over on the STAMPlorations Blog and this month it is All about Dad and the Optional Twist is Stencils:

  • cut out one of the CUTplorations Manila Tags from watercolor paper
  • create a background using Distress Inks (Broken China, Rusty Hinge, Peeled Paint)
  • add some water droplets for more texture
  • apply some Distress Ink (Walnut Stain) through the ARTplorations Foiled again Mini stencil and ink up the edges of the tag with that same ink as well
  • cut out the base of the CUTplorations Shaker Balloon #1 Heart directly from the tag and cut the other elements for a shaker from acetate and foam rubber
  • before closing the shaker add some Little Things from Lucy's Cards Fairy Dust 
  • add a balloon string and a little bow from natural twine
  • create the sentiment with the help of a Dymo Laber Maker
  • thread a piece of beige Sari Silk Ribbon through the hole of the tag

I hope you got inspired.

Hugs,


Tuesday, February 5, 2019

Rainbow Cupcakes

Hi there,

we are starting a new TAGplorations Challenge over on the STAMPlorations Blog and this time the Topic is All about Love and the Optional Twist is Cupcakes:

  • cut out a CUTplorations Manila Tag from watercolor paper
  • stamp the STAMPlorations Sketched: Cupcake with Versafine (Onyx Black) three times - use the masking technique
  • color the images with Faber-Castell Albrecht Dürer Pencils and a damp watercolor brush
  • apply Distress Ink (Hickory Smoke) though the ARTplorations Rows of Hearts stencil
  • add a sentiment with the help of the Dymo Label maker
  • dye a piece of seam binding with Distress Ink (Hickory Smoke) and thread it through the hole of the tag

Have a sweet day.

Yours,


Friday, February 16, 2018

Winter Bear

Hi there,

this is my second individual post on the Elizabeth Craft Designs Blog and I created this beary winter card for you:


  • stamp one of the bears and some trees from the adorable Elizabeth Craft Designs Winter Bears set with Memento Tuxedo Black
  • color the images with Copic, Touch Twin Brush and Delta Markers 
  • add sparkle to the tree tops with Wink of Stella Clear Glitter
  • add patterns and highlights with a white gel pen
  • cut out three squares from watercolor paper using the Elizabeth Craft Designs Dashing Squares set
  • add a night sky to one of the squares using Distress Ink Chipped Sapphire and a Mini Ink Blending Tool
  • add texture with some water droplets
  • cut hill shapes from the two other squares and add Distress Ink Tumbled Glass and Elizabeth Craft Designs Silk Microfine Glitter Cool Diamond for a snowy look
  • draw in some snowflakes with a white paint marker
  • cut out a larger square using the same die set from patterned paper from the ModaScrap Let it snow 6x6 paper pad
  • add all the layers to a light grey cardbase
  • create a sentiment using a Dymo Label Maker

I hope you got inspired.

Yours,


Sunday, January 21, 2018

Dreamers only Art Journal Page

Hi there,

this is just a quick reminder of this month's Mixed Media Challenge over on the STAMPlorations Blog.

  • cover an art journal page cut from extra sturdy watercolor paper with white gesso
  • apply Prima Marketing Modeling Paste through the ARTplorations Curve Play stencil and let it dry thoroughly
  • add color to the background with Paper Artsy Infusions Emerald Isle
  • use purple foil for extra shine
  • stamp around the edges with one of the stamps from the STAMPlorations Mixed Media Elements set and Archival Ink Majestic Violet
  • cut one of the Tim Holtz Wildflowers 2 and the CUTplorations Dragonfly from black cardstock and add those elements to the page
  • dye a piece of seam binding with Distress Ink Rusty Hinge and tie it around the page
  • add the first part of the sentiment with the help of a Dymo Label Maker - the second part of the sentiment is handwritten

I hope you got inspired and don't forget to join us for our Mixed Media Challenge over at the STAMPlorations Blog. The theme is always anything mixed media except a card. You must use at least one stencil (any brand) in your project. The Linky closes at the end of the month.


Yours,


Wednesday, December 6, 2017

ATC Box

Hi there,

we are starting a new Mixed Media Challenge over on the Happy Little Stampers Blog and this time it's Anything goes. Since I created a lot of ATCs this year, I needed a nice little box to store them in:


  • cut out a box from kraft cardstock
  • cover the outside with gesso
  • apply some texture paste through the ARTplorations Forest of Leaves stencil and let it dry thoroughly
  • add color using Distress Stains (Broken China, Salty Ocean, Evergreen Bough) 
  • use black acrylic paint to cover the box with splatters
  • ink up the edges with Distress Ink (Black Soot)
  • create a label with the help of the Dymo Label Maker

I can't wait to see your creations in the gallery.

Yours,


Sunday, December 3, 2017

Fixstern - Fixed Star Tag

Hi there,

it is time for another Stencil Sunday and the start of a new Mixed Media Challenge over on the STAMPlorations Blog.

  • cut out a tag using dies from the CUTplorations ATC/Tag Builder set and apply heavy white gesso through the ARTplorations Oh my Stars! Mini stencil - let this layer dry thoroughly
  • add color to the tag with the help of watered-down Distress Paint (Evergreen Bough, Weathered Wood, Iced Spruce)
  • draw a line around the edges with a black Stabilo All pencil and activate the color with a wet watercolor brush
  • add more texture to the background by stamping the numbers and the script from the STAMPlorations Mixed Media Elements set with Archival Ink (Black Soot)
  • let some Daler-Rowney Pearlescent Liquid Acrylic (Moon Violet) drip down the tag
  • stamp some stars from the STAMPlorations Art Marks set with Delicata (Silvery Shimmer)
  • create the word "Fixstern" (fixed star) with a Dymo Label Maker and adhere it to the tag on top of a piece of corrugated cardboard and a piece of sari silk ribbon
  • dye a piece of seam binding with that same violet liquid acrylic paint and rip it in half before threading it through the hole of the tag

I hope you got inspired and don't forget to join us for our Mixed Media Challenge over at the STAMPlorations Blog. The theme is always anything mixed media except a card. You must use at least one stencil (any brand) in your project. The Linky closes at the end of the month.

Yours,


Tuesday, October 24, 2017

Happy Birthday Flower

Hi there,

today, I would like to show you this quick and easy birthday card:

  • stamp one of the Darkroom Door Fine Flowers and one of the Darkroom Door Fine Butterflies with Versamark and heat-emboss both with WOW! Bright White Super Fine embossing powder
  • create a background with Jane Davenport watercolors
  • cut out a stitched scalloped panel around the images and layer the watercolor panel onto another stitched panel before adhering it to a white cardbase
  • cut out the Mama Elephant Happy Scrips once from silver glitter paper and a second time from sturdy white cardstock - glue both layers on top of each other 
  • create the second part of the sentiment with a Dymo Label Maker

Have a colorful day.

Yours,


Tuesday, October 3, 2017

Fall Basket

Hi there,

there is a new Challenge on the STAMPlorations Blog and here it is all about Tags. This month we are starting with the Topic All about Fall and the Optional Twist Red, Gold, Orange:

  • cut out a tag from kraft cardstock using the CUTplorations ATC/Tag Builder die set
  • stamp the basket from the STAMPlorations Many Blessings set with Versafine (Vintage Sepia) and color the image with Faber-Castell Polychromos pencils
  • add some splatters with Finetec Mica Watercolors (Inca Gold)
  • ink up the edges of the tag with Distress Ink (Vintage Photo) and  a Mini Ink Blending Tool
  • dye a piece of seam binding with that same brown ink and rib it in half
  • add the sentiment with the help of the Dymo Label Maker

I can't wait to see your creations in the gallery.

Yours,


Tuesday, July 25, 2017

Summer Fun

Hi there,

I created this Summer Fun project using images created by the wonderful Gerda Steiner. You can find them over at Gerda Steiner Designs:


  • color the Gerda Steiner Designs Watermelon Kid and the Gerda Steiner Designs Bear with Watermelon with Faber-Castell Polychromos pencils and Zest-it
  • cut put some Polaroids using patterned paper from the Echo Park Summer Bliss 6x6 paper pad and one of the My Favorite Things Polaroids dies
  • dry emboss a stitched piece of Neenah Desert Storm kraft cardstock with the Tim Holtz Ringer embossing folder for extra dimension
  • add another strip of patterned paper underneath the pictures and adhere all the layers to a cardbase
  • add the sentiment created with a Dymo Label Maker


Have a sunny day.

Yours,


Thursday, July 6, 2017

You can never have too much happy

Hi there,

we are starting a new Mixed Media Challenge over on Happy Little Stampers and this time we would like to see some texture:

  • cover a woodpanel with three layers of white gesso - let each layer dry before applying the next
  • cover the whole panel with Tissue Wrap Melange - use Matte Medium to adhere this next layer
  • use a brayer to apply three different shades of turquoise (DecoArt Laguna, DecoArt Indian Turquoise, Distress Paint Evergreen Bough)
  • stamp the letters from the Paper Artsy JOFY 54 set with Memento Luxe (Gray Flannel)
  • add the little garden scene by using the JOFY sets 24, 32, 42 and Archival Ink (Black Soot)
  • color the images with Derwent Inktense Pencils and a damp watercolor brush
  • ink up the edges of the whole panel with Distress Ink (Evergreen Bough)
  • add the sentiment created with a Dymo Label Maker

I hope you got inspired.

Yours,


Thursday, May 25, 2017

Kindness ATC

Hi there,

I created another ATC for the Stamping-Fairies Blog:

  • in one of my previous posts I explained how I created the background for several ATCs
  • choose one of them and add some droplets of Alcohol Ink (Patina, Slate)
  • stamp the butterflies/moths from the Stampers Anonymous Papillon set with Archival Ink (Black Soot)
  • color the edges with Distress Crayon Peacock Feathers
  • use white gouache to add some splatters and let some run down the right side of the ATC
  • add some Heidi Swapp Teal Silver Ombre Foil with the help of the Collage Glue Stick
  • create the sentiment using the Dymo Label Maker

Thanks for stopping by.

Yours,


Wednesday, May 17, 2017

Get Well Critters

Hi there,

it's time for another Challenge over at Addicted to Stamps and More and I would like to share this cute Get-Well-Pop-Up-Card with you:


  • prepare a pop-up card from Neenah Desert Storm Kraft cardstock with three pop-up place holders
  • cover the front and back with patterned paper from the Prima Marketing All about me 6x6 paper pad
  • create the first part of the sentiment by cutting out the second part of the Karten-Kunst Große Texte Alles Gute once from patterned paper from the same paper pad and once from black cardstock for a shadow layer
  • create the second part of the sentiment with a Dymo Label Maker
  • stamp a background on the inside by using small images from the Clearly Besotted Stamps Under the Weather stamp set with Memento (Tuxedo Black)
  • stamp two of the sweet critters and the doctor's bag from the same stamp set with the same ink
  • color all the images with Delta and Touch Twin Brush Markers 
  • add highlights with a white gel pen
  • add the three cut out images to the pop up place holders
  • personalize the card by cutting out the recipients name frome patterned paper from the same paper pad with the help of the Lil' Inker Designs Mixed & Stitched Alphabet dies

I hope you got inspired.

Yours,


Wednesday, May 3, 2017

Balloon Bunny

Hi there,

we are starting a Photo Inspiration Challenge over at Addicted to Stamps and More:

  • stamp the adorable little bunny from the Gerda Steiner Designs Happy Hoppy set with Lawn Fawn (Jet Black) and color the image with Delta, Touch Twin Brush and Copic Markers
  • add extra shading with Faber-Castell Polychromos Pencils
  • cut out a balloon from golden glitter cardstock with the help of one of the Lawn Fawn Party Balloons
  • knot a piece of natural twine around the end of the balloon, pierce a little hole underneath the bunny's hand and thread the twine through it
  • cut out a scalloped rectangle from Strathmore Bristol Smooth cardstock with one of the My Favorite Things Blueprints 20 dies
  • color the background with several layers of Distress Oxide Ink (Broken China)
  • cut out the largest oval from the My Favorite Things Stitched Oval Scallop Frame set from sturdy white cardstock
  • cut out the Memory Box Paintbrush Happy three times from black cardstock and layer them on top of each other
  • create the second part of the sentiment using the Dymo Label Maker

I hope you got inspired.

Yours,

Sunday, March 19, 2017

Stamp Connection #23

Hi there,

connected through our love for card making, blogging and being from Germany we (Cornelia from Stempel Spass and I) decided to create a monthly project within predefined requirements. We are going to show you the result every 3rd Sunday of the month and this is our 22nd transatlantic get-together!

Our requirement for this meet-up was:
"acetate but not on a shaker"

This time we have a special guest. Cornelia invited the wonderful Rosi from Daeny's Creations to share her project with us. So make sure to visit her blog by clicking on this link.

  • stamp the sweet giraffe from the Clearly Besotted Stamps Wild Thing set with Memento (Tuxedo Black) and color the image with Delta, Touch Twin Brush and Copic Markers 
  • stamp the first and fourth part of the sentiment from the same set with Versamark onto a strip of green cardstock and heat-emboss them with WOW! Bright White Super Fine embossing powder 
  • create the second and third part of the sentiment with a Dymo Label Maker
  • cut out a stitched panel from watercolor paper and create a background using Versafine (Onyx Black) and the leaf images from the Clearly Besotted Stamps Some Birdie loves you set
  • color the leaves with Brushos (Leaf Green, Emerald Green)
  • cut out a My Favorite Things Stitched Scalloped Rectangle from aceteate from the We R Memory Keepers Clearly Posh 6x6 pad
  • mount all the layers onto a Gmund Beer Paper cardbase

Now make sure to hop over to see Cornelia's Creation.

Thanks for stopping by. We hope to see you again at the ...


Yours,


Wednesday, February 15, 2017

Lacy Edges Tag and Card

Hi there,

there is a Mini Release Blog Hop over on the STAMPlorations Blog and I got the chance to work with the fabulous new Lacy Edges and Borders die set.


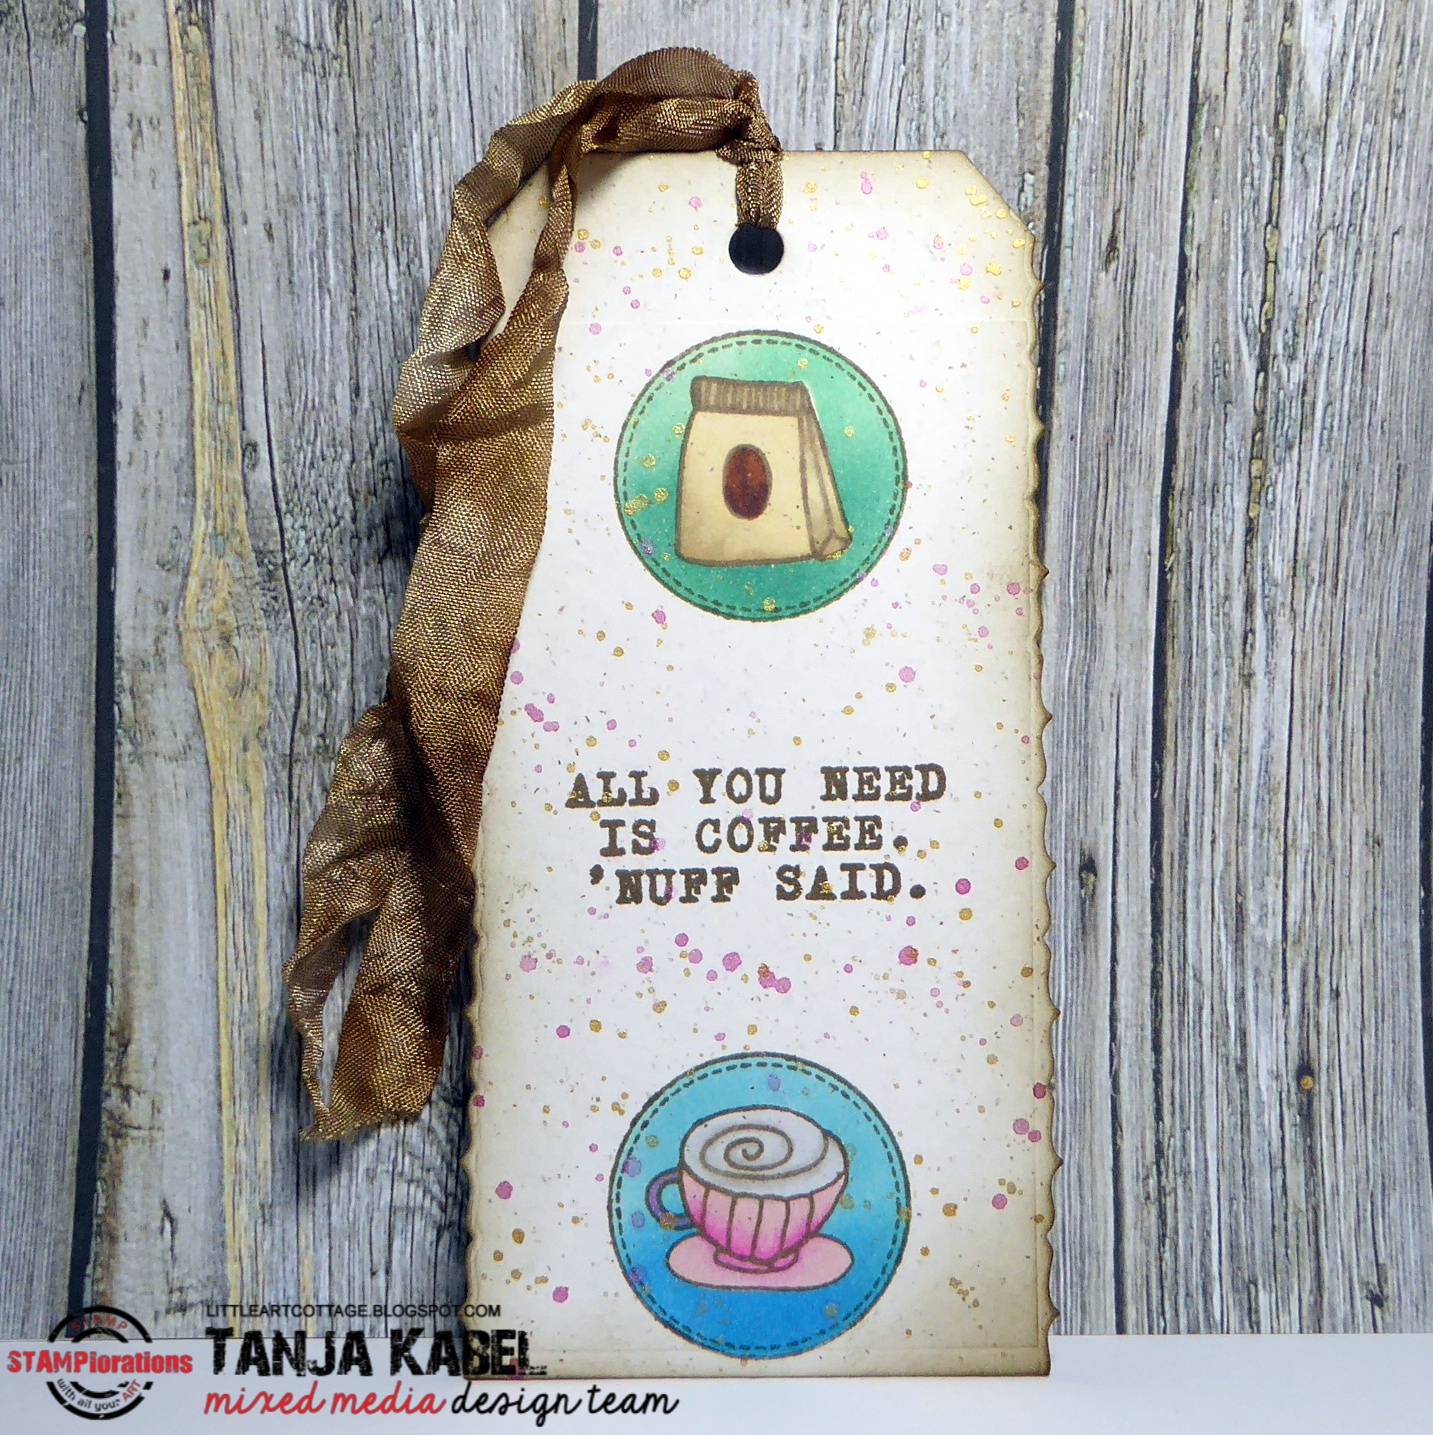
My first project is a Coffee Tag/Bookmark:

  • cut out a tag from Gmund Beer Paper
  • use one of the versatile CUTplorations Lacy Edges and Borders dies on both sides of the tag
  • stamp the circle and two cute little coffee icons from the STAMPlorations Coffee Petites set with Versafine (Vintage Sepia)
  • add the sentiment from the STAMPlorations All you need is Coffee set with that same brown ink
  • mask off the coffee icons and the space around the circles and add an ombre background using Distress Inks (Cracked Pistachio, Evergreen Bough, Tumbled Glass, Salty Ocean) and a Mini Ink Blending Tool
  • remove the masks and add some splatters with the Prima Marketing Metallic Accents
  • color the images with Copic, Delta and Touch Twin Brush Markers
  • ink up the edges of the tag and dye a piece of seam binding with Distress Ink (Ground Espresso)
  • thread the seam binding through the hole of the tag to finish it

My second project is a vibrant Mixed Media Card:

  • create a background on a piece of watercolor paper using watered-down Distress Re-Inkers (Picket Fence, Worn Lipstick, Picked Raspberry)
  • use one of the brand new CUTplorations Lacy Edges and Borders dies on the right side of the panel
  • mix some DecoArt Media Crackle Paste with Distress Re-Inker (Wilted Violet) and apply it through on of the hearts of the ARTplorations Zen Hearts stencil
  • let the crackle paste dry thoroughly
  • ink up the edges of the panel and the raised areas with Distress Ink (Black Soot)
  • cut out the CUTplorations Happy word die from black cardstock and cover the sentiment with Spectrum Noir Clear Glitter
  • use a sticker for the second part of the sentiment and a label from the Dymo Label Maker for the third part
  • stamp the script from the STAMPlorations Mixed Media Elements set with Delicata (Silvery Shimmer) for more texture
  • add splatters with black gouache
  • add a strip of silver glitter paper to the right side of the panel before adhering it to a cardbase

Don't forget to leave comments for there a prizes to be won:
1 winner of a $15 gift certificate and 1 winner of her choice of either the Lacy Edges or Winter & Spring Stitched Landscape dies.
Commenting closes on Tuesday, February 21st.
Winners will be announced on March 10th.
Enjoy the rest of the hop.

Yours,