Showing posts with label Doodlebug Design. Show all posts

Tuesday, February 16, 2021

Wish

Hi there,

I created this sweet card using the Gerda Steiner Designs Lovely Pandas stamp set:

  • stamp the cute little panda with the balloon from the Gerda Steiner Designs Lovely Pandas set with Lawn Fawn Jet Black 
  • color the image with Spectrum Noir Triblend Markers and add extra shading with Faber-Castell Polychromos pencils
  • cover the cardbase with patterned paper from the Doodlebug Design Fairy Tales 6x6 paper pack
  • cut out the sentiment using the STAMPlorations Skinny Sentiments and color the letters and the background layer with matching alcohol markers
  • add some star sequins as final embellishments


I hope you got inspired.

Hugs,


Monday, August 12, 2019

Soak up the Sun

Hi there,

are you ready for some Summer Fun over on the Elizabeth Craft Designs Blog?

  • cut out a palm tree from Elizabeth Craft Designs white Soft Finish Cardstock using dies from the Elizabeth Craft Designs Palm Tree set
  • color the parts with Delta, Touch Twin Brush and Copic Markers
  • add highlights with a white gel pen and splatters to the sand with Ecoline Liquid Watercolors
  • cut out a stitched rectangle from watercolor paper using one of the Elizabeth Craft Designs Stitched Rectangles
  • add color to the background with Ecoline Liquid Watercolors - water droplets will help you to create more texture
  • apply Distress Oxide Ink Mustard Seed through the My Favorite Things Radiating Rays stencil with a Mini Ink Blending Tool
  • stamp the sentiment from the Elizabeth Craft Designs Beach Sentiments set with Versafine Deep Lagoon
  • add a strip of patterned paper from the Doodlebug Design Sweet Summer 6x6 paper pad to the left and the right of the panel before adhering it to a white cardbase


I hope you have a wonderful day.

Hugs,


Thursday, July 18, 2019

It's your Birthday

Hi there,

I created this adorable birthday card using the Avery Elle Peek a Boo Pets stamp set for the Stamping-Fairies Blog:

  • create some rectangular openings on a stitched panel of watercolor paper using masking tape
  • stamp four of the Avery Elle Peek a Boo Pets into those opening with Versafine Onyx Black and mask them off too
  • add some Distress Oxide Ink (Wilted Violet, Mermaid Lagoon, Pine Needles, Picked Raspberry) with Blending Brushes
  • stamp some confetti from the Lawn Fawn Year Nine set with Versamark and heat-emboss it with WOW! Mermaid Tails embossing powder
  • color the images with ZIG Clean Colors Real Brush Markers and the matching Blender
  • stamp the sentiment from the same set with Versafine Onyx Black, cut it out and adhere it in the center of the rectangles with double-sided foam adhesive
  • add strips of patterned paper to the left and the right side of the panel before adhering it to a white cardbase


I hope you got inspired.

Hugs,


Tuesday, April 16, 2019

Eggstra-Special

Hi there,

this week I would like to show you another Easter Card that I created with an image from the Gerda Steiner Designs Easter Bunnies Digital Stamp Bundle:

  • color the image from the Gerda Steiner Designs Easter Bunnies Digital Stamp Bundle with Zig Clean Color Real Brush Pens and a damp watercolor brush
  • stamp the sentiment from the Doodlebug Design Happy Easter Doodle Stamps with Versafine Onyx Black right onto the sign
  • create a background with Prima Marketing Vintage Pastels watercolor onto a stitched panel cut from watercolor paper
  • stamp some Easter Eggs from the Gerda Steiner Designs Peeking Easter Friends and the Gerda Steiner Designs Easter Bunnies sets with Versamark onto that background and heat-emboss them with WOW! Bluetiful embossing powder
  • adhere the panel to a cardbase covered with patterned paper
  • add two Altenew Fine Rectangles cut from grey cardstock around the image 


Have a wonderful Easter Time.

Hugs,


Tuesday, April 9, 2019

Happy Easter Egg Cart

Hi there,

I created this colorful Easter Card using an image from the Gerda Steiner Designs Easter Bunnies Digital Stamp Bundle:

  • color the bunny and the cart from the Gerda Steiner Designs Easter Bunnies Digital Stamp Bundle with Winsor & Newton Watercolor Markers and a damp watercolor brush
  • stamp the sentiment from the Gerda Steiner Designs Easter Bunnies set with Versamark onto a banner cut from Neenah Desert Storm kraft cardstock and heat-emboss it with WOW! Bright White Super Fine embossing powder - add a strip of patterned paper underneath
  • create a cloud background with the help of the My Favorite Things Mini Cloud Edges stencil, Distress Oxide Ink Tumbled Glass and a Blending Brush
  • cut out a grass border with one of the dies from the Elizabeth Craft Designs Tree set from green cardstock - add shading with Distress Oxide Ink Mowed Lawn and a Blending Brush


I hope you got inspired.

Hugs,


Tuesday, March 26, 2019

Happy Easter Painting Bunny

Hi there,

I created this Easter Card using images from the brand new Gerda Steiner Designs Easter Bunnies Digital Stamp Bundle:

  • color the images from the Gerda Steiner Designs Easter Bunnies Digital Stamp Bundle with Zig Clean Color Real Brush Markers and a damp watercolor brush
  • cut out a stitched scalloped square around the image
  • create a colorful background using patterned paper from the Doodlebug Design Easter Express 6x6 patterned paper
  • stamp the sentiment with Versamark onto a wavy banner and heat-emboss it with WOW! Bright White Super Fine embossing powder


Thanks for stopping by.

Hugs,


Tuesday, March 19, 2019

Easter Blessings

Hi there,

this week I used the adorable Gerda Steiner Designs Bunnies with an Easter Egg to create this card:

  • color the Gerda Steiner Designs Bunnies with an Easter Egg with ZIG Clean Color Real Brush Pens and a damp watercolor brush
  • add highlights with a white gel pen and the dots onto the egg with Nuvo Crystal Drops Gloss White
  • cut out one of the My Favorite Things Stitched Mini Scallop Square STAX around the image
  • create a background on a stitched panel of Neenah Desert Storm kraft cardstock using the carrot from the Clearly Besotted Stamps Garden Fresh set and Versafine Vintage Sepia
  • mount the panels onto a piece of patterned paper from the Doodlebug Design Easter Express 6x6 paper pad before adhering all the layers to a white cardbase
  • stamp the sentiment from the Clearly Besotted Many Mini Messages set with Versamark and heat-emboss it with WOW! Bright White Super Fine embossing powder


I hope you got inspired.

Hugs.


Sunday, March 10, 2019

Stamp Connection #47

Hi there,

connected through our love for card making, blogging and being from Germany we (Cornelia from Stempel Spass and I) decided to create a monthly project within predefined requirements. We are going to show you the result every 2nd Sunday of the month and this is our 47th transatlantic get-together!

Our requirement for this meet-up was:
"Easter with Embossing Folder and Die Cuts"

  • stamp the bunny, the sheep, an egg and some flowers from the Clearly Besotted Stamps Spring Plushies set with Ink on 3 Fadeout Ink - use the masking technique
  • color the images with Derwent Inktense pencils and a damp watercolor brush
  • frame the image with an Avery Elle Wonky Scalloped Frame cut from patterned paper from the Doodlebug Design Easter Express 6x6 paper pad
  • create a background on smooth white cardstock with a plaid embossing folder
  • stamp the sentiment from the same set with Versamark onto a sentiment strip cut from orange cardstock and heat-emboss it with WOW! Bright White Super Fine embossing powder
  • adhere the panel to an orange cardbase


Now make sure to hop over to see Cornelia's Creation.

Thanks for stopping by. We hope to see you again at the ...


Hugs,


Tuesday, January 8, 2019

What's on the Table?

Hi there,

I created this adorable Birthday Card using images from the Gerda Steiner Designs What's on the Table? digital stamp set:

  • create a scene using images from the Gerda Steiner Designs What's on the Table? digital stamp set
  • color the images with Derwent Inktense pencils and a damp watercolor brush
  • add highlights with a white gel pen
  • stamp the sentiment from the Gerda Steiner Designs Happy Hoppy set with Versafine Onyx Black
  • cut a decorative edge at the top
  • layer a piece of patterned paper from the Doodlebug Design Fairy Tales 6x6 paper pad behind the panel before adhering it to the cardbase
  • add Nuvo Glitter Drops White Blizzard to the icing on the cupcakes for extra sparkle and dimension


I hope you got inspired.

Hugs,


Friday, December 21, 2018

Weihnachtsgrüße - Christmas Wishes

Hi there,

I created this Christmas Reveal Wheel Card for the Karten-Kunst Blog:

  • stamp the Karten-Kunst Braver Schneemann with Memento Tuxedo Black onto smooth white cardstock
  • color the image with Delta, Touch Twin Brush and Copic Markers
  • add highlights with a white gel pen
  • create a Reveal Wheel using dies from the Lawn Fawn Reveal Wheel set and a small circle die
  • stamp little toys from the Lawn Fawn Holiday Helpers set onto the Reveal Wheel and color them with Alcohol Markers as well
  • stamp the sentiment from the Karten-Kunst Viecher im Winter with Versafine Onyx Black onto a sentiment strip and add a little green strip underneath
  • cover a cardbase with patterned paper from the Doodlebug Design Frosty Friends 6x6 paper pad before adhering the Reveal Wheel


Have a christmasy day.

Hugs,


Sunday, July 8, 2018

Stamp Connection #39

Hi there,

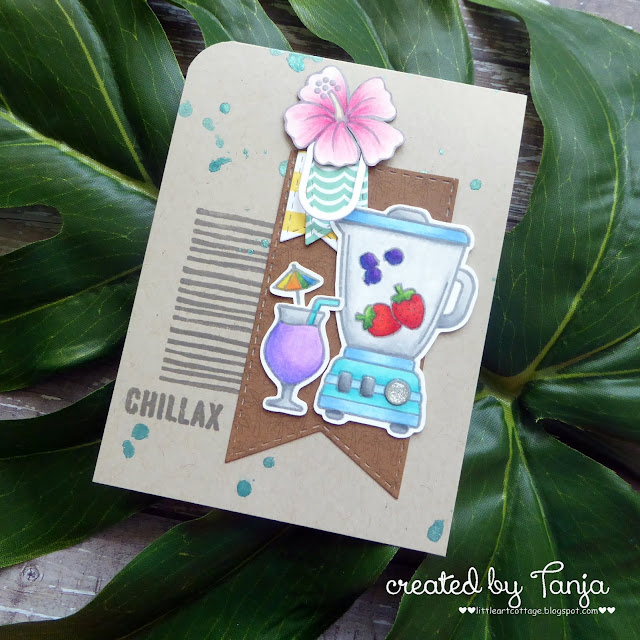
connected through our love for card making, blogging and being from Germany we (Cornelia from Stempel Spass and I) decided to create a monthly project within predefined requirements. We are going to show you the result every 2nd Sunday of the month and this is our 39th transatlantic get-together!

Our requirement for this meet-up was:
"Paper Clip"


  • stamp the blender and the cocktail glass from the Lawn Fawn So Smooth set and the hibiscus flower from the Paper Smooches Get outta Town set with Versafine Clair Morning Mist and color the images with Prismacolor Colored Pencils
  • add some shimmer and texture with Wink of Stella Clear Glitter, Nuvo Crystal Glaze and an enamel dot from the Doodlebug Design Sprinkles Silver Assortment
  • create a background on a Neenah Desert Storm cardbase with splatters of Heidi Swapp Color Shine Teal and stripes from the Flora & Fauna Texture Three set
  • cut out little fishtail banners from patterned paper from the Doodlebug Design Sweet Summer 6x6 paper pad
  • create a paper clip using a die from the My Favorite Things Hip Clips die set and add it to the upper left corner of the background banner to hold the little banners in place
  • stamp the sentiment from the STAMPlorations Beach Vibes set
  • round the top left corner with a 1'' corner rounder


Now make sure to hop over to see Cornelia's Creation.

Thanks for stopping by. We hope to see you again at the ...


Hugs,