Showing posts with label Heidi Swapp. Show all posts

Monday, July 20, 2020

Lass alle deine Wünsche wahr werden

Hi there,

I created this kraft-colored card using the new Karten-Kunst Riesige Beste Wünsche stamp set:

  • stamp a background using the Karten-Kunst Scribble Leaves with Versafine Clair Fallen Leaves
  • stamp the Karten-Kunst Wünsche from the Riesige Beste Wünsche set with Versamark and heat-emboss it with WOW! Metallic Gold Rich Pale embossing powder and stamp over it slightly offset with Versafine Clair Fallen Leaves for a drop-shadow effect
  • ink up the edges of the kraft panel with Distress Oxide Ink Ground Espresso
  • stamp the first and third part of the sentiment with Versamark onto a strip of brown cardstock and heat-emboss them with WOW! Bright White Super Fine embossing powder
  • add a strip of golden glitter paper to the top and bottom of the panel before adhering it to a cardbase
  • add some splatters with Heidi Swapp Color Shine Gold spray


Thanks for stopping by.

Hugs,


Monday, June 15, 2020

Beach. Sleep. Margaritas. Repeat.

Hi there,

this is just a quick reminder of this month's Stencil Challenge over on the STAMPlorations Blog:

  • cut out one of the CUTplorations Manila Tags from watercolor paper
  • apply Deco Foil Transfer Gel through the ARTplorations Bold Florals mini stencil and let this dry until it's completely clear - I left it over night
  • run the tag through the Mini Minc covered with Heidi Swapp Teal Silver Ombre Foil
  • add some color with watered-down Dina Wakley Scribble Stcks
  • grunge up the edges with Art Graf Watercolor Graphite
  • stamp the pineapple from the STAMPlorations Beach Vibes set with Versamark onto a piece of torn vellum and heat-emboss it with Ranger Sage embossing powder
  • stamp the sentiment from the same set with Archival Ink Watering Can and heat-emboss it with clear embossing powder
  • color the pineapple from the back with Delta, Touch Twin Brush and Copic Markers
  • wrap the vellum strip around the tag
  • add some brown splatters as a finishing touch
  • dye a piece of seam binding with color from the brown scribble stick and thread it through the hole of the tag


Make sure to link up your creations to the Challenge Gallery.

Hugs,


Sunday, March 1, 2020

All the Love

Hi there,

it is time for another Stencil Challenge over on the STAMPlorations Blog:

  • start on a rectangular panel cut from watercolor paper
  • apply Prima Marketing Heavy Gesso through the ARTplorations Flowers 2 stencil
  • add color with watered-down Dina Wakley Heavy Body acrylic Paints (Heather, Mineral, Carnation)
  • grunge up the edges with Art Graf Watercolor Graphite
  • add some more texture by stamping the script from the STAMPlorations Mixed Media Elements with Archival Ink Watering Can
  • dye a piece of cheesecloth with Distress Ink Spun Sugar and Heidi Swapp Color Shine Spray Tinsel
  • stamp the STAMPlorations Typografia Romantique All the Love with three different colors of Altenew Crisp Ink (Pink Diamond, Industrial Diamond, Lavender Fields) to match the background
  • adhere the sentiment panel with double-sided foam adhesive


You must use at least one stencil (any brand) in your project. The Linky closes at the end of the month.

Have fun creating.

Hugs,


Monday, December 16, 2019

Things with Wings - Live what you love

Hi there,

this is my second Things with with Wings Special Feature Project Post for STAMPlorations:

  • apply Distress Oxide Ink (black Soot) through the ARTplorations Pensive stencil
  • add rosy cheeks with a PITT Pastel Pencil
  • stamp the sentiment from the STAMPlorations Trendy Butterflies 2 set with Versafine Clair Nocturne
  • stamp one of the butterflies from the same set with Versamark onto a piece of vellum and heat-emboss it with Ranger Wild Plum embossing powder
  • add a dot pattern from the STAMPlorations Mixed Media Grunge set with Altenew Crisp Ink Razzleberry

  • create a background on a CUTplorations Luggage Tag with the help of Distress Oxide Inks (Tattered Rose, Spun Sugar, Shaded Lilac)
  • stamp the sentiment from the STAMPlorations It's a Girl Thing: Sunshine with Versafine Clair Morning Mist
  • stamp some butterflies from the STAMPlorations Winged Things set with that same grey ink and heat-emboss them with WOW! Midas Touch embossing powder
  • add splatters with the Heidi Swapp Color Shine Spray Tinsel
  • thread two strands of twine through the hole of the tag

Have a wonderful day.

Hugs,


Sunday, July 8, 2018

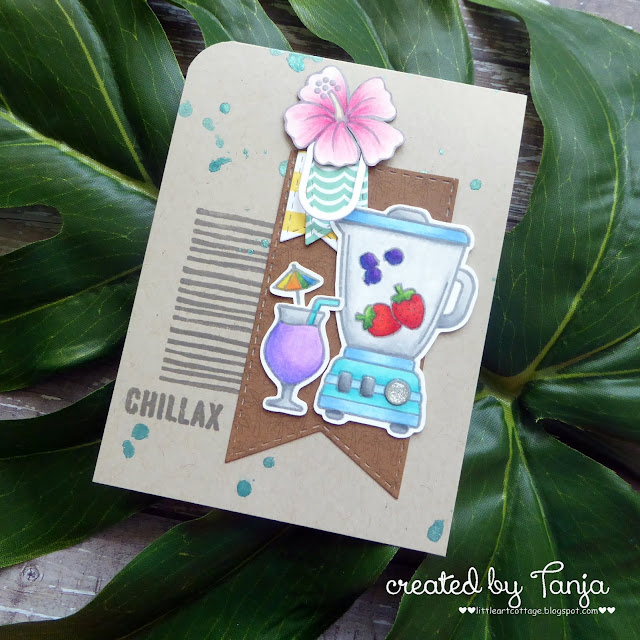
Stamp Connection #39

Hi there,

connected through our love for card making, blogging and being from Germany we (Cornelia from Stempel Spass and I) decided to create a monthly project within predefined requirements. We are going to show you the result every 2nd Sunday of the month and this is our 39th transatlantic get-together!

Our requirement for this meet-up was:
"Paper Clip"


  • stamp the blender and the cocktail glass from the Lawn Fawn So Smooth set and the hibiscus flower from the Paper Smooches Get outta Town set with Versafine Clair Morning Mist and color the images with Prismacolor Colored Pencils
  • add some shimmer and texture with Wink of Stella Clear Glitter, Nuvo Crystal Glaze and an enamel dot from the Doodlebug Design Sprinkles Silver Assortment
  • create a background on a Neenah Desert Storm cardbase with splatters of Heidi Swapp Color Shine Teal and stripes from the Flora & Fauna Texture Three set
  • cut out little fishtail banners from patterned paper from the Doodlebug Design Sweet Summer 6x6 paper pad
  • create a paper clip using a die from the My Favorite Things Hip Clips die set and add it to the upper left corner of the background banner to hold the little banners in place
  • stamp the sentiment from the STAMPlorations Beach Vibes set
  • round the top left corner with a 1'' corner rounder


Now make sure to hop over to see Cornelia's Creation.

Thanks for stopping by. We hope to see you again at the ...


Hugs,


Thursday, June 14, 2018

Be a little Shellfish

Hi there,

I created this sweet Birthday Card for the Stamping-Fairies Facebook Group:

  • create a background on Yupo using Alcohol Inks (Cool Peri, Pink Sherbet, Aqua) and cut out a panel with the help of one of the dies from the Clearly Besotted Small Frames die set
  • stamp the sweet little shell from the Lawn Fawn Year Six set and color it with Schmincke Horadam and Daniel Smith watercolors
  • adhere the shell to the Alcohol Ink panel and the panel to a piece of white cardstock with a shaped edge cut using one of the My Favorite Things Stitched Scallop Basic Edges 2
  • stamp the sentiment from the same Lawn Fawn set with Versafine Onyx Black
  • create a background with the help of a printed pattern, the Mini Minc and Heidi Swapp Reactive Foil in light pink
  • add two strips of cardstock colored with that same Aqua Alcohol Ink to the left and right of the main panel and adhere all the layers to a white cardbase

I hope you got inspired.

Hugs,


Thursday, May 31, 2018

Elephant Tag

Hi there,

today, I would like to show you this cute little elephant tag as inspiration for this month's Happy Little Stampers Watercolor Challenge:


  • cut out a base from watercolor paper, a frame from patterned paper from the Heidi Swapp Dreamy 6x6 paper pad, a foam layer and a shaker window from acetate using dies from the My Favorite Things Tag Builder Blueprints 4 set
  • stamp an image with the help of the Lawn Fawn Elphie Selfie set and Versafine (Onyx Black) - I used the masking technique
  • color the animals and the umbrella with Daniel Smith and Schmincke Horadam watercolors
  • add color and texture to the background with Distress Oxide Ink (Broken China) and water droplets from a mister bottle
  • fill the shaker element with Pretty Pink Posh Sequins (4 mm Sparkling Clear, 4 mm Cornflower, 4 mm Aquamarine)
  • thread a piece of ribbon through the hole of the tag

I hope you got inspired.

Yours,


Tuesday, January 16, 2018

Magical Winter

Hi there,

just a quick reminder of this month's TAGplorations Challenge - the Topic is All about Winter and the Optional Twist is Texture Paste:

  • cut out a CUTplorations Luggage Tag from watercolor paper
  • apply Texture Paste though the ARTplorations All my Stars! Mini stencil
  • stamp some newsprint from the STAMPlorations Mixed Media Grunge set onto the raised areas with Archival Ink (Black Soot)
  • add color with Lindy's Stamp Gang Starburst (Tibetian Poppy Teal) and Heidi Swapp Color Shine (Tinsel)
  • ink up the edges of the Tag with Distress Ink (Black Soot) and add Prima Metallique Wax (Brushed Iron) to the raised areas
  • cut out the CUTplorations Magical die directly from the tag and an additional three times from grey cardstock
  • layer a black tag behind the colored one and puzzle all the layer back into the opening for a raised look
  • stamp the second part of the sentiment from the STAMPlorations Joyful set with Versamark onto a strip of black cardstock and heat-emboss it with WOW! Metallic Silver embossing powder
  • dye a piece of seam binding with some leftover spray and thread it through the hole of the tag

Have a wonderful day.

Yours,


Tuesday, July 4, 2017

Warm Hugs Penguin

Hi there,

from this month on I have the great joy to join the Happy Little Stampers Christmas Challenge Design Team. This month the optional twist is "Die Cuts":


  • stamp the adorable little penguin from the WPlus9 Winter Pals set with Versafine (Onyx Black) and color the image with Faber-Castell Polychromos pencils
  • color a piece of smooth white cardstock with Distress Inks (Tumbled Glass, Broken China) and a Mini Ink Blending Tool and die cut one of the Lawn Fawn Stitched Snowflakes
  • cut the sentiment strip from that same colored paper with the help of one of the My Favorite Things Stitched Sentiment Strips
  • stamp the sentiment from the Clearly Besotted Stamps Arctic Animals set with Hero Arts Shadow Ink (Pool)
  • mist the stitched watercolor panel with Heidi Swapp Minc Reactive Mist and let it dry thoroughly
  • once it's dry run the panel through the Mini Minc together with DecoFoil (Silver Star)
  • ink up the edges of the panel with Distress Ink (Broken China)
  • ink up the edges of the cardbase with Distress Ink (Faded Jeans) before adhering the panel

I can't wait to see your creations in the gallery.

Yours,


Thursday, May 25, 2017

Kindness ATC

Hi there,

I created another ATC for the Stamping-Fairies Blog:

  • in one of my previous posts I explained how I created the background for several ATCs
  • choose one of them and add some droplets of Alcohol Ink (Patina, Slate)
  • stamp the butterflies/moths from the Stampers Anonymous Papillon set with Archival Ink (Black Soot)
  • color the edges with Distress Crayon Peacock Feathers
  • use white gouache to add some splatters and let some run down the right side of the ATC
  • add some Heidi Swapp Teal Silver Ombre Foil with the help of the Collage Glue Stick
  • create the sentiment using the Dymo Label Maker

Thanks for stopping by.

Yours,


Thursday, March 16, 2017

Hawaiian Tag

Hi there,

inspired by the movie Vaiana I created this tag over on the Stamping-Fairies Blog:

  • cut out one of the My Favorite Things Stitched Traditional Tag STAX from watercolor paper
  • stamp the pineapple from the My Favorite Things Polynesian Paradise set with Versafine (Vintage Sepia) and color the image with Brushos (Light Brown, Lemon, Olive Green), water from the Mini Mister and a watercolor brush
  • cut out a sandy hill using patterned paper from the Kaisercraft Island Escape paper pad and the My Favorite Things Stitched Snow Drifts
  • stamp the little turtle from the same stamp set with Versafine (Vintage Sepia) and color it with Brushos (Light Brown, Olive Green) as well
  • cut out a flower using patterned paper from the Maja Design Vintage Spring and Maja Design Vintage Summer Basics 6x6 paper pad with the help of the Sizzix Tim Holtz Tropical die set
  • add foil to the leaves with the help of the Ranger Collage Glue Stick and Heidi Swapp Teal to Silver Ombre foil
  • ink up the edges of the flower with Distress Ink (Victorian Velvet) and the edges of the leaf with Distress Ink (Peacock Feathers) 
  • cut a sentiment strip with the My Favorite Things Stitched Sentiment set from the Kaisercraft Island Escape paper pad and stamp the sentiment with Versamark and heat-emboss it with WOW! Verdigris embossing powder
  • punch a little hole at the top of the tag and thread teal and natural twine through it

Have a fabulous day.

Yours,


Sunday, November 20, 2016

Stamp Connection #19

Hi there,

connected through our love for card making, blogging and being from Germany we (Cornelia from Stempel Spass and I) decided to create a monthly project within predefined requirements. We are going to show you the result every 3rd Sunday of the month and this is our 19th transatlantic get-together!

Our requirement for this meet-up was:
"foiling"

  • stamp one of the adorable Mama Elephant Page Huggers onto a piece of white cardstock with Memento (Tuxedo Black) and color the image with Delta and Touch Twin Brush Markers
  • add Glossy Accents to the glasses and set the bear aside to dry
  • cut out a bookmark from white cardstock using one of the Avery Elle Bookmark dies and spritz it with Heidi Swapp Minc Reactive Mist - this should also dry thoroughly
  • cover the bookmark with Heidi Swapp Minc Foil (Teal Silver Ombre) and run it through the Mini Minc with a heat setting of 3
  • ink up the white space of the bookmark with Distress Ink (Chipped Sapphire) and dye a piece of seam binding with that same blue ink
  • stamp the sentiment from the My Favorite Things Birthday Bears stamp set with Versamark onto a strip of vellum and heat-emboss it with WOW! Silver Bells embossing powder
  • wrap the vellum strip around the bookmark and use a piece of washi tape to secure it in the back
  • cut out another bookmark from kraft cardstock and use it to cover the backside 
  • adhere the little bear using foam tape
  • thread the seam binding through the hole of the tag

Now make sure to hop over to see Cornelia's Creation.

Thanks for stopping by. We hope to see you again at the ...


Yours,


Monday, November 14, 2016

Nikolaustag

Hi there,

I would like to share a Pop-up Christmas Card with you over at the Karten-Kunst Blog:

  • stamp the bunny, the cap and the little present from the Memory Box Holiday Bunnies set and the big present, the bag and the tree from the Poppy Stamps Christmas Delights set with Memento (Tuxedo Black)
  • color the images with Delta and Touch Twin Brush Markers
  • cut the Memory Box Country Landscape from grey cardstock - color the cardbase behind the windows with an Alcohol Marker
  • ink up the edges of the top of the card with Distress Ink (Tumbled Glass)
  • stamp some stars from the Memory Box Holiday Bunnies with Delicata (Golden Glitz)
  • prepare a pop-up panel from white cardstock - I used three of the Lawn Fawn Everyday Pop-ups and the My Favourite Things Stitched Snow Drifts to give a finished look to the edges
  • adhere the images to the pop-ups with liquid glue - this will give you a little wiggle room

And this is how the card looks from the outside:

  • cut a piece of patterned paper from the Maja Design Vintage Winter 6x6 paper pad into shape with one of the My Favourite Things Stitched Basic Edges
  • ink up the edges of the patterened paper piece and the cardbase with Distress Ink (Antique Linen)
  • stamp the sentiment from the Karten-Kunst Capri Weihanchtspost set with Versafine (Vintage Sepia)
  • add some splatters with Heidi Swapp Color Shine (Gold)

I hope you got inspired.

Yours,


Wednesday, November 9, 2016

Hello Flower Tag

Hi there,

I have a new project on the Stamping-Fairies Blog for you today. I played with some new Alcohol Ink Colors and Compressed Air:

  • cut a tag from Yupo and use some Alcohol Inks (Juniper, Flamingo, Limeade, Willow) and Compressed Air to create a loose flower background
  • draw in some outlines and a sketched frame around the tag using a black Fude Ball Pen
  • add dots to the center of the flowers with that same black pen and a golden gel pen
  • cut the "Hello" from the My Favorite Things Hellothere die set once from pink cardstock and once from black cardstock
  • foil the bottom part of the sentiment with the help of the DecoFoil Adhesive Pen and Heidi Swapp Minc Reactive Foil (Pink Gold Ombre)
  • glue the black sentiment slightly offset on top of the pink sentiment
  • thread a piece of matching Sari Silk Ribbon through the hole of the tag

Here is a close-up of the foiled sentiment:


Thanks for stopping by.

Yours,


Tuesday, September 20, 2016

Do I smell Cake?

Hi there,

I would like to show you this sweet creation using the brand new Gerda Steiner Designs Fall Mice stamp set:

  • color the cake and the little mouse from the Gerda Steiner Designs Fall Mice stamp set with Lyra Rembrandt Polycolor Pencils and Zest-it
  • add highlights and some details with a white gel pen and Wink of Stella Silver Glitter
  • cut out the Clearly Besotted Stamps Window from Neenah Desert Storm Kraft cardstock and ink it up with Distress Ink (Gathered Twigs)
  • stamp the Hero Arts Designer Woodgrain with the same ink onto the frame
  • cut out a stitched panel from the same kraft cardstock and add splatters with Heidi Swapp Color Shine (Gold)
  • stamp the sentiment from the Gerda Steiner Designs Monster stamp set with Versamark and heat-emboss it with WOW! Bright White Super Fine embossing powder
  • adhere the panel onto a dark kraft cardbase

City Crafter Challenge #330 - Pencil me in

Creative Friday Challenge #162 - Clean and Simple

Task for Two Tuesday Challenge #60 - Alles neu

Addicted to CAS Challenge #97 - Stitched


Simon Says Stamp Wednesday Challenge - Simon says Clean and Simple

I hope to see you again soon.

Yours,