Thursday, April 30, 2020

Throwback Thursday - Frangipanis

Hi there,

this is my first Throwback Thursday Special Feature for the STAMPlorations Blog.
My inspiration for my projects was this flower tag that I created for STAMPlorations 5th Birthday in June 2018.


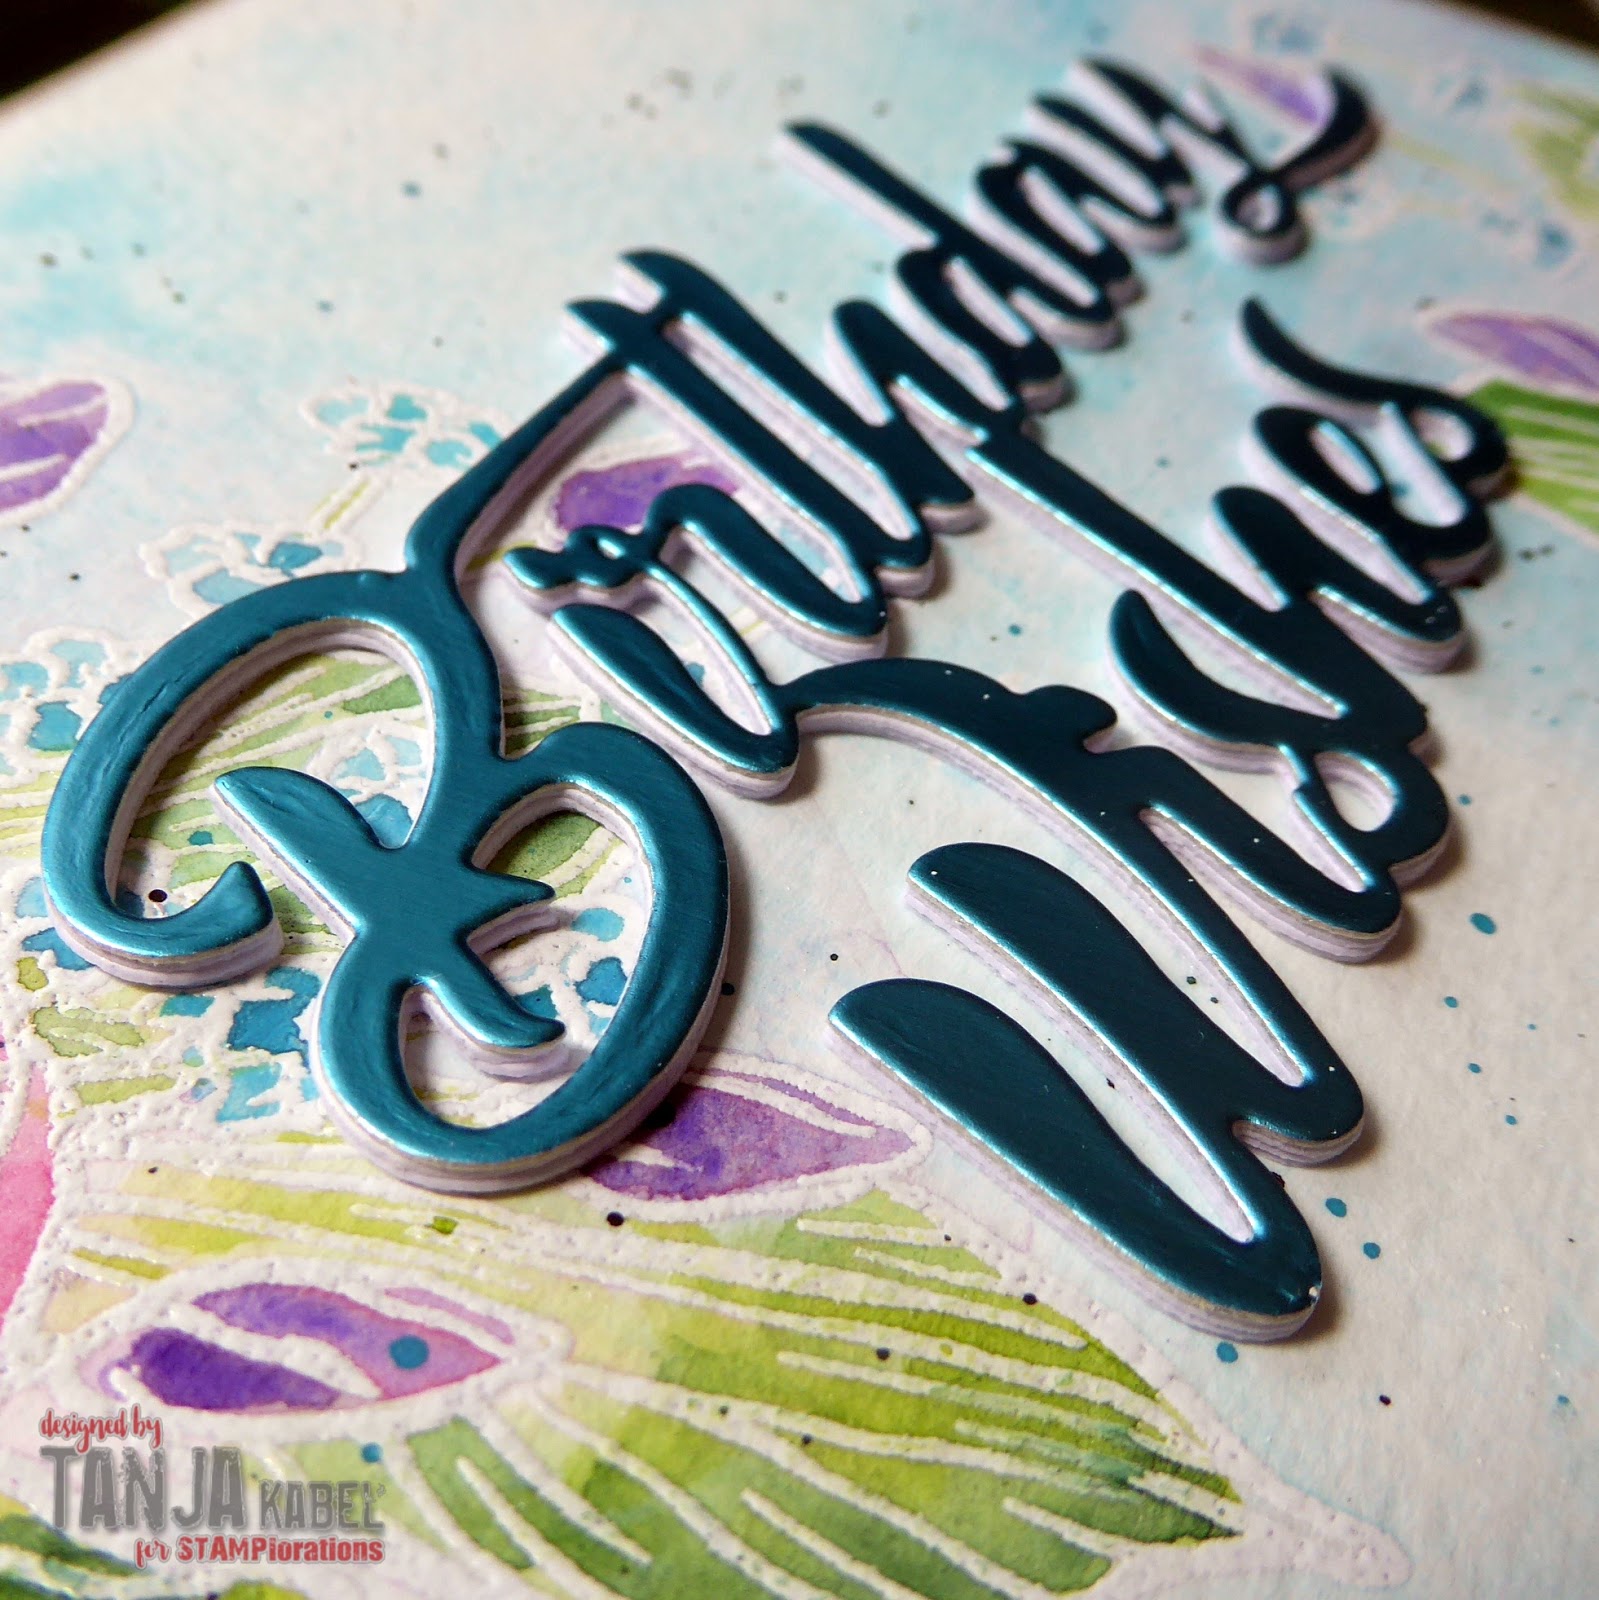
I used the beautiful STAMPlorations Fancy Frangipanis on this one and I will use that same stamp set throughout this special feature and try different coloring techniques to achieve quite different looks.

  • stamp the STAMPlorations Fancy Frangipanis twice with Versamark and heat-emboss them with WOW! Bright White Super Fine embossing powder
  • color the image with Schmincke Horadam and Daniel Smith watercolors and add some splatters
  • die cut the CUTplorations Birthday Wishes three times from white cardstock and once from turquoise foiled cardstock for the top layer
  • adhere the finished panel to a Neenah Desert Storm kraft cardbase


  • cut out the medium-sized CUTplorations Luggage Tag from grey cardstock
  • stamp the STAMPlorations Fancy Frangipanis with Versamark and heat-emboss them with WOW! Metallic Silver Super Fine embossing powder
  • color the image with Faber-Castell Polychromos pencils
  • add some splatters with Finetec Silver Pearl watercolor
  • the sticker is from the STAMPlorations Hey Sunshine sticker set
  • thread a piece of grey twine through the hole of the tag


  • stamp the STAMPlorations Fancy Frangipanis with My Favorite Things Extreme Black 
  • color the image with Delta, Touch Twin Brush and Copic Markers and add extra shading with Faber-Castell Polychromos pencils
  • add some splatters with watered-down black acrylic paint
  • cut out the CUTplorations Smile directly from the colored panel and keep this die cut for the top layer including the inner pieces - cut three more sentiments from white cardstock and layer them all on top of each other
  • puzzle the card back together and adhere it to a cardbase


I hope you got inspired.

Hugs,


Miss you Monkey

Hi there,

you can read the step-by-step tutorial for this shaker card over on the Elizabeth Craft Designs Blog:


I hope you will get inspired to create your own controlled shaker card.

Hugs,


Pucker up

Hi there,

I created this fun Mermaid Card for the Stamping-Fairies Blog:


I hope you got inspired.

Hugs,


Monday, April 27, 2020

Easter Mail Tags

Hi there,

here is another project featuring new Karten-Kunst Dies. I created these tags with my son Finn (12) and he had the fabulous idea to use the die cut normally used as the bunny's belly to cut out some eggs:

  • die cut all the elements of the Karten-Kunst Mini Rabbit from white cardstock
  • cut additional belly pieces for the eggs and a little flower from the Karten-Kunst Small Flower Wreath die set
  • cut out two Karten-Kunst Tags from patterned paper and a grass border
  • ink up the edges with blue and green ink
  • color the die cuts with Spectrum Noir Triblend Markers
  • for the brown rabbit I used the Muted Brown Blend and for the grey bunny my son used the Brown Grey Blend; the nose and eyes are colored with Ice Grey Shade and the pink ears with the Pale Pink Blend
  • the eggs are colored with the Magenta Blend, the True Blue Blend and the Gold Yellow Blend and the flower is colored with the Magenta Blend and the Gold Yellow Blend
  • add highlights with a white gel pen
  • stamp the sentiment from the Karten-Kunst Capri Frühlingserwachen with Versafine Clair Warm Breeze - the darker impression is first and the lighter impression second generation stamping
  • thread some yellow and natural twine through the holes of the tags

I hope you got inspired.

Hugs,


Sunday, April 26, 2020

Birthday Wishes from all of us

Hi there,

I created this sweet Birthday Card using the Waffle Flower Hello stamp set:

  • stamp one of the girls, one of the boys and the cat from the Waffle Flower Hello set with Versafine Clair Morning Mist
  • color the images with Prismacolor Colored Pencils
  • stamp the sentiment from the Avery Elle Critter Crew set with Altenew Crisp Ink (Pink Diamond and Pinkalicious) and Versafine Clair Morning Mist
  • add a piece of patterned paper from the Avery Elle The Everyday Collection 6x6 paper pad behind the panel before adhering it to a cardbase

Thanks for stopping by.

Hugs,

Friday, April 24, 2020

Timeless Beauty

Hi there,

I created this Mixed Media Card for Elizabeth Craft Designs:

  • create a background on a piece of Yupo Paper using Alcohol Inks (Mushroom, Laguna) and the Alcohol Ink Alloy Gilded
  • cut out one of the branches from the Elizabeth Craft Designs Blooming Branches die set from black cardstock
  • cover the little hearts and berries with a layer of Midas Touch Nuvo Shimmer and cover it with Elizabeth Craft Designs transparent Craft Drops
  • the sentiment is from the Tim Holtz Big Chat sticker set
  • add a strip of black cardstock and of black glitter paper to the left side of the panel before adhering it to a cardbase


Thanks for stopping by today.

Hugs,


Tuesday, April 21, 2020

Rusty Artist Trading Card Duo

Hi there,

I wrote a step by step tutorial for this Rusty Artist Trading Card Duo over on the Elizabeth Craft Designs Blog:


I hope you got inspired.

Hugs,


Monday, April 20, 2020

Things with Wings - Forever Grateful

Hi there,

this is my fourth Things with Wings Special Feature Project Post for STAMPlorations:

  • stamp one of the butterflies from the STAMPlorations Grateful Flutters set with Lawn Fawn River Rock onto a piece of Strathmore toned grey cardstock
  • color the image with Delta, Touch Twin Brush and Copic Markers and add extra shading with Faber -Castell Polychromos pencils
  • stamp the sentiment from the same set with that same grey ink
  • stamp the dot pattern from the STAMPlorations Mixed Media Grunge set with Versamark and heat-emboss it with WOW! Midas Touch embossing powder
  • add shading around the edges of the panel with Distress Oxide Ink Pumice Stone
  • add two strips of foiled cardstock to the left and the right of the panel before adhering it to a cardbase

  • create a background on an old gel print using white gesso, tissue paper, gel medium and  Alcohol Ink (Mushroom, Gunmetal)
  • apply Grit Paste through the ARTplorations Make Marks 5 stencil and let this dry thoroughly
  • cut out the birds from the For the Birds die set from woodgrain paper and shade the edges with Distress Ink Ground Espresso
  • dye a piece of cheesecloth with Distress Oxide Spray Spun Sugar 
  • add some splatters with Distress Spray Stain Tarnished Brass
  • use a sticker from the STAMPlorations Hey, Sunshine set as the sentiment

I hope you got inspired.

Hugs,


Sunday, April 19, 2020

You make me hoppy

Hi there,

I created this cute scene using the Clearly Besotted Stamps Jump for Joy stamp set:


  • stamp the frog couple from the Clearly Besotted Stamps Jump for Joy set with Memento Tuxedo Black
  • color the image with Faber-Castell Polychromos Pencils
  • create a background with the help of Alcohol Inks (Limeade, Botanical, Cloudy Blue) on Gloss Paper and cut it out with one of the My Favorite Things Wonky Stitched Squares
  • cut out a stitched panel from kraft cardstock using one of the Elizabeth Craft Designs Stitched Rectangles
  • create a background using the tiny heart from the same stamp set and Altenew Crisp Ink Rubelite
  • stamp the sentiment from the same set with Versamark and heat-emboss it with WOW! Bright White Super Fine embossing powder
  • add a strip of pink glitter paper to the left and to the right of the kraft panel before adhering it to a cardbase

Have a lovely day.

Hugs,


Friday, April 17, 2020

I am here for you

Hi there,

I created this Encouragement Card for Elizabeth Craft Designs:

  • stamp the leaf cluster from the beautiful Elizabeth Craft Designs First Sights of Spring set with Lawn Fawn Crunchy Leaf and color the images with Spectrum Noir Triblend Markers and colored pencils
  • add some splatters with Finetec Mica Watercolor Inca Gold
  • stamp the sentiment from the Elizabeth Craft Designs Build your own Sentiment 1 set with Versamark onto a strip of kraft cardstock and heat-emboss it with WOW! Bright White Super Fine embossing powder
  • add a strip of kraft cardstock and striped patterned paper to the left side of the panel before adhering it to a cardbase


Have a wonderful day.

Hugs,


Thursday, April 16, 2020

Under my Umbrella

Hi there,

you can find the step by step tutorial for this April Card over on the Stamping-Fairies Blog:


Thanks for stopping by.

Hugs,


Wednesday, April 15, 2020

Grateful Heart

Hi there,

this is just a quick reminder of this month's Stencil Challenge over on the STAMPlorations Blog:

  • apply Distress Oxide Ink Black Soot through the ARTplorations Faces: Grace stencil - just the mouth is stenciled in with Distress Oxide Ink Picked Raspberry
  • add some color to the cheeks and the eyes with PITT Pastel pencils
  • stamp some butterflies and the sentiment from the STAMPlorations Grateful Flutters set with Versafine Clair Nocturne
  • add some splatters with the help of the Hero Arts Ink Dauber Neon Pink
  • stamp the dot pattern from the STAMPlorations Mixed Media Grunge set with blue ink around the edges
  • add a strip of striped patterned paper at the top and bottom of the panel before adhering it to a cardbase


Have a wonderful day.

Hugs,


Thursday, April 9, 2020

Happy Easter Bunny

Hi there,

today I have another Easter Card for you over on the Stamping-Fairies Blog:


Have a wonderful Easter Time.

Hugs,


Tuesday, April 7, 2020

Easter Scene Pop-up Box Card

Hi there,

with Easter being right around the corner I created this sweet Pop-up Box Card using the wonderful Gerda Steiner Designs Chicks and Bunnies set:

  • stamp the bunny, the basket and some chicks from the Gerda Steiner Designs Chicks and Bunnies set with Lawn Fawn Crunchy Leaf 
  • color the images with Spectrum Noir Triblend Markers
  • cut out the Lawn Fawn Scalloped Box Card Pop-up
  • adhere the colored elements to the box
  • add some clouds and some butterflies from the Lawn Fawn Butterfly Kisses set
  • the wavy sentiment banner with the white heat-embossed sentiment finishes the card

Have a hoppy day.

Hugs,