Wednesday, June 27, 2018

Winter Tags

Hi there,

I created these two tags using the adorable Avery Elle Winter Woodland Wonders stamp set as inspiration for the Addicted to Stamps and More Holiday Challenge:

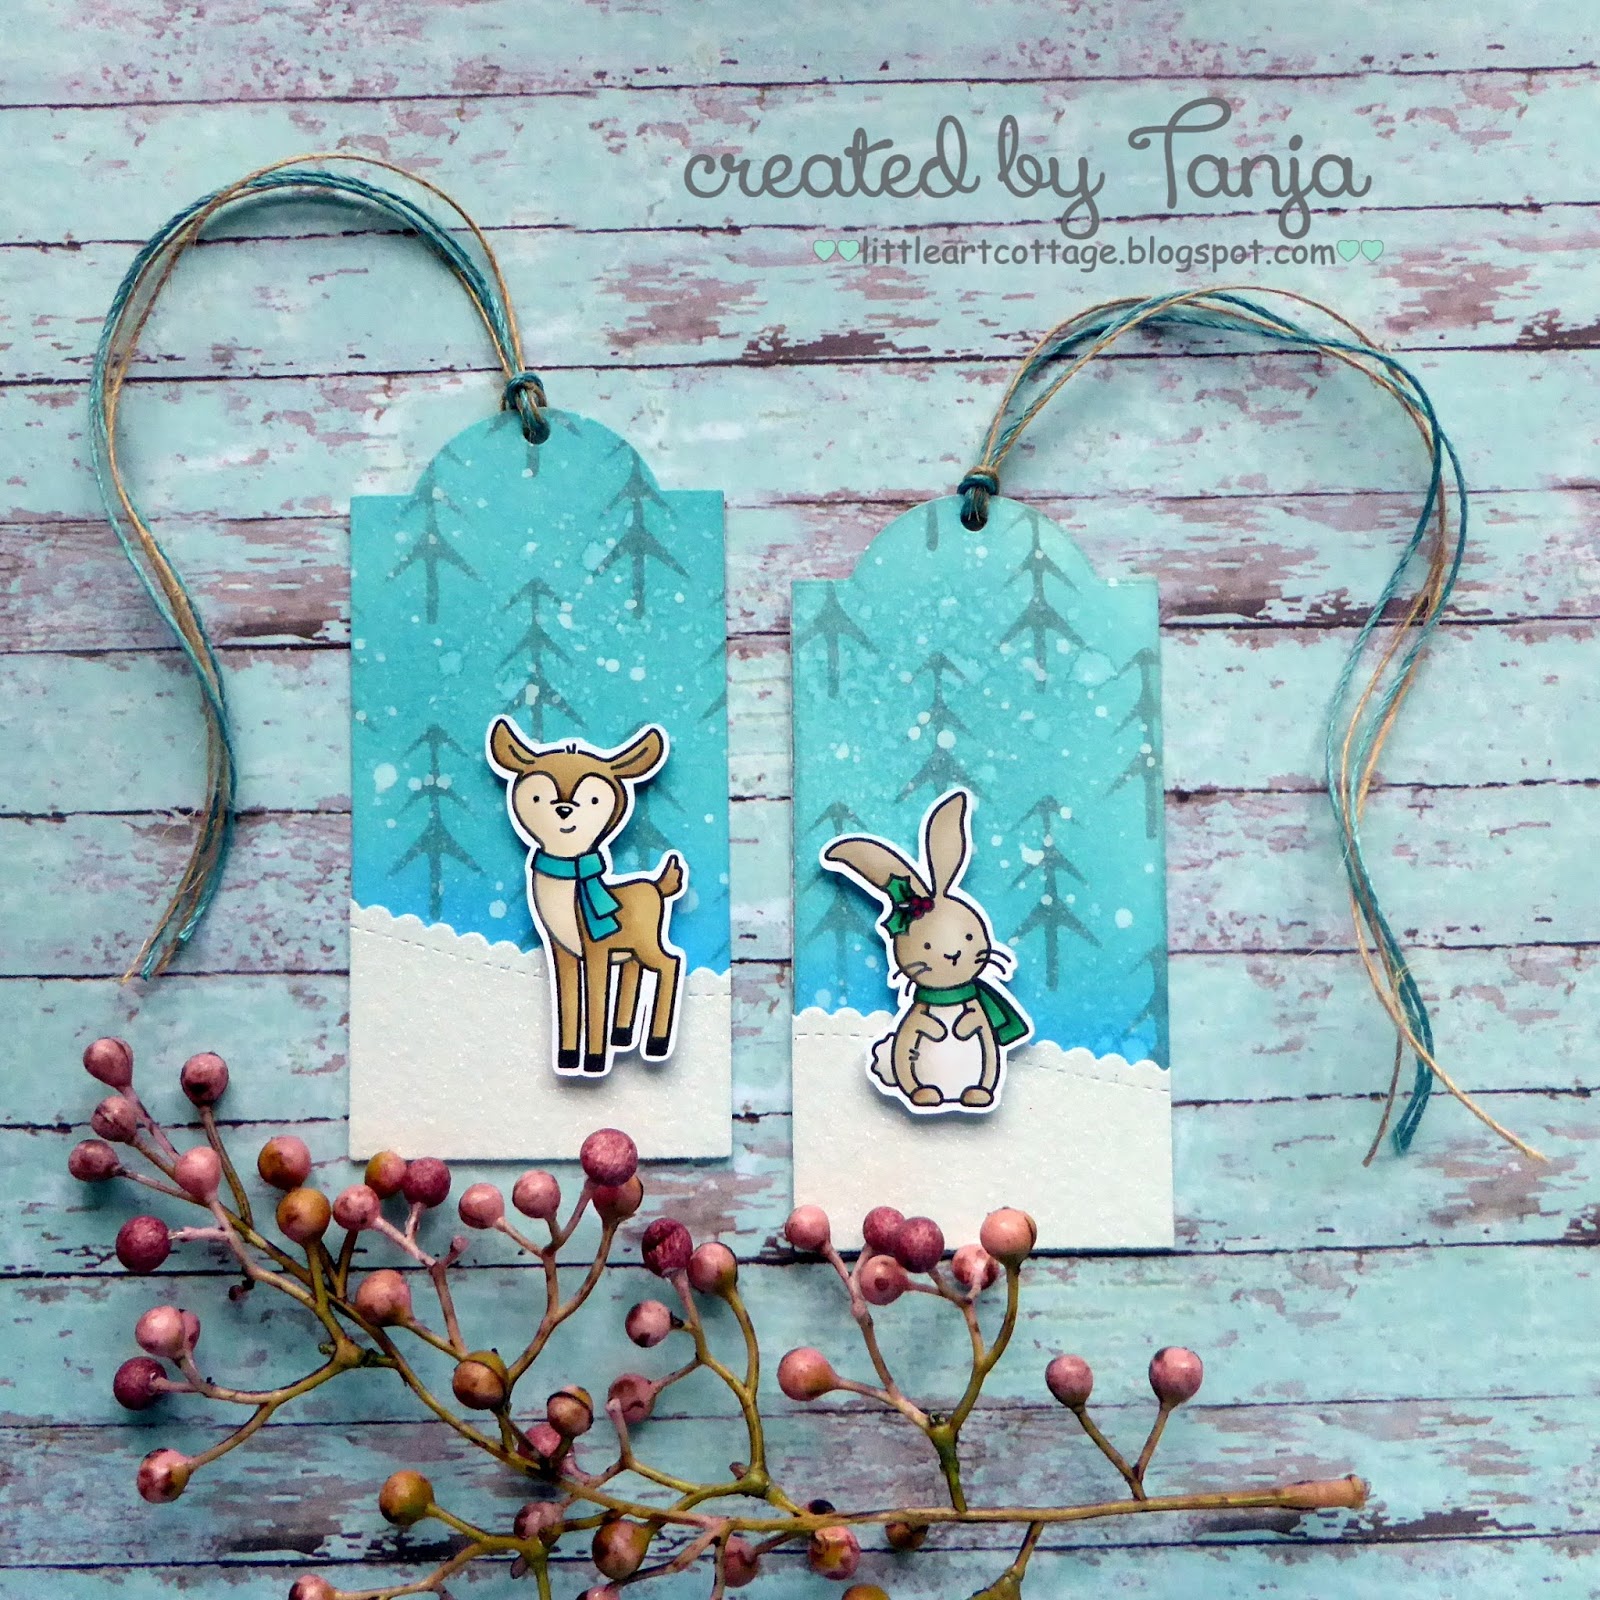
  • stamp the sweet deer and bunny from the Avery Elle Winter Woodland Wonders set with Memento Tuxedo Black and color them with Copic, Touch Twin Brush and Delta Markers
  • add extra shading with Faber-Castell Polychromos pencils and highlights with a white gel pen
  • cut out two tags from watercolor paper using one of the CUTplorations Tags #1 dies
  • create a background with Distress Oxide Inks (Salty Ocean, Broken China)
  • apply Distress Oxide Ink Iced Spruce through the ARTplorations Christmas Tree 1 stencil
  • add a snow effect with Pearlized Water and watered-down white acrylic paint
  • cut the hill shape from white glitter cardstock using the tag die and one of the My Favorite Things Stitched Scallop Basic Edges 2
  • thread teal and natural twine through the holes of the tags


Have a wonderful day.

Yours,


Tuesday, June 26, 2018

STAMPlorations 5th Birthday

Hi there,

we are celebrating 5 years of STAMPlorations and I would like to show you my three favorite projects that I created over the past few years and this new tag. I chose the sentiment especially for the wonderful Shery.


  • cut out a CUTplorations Stitched Tag from watercolor paper
  • stamp the STAMPlorations In Bloom: Fancy Frangipanis with Versamark and heat-emboss these beautiful flowers with WOW! Bright White Super Fine embossing powder
  • stamp the sentiment from the STAMPlorations Strong Women set with Versafine Smokey Gray
  • color the image and the background with Derwent Inktense Pencils and a damp watercolor brush
  • apply Versamark through the ARTplorations Dots all over stencil and heat-emboss the pattern with Ranger Aqua Tinsel embossing powder
  • add some texture using the grid from the STAMPlorations Mixed Media Grunge set and Archival Ink Watering Can and the script from the STAMPlorations Mixed Media Elements set and Distress Ink Hickory Smoke
  • ink up the edges of the whole tag with Distress Ink Hickory Smoke as well
  • dye a piece of seam binding with Distress Ink Dusty Concord and Distress Stain Brushed Pewter and thread it together with a piece of grey ribbon through the whole of the tag

And here are the three promised favorites from the last couple of years:


I would like to invite you to CASE one of these projects. I can't wait to see your creations.

Hugs,


Monday, June 25, 2018

Summer Fun Butterfly

Hi there,

I created this kraft butterfly card for Elizabeth Craft Designs:

  • cut a rectangle from kraft cardstock and create a Polaroid by cutting an opening into it with the help of one of the Elizabeth Craft Designs Frame it Stitched Squares dies
  • stamp little critters from the Elizabeth Craft Designs Bugs & Butterflies set with Versafine Clair Pinecone and color them with Faber-Castel Polychromos pencils
  • stamp the sentiment from the Elizabeth Craft Designs Beach Sentiments with Versafine Clair Morning Mist
  • stamp one of the larger butterflies with Versafine Clair Morning Mist and color it with Polychromos pencils as well
  • add silver gel pen to the dots on his body
  • create a background on a piece of watercolor paper using the Nuvo Shimmer Powder Blue Blitz
  • mount the Polaroid to a stitched kraft panel cut with one of the Elizabeth Craft Designs Stitched Rectangles before adhering all the layers to an off white cardbase


I hope you got inspired.

Hugs,


Willkommen - Welcome

Hi there,

I would like to show you this cute monster card over on the Karten-Kunst Blog:

  • stamp the adorable little Karten-Kunst Daisy mit Geschenk with Distress Oxide Ink Antique Linen onto a piece of Bristol Smooth Cardstock
  • color the image with Prismacolor Colored Pencils 
  • create a background using the little start from the same stamp set on a stitched panel cut from Neenah Desert Storm kraft cardstock
  • cut out the Karten-Kunst Große Texte Willkommen three times from dark kraft cardstock and ink up the bottom edge with Distress Ink Walnut Stain
  • adhere a thin strip of violet glitter cardstock underneath the sentiment before adhering the panel to a grey cardbase

Thanks for stopping by.

Hugs,


Thursday, June 21, 2018

Welcome Baby

Hi there,

I created this sweet little welcome baby tag for the Stamping-Fairies Facebook Group:

  • cut out a tag from watercolor paper using a die from the Sizzix Tag Collection
  • stamp the rocking horse from the My Favorite Things Hello Little One set with My Favorite Things Hybrid Ink grout Gray 
  • color the image with Faber-Castell Albrecht-Dürer Pencils and a damp watercolor brush
  • cover the image with masking fluid and let it dry thoroughly
  • create a background by applying Distress Oxide Ink Bundled Sage through the Tim Holtz Layering Stencil Feather
  • create a sentiment with a label maker
  • dye a piece of seam binding with Distress Stain Picked Raspberry and thread it through the hole of the tag

Have a wonderful day.

Hugs,


Wednesday, June 20, 2018

You're the Best

Hi there,

here is another creation using the adorable Gerda Steiner Designs Cat in bookshelf stamp set and if my son was a cat he would look exactly like this :o)


  • color the images from the Gerda Steiner Designs Cat in bookshelf stamp set with Zig Clean Color Real Brush Pens and a damp watercolor brush
  • as a background I used a leftover piece from an earlier watercolor session cut out with one of the Elizabeth Craft Designs Stitched Rectangles 
  • stamp the sentiment from the Mama Elephant Labeled Messages with Versafine Onyx Black
  • add a swirl of silver thread behind the cute little cat before adhering it to the watercolor panel

Have a wonderful day.

Hugs,

Tuesday, June 19, 2018

Hello Flowers

Hi there,

we are starting a Hexagon Challenge over on the Elizabeth Craft Designs Blog and I tried some spotlight coloring on my card:

  • cut out a stitched panel from watercolor paper using one of the ModaScrap Dashing Rectangles 
  • stamp the flowers and leaves from the Elizabeth Craft Designs Color my Flowers set with Versafine Smokey Gray
  • cut out some Elizabeth Craft Designs Fitted Hexagons from the panel and only color those parts with Schmincke Horadam and Daniel Smith watercolors
  • pop up the panel with some double-sided foam adhesive and puzzle the hexagons back in adhering them with Elizabeth Craft Designs 6mm clear double-sided adhesive
  • cut out the hello from the Elizabeth Craft Designs Words 2 Thinking of you die set twice from black cardstock and glue both layers on top of each other

I can't wait to see you creations in the gallery.

And by the way the question for the $20 giveaway this month is What is your favorite way to use Elizabeth Craft Designs Stitched Hexagons or Fitted Hexagons dies.

Hugs,


Monday, June 18, 2018

Collect beautiful Moments

Hi there,

I would like to show you how I created this Mixed Media Flower Tag over on the Elizabeth Craft Designs Blog:

  • cover a sturdy white tag with gesso
  • add color with Distress Paint (Spun Sugar, Dusty Concord)
  • create some texture by applying gesso through the ARTplorations Leaves 2 stencil and by stamping script from the STAMPlorations Mixed Media Elements set and a dot pattern from the STAMPlorations Mixed Media Grunge set with Archival Ink Watering Can
  • spread some crackle paste over random spots and let everything dry thoroughly
  • to create the Lilac use the Elizabeth Craft Designs Garden Notes Lilac 2 die set
  • cut the base once from very sturdy craft cardstock and once from 270gr Elizabeth Craft Designs white Soft Finish Cardstock
  • cut five leaves, the plate with the larger flowers four times and the smaller flowers twice - use the Elizabeth Craft Designs Soft Finish Cardstock as well
  • add color to the white cardstock using Alcohol Markers
  • shape the elements with the help of the fabulous Elizabeth Craft Designs Susan's Garden Tool Kit
  • create the flower right on the tag
  • add green prills to the center of the little flowers and shading using purple and green Pan Pastels
  • add two sentiment stickers and dye a piece of torn seam binding with Distress Ink Dusty Concord
  • cut out a ladybug from the Elizabeth Craft Designs Susan's Garden Bugs & Butterflies die set, color it, shape it and adhere it to one of the leaves - to achieve a shiny, more realistic look add a thick coat of Nuvo Crystal Glaze on top
Hugs,


Thursday, June 14, 2018

Be a little Shellfish

Hi there,

I created this sweet Birthday Card for the Stamping-Fairies Facebook Group:

  • create a background on Yupo using Alcohol Inks (Cool Peri, Pink Sherbet, Aqua) and cut out a panel with the help of one of the dies from the Clearly Besotted Small Frames die set
  • stamp the sweet little shell from the Lawn Fawn Year Six set and color it with Schmincke Horadam and Daniel Smith watercolors
  • adhere the shell to the Alcohol Ink panel and the panel to a piece of white cardstock with a shaped edge cut using one of the My Favorite Things Stitched Scallop Basic Edges 2
  • stamp the sentiment from the same Lawn Fawn set with Versafine Onyx Black
  • create a background with the help of a printed pattern, the Mini Minc and Heidi Swapp Reactive Foil in light pink
  • add two strips of cardstock colored with that same Aqua Alcohol Ink to the left and right of the main panel and adhere all the layers to a white cardbase

I hope you got inspired.

Hugs,


Wednesday, June 13, 2018

Go Bananas

Hi there,

I have another fun Birthday Card to share with you as inspiration for the Addicted to Stamps and More Anything goes Challenge:

  • stamp the branch, one of the super cute monkeys, the party hat and the bananas from the Clearly Besotted Stamps Cheeky Monkey stamp set with Memento (Rich Cocoa) and color the images with Prismacolor Colored Pencils and Zest-it
  • use a craft knife to cut little slits to make it look like the monkey is hanging from the branch
  • cut out a My Favorite Things Stitched Wonky Circle from watercolor paper and add color with Distress Inks (Tumbled Glass, Fossilized Amber, Peeled Paint) - spray on some water droplets for more texture
  • mount the panel onto a cardbase cut from Gmund Beer Paper (Weizen) and use scissors to remove the excess on the right side
  • stamp the sentiment from the same stamp set with the same brown ink onto a sentiment strip cut with a die from the My Favorite Things Blueprints 27 set  from Gmund Beer Paper (Weizen) and adhere it with foam tape
  • add three Create a Smile Enamel Dots as final embellishment

Thanks for stopping by.

Yours,

Tuesday, June 12, 2018

Relax

Hi there,

did you see the adorable new Gerda Steiner Designs Cat in Bookshelf stamp set? This is my first creation using this set:

  • color some of the images from the Gerda Steiner Designs Cat in Bookshelf set with Faber-Castell Polychromos Pencils
  • add woodgrain to the shelf with the help of the Hero Arts Designer Woodgrain stamp and Archival Ink Watering Can
  • cut out a stitched panel from Gmund Beer Paper Weizen and add a heart border using one of the Elizabeth Craft Designs Valentine's Edges dies
  • add a strip of pattierend paper from the Carta Bella Spring Market 6x6 paper pad underneath the heart border


I hope you got inspired.

Hugs,


Monday, June 11, 2018

Thank you

Hi there,

I created this thank you card using some wonderful products from Elizabeth Craft Designs:

  • cut out a stitched panel from watercolor paper using one of the Elizabeth Craft Designs Stitched Rectangles 
  • stamp the large flower from the Elizabeth Craft Designs Spring Blooms set with Versamark and heat-emboss it with Hero Arts white embossing powder
  • add color to the background with Distress Oxide Inks (Bundled Sage, Worn Lipstick, Salty Ocean) and a Mini Ink Blending Tool - drop on some water for more texture
  • add more depth and color to the flower with the help of Faber-Castell Albrecht-Dürer pencils and a damp watercolor brush
  • cut out the word "Danke" (thank you) with the fabulous new Elizabeth Craft Designs Blackboard Alphabet once from black and a second time from white cardstock - layer the letters on top of each other leaving a slight offset
  • add a strip of black and white washi tape to the left side of the watercolor panel before adhering it to the cardbase

I hope you got inspired.

Hugs,


Sunday, June 10, 2018

Stamp Connection #38

Hi there,

connected through our love for card making, blogging and being from Germany we (Cornelia from Stempel Spass and I) decided to create a monthly project within predefined requirements. We are going to show you the result every 2nd Sunday of the month and this is our 38th transatlantic get-together!

Our requirement for this meet-up was:
"Summer Fun"


  • stamp the little toucan from the Clearly Besotted Stamps Some Birdie loves you with Versafine Smokey Gray and color the image with Delta, Touch Twin Brush and Copic markers - add additional shadows with Prismacolor Colored Pencils
  • stamp some leaves from that same stamp set with Altenew Crisp Ink Just Green and add color to the background with Distress Ink Twisted Citron
  • cut out the word fun using the Altenew Caps Bold Alphabet dies
  • stamp the word summer from the Clearly Besotted Stamps Seal of Approval set onto a strip of black cardstock with Versamark and heat-emboss it with WOW! Bright White Super Fine embossing powder
  • cut out the Lawn Fawn Itsy Bitsy Polka Dot Backdrop from Neenah Desert Storm kraft cardstock and layer it on top of a piece of teal cardstock before adhering all the layers to a cardbase

Now make sure to hop over to see Cornelia's Creation.

Thanks for stopping by. We hope to see you again at the ...


Hugs,


Thursday, June 7, 2018

Birthday Wishes from all of us

Hi there,

I would like to show you this birthday card that I created for my son over in the Stamping-Fairies Facebook Group:

  • stamp the Avery Elle Critter Crew with Memento Tuxedo Black and color the image with Delta, Touch Twin Brush and Copic Markers - add extra shading with Faber-Castell Polychromos Pencils
  • stamp the triangle pattern from the Flora & Fauna Texture 2 stamp set with Versamark and heat-emboss it with Ranger Sticky embossing powder
  • rub IndigoBlu Mega Flakes Winter Dawn onto the pattern
  • stamp the sentiment from the same set with Versafine Onyx Black and Smokey Gray onto a piece of patterned paper from the My Favorite Things Graphic Grid Pastels 6x6 paper pad for an ombre look
  • add Little Things From Lucy's Cards Diamonds Rainbow Bright as final embellishments

Have a colorful day.

Hugs,