Tuesday, January 28, 2020

Let it snow

Hi there,

I would like to show you another cute snowman project - on this one I used the Gerda Steiner Designs Little Snowman Clear Stamp Set:

  • stamp the Gerda Steiner Designs Little Snowman with Versafine Smokey Gray
  • color the image with Winsor & Newton Watercolor Markers and a damp brush
  • stamp some snowflakes from the same set
  • add highlights with a white gel pen and extra sparkle with Stickles Glitter Glue Crystal
  • cover the cardbase with patterned paper
  • cut out the sentiment with the help of the CUTplorations Let it snow die from Neenah Desert Storm kraft cardstock
  • stamp the woodgrain from the Tim Holtz Lumberjack set with Versamark and heat-emboss it with WOW! Bright White Super Fine embossing powder


I hope you got inspired.

Hugs,


Sunday, January 26, 2020

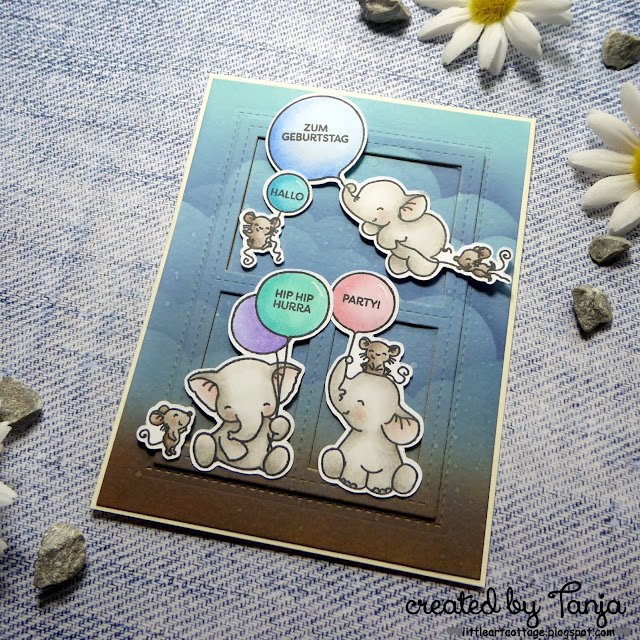
Elephantastic Birthday

Hi there,

I created this elephantastic birthday card using the Mama Elephant Flying with Friends stamp set:

  • stamp the images from the Mama Elephant Flying with Friends set with Memento Tuxedo Black
  • color the images with Delta, Touch Twin Brush and Copic Markers and add extra shading with Faber-Castell Polychromos pencils 
  • add highlights to the balloons with a white gel pen
  • create a background on a piece of watercolor paper using Distress Oxide Inks (Ground Espresso, Faded Jeans, Tumbled Glass, Chipped Sapphire) and the My Favorite Things Cloud stencil
  • add some water droplets for extra texture
  • cut out the frame from the My Favorite Things Blueprints 29 die set from this watercolor background panel
  • cut the frame three more times from kraft cardstock and layer one on top of the other for more dimension
  • stamp some sentiments from the Create a Smile Stamps Kleine Sprüche set into the balloons
  • adhere the images using double-sided foam adhesive


Have a wonderful day.

Hugs,


Friday, January 24, 2020

Splish Splash Merman

Hi there,

as promised, I am back today with this Merman Tag for Elizabeth Craft Designs:

  • cut out the elements for the cute merman with the help of the Elizabeth Craft Designs Mermaid set
  • color the elements with Delta, Touch Twin Brush and Copic Markers, add highlights with a white gel pen and extra sparkle with Stickles Glitter Glue Crystal
  • cut out the larger tag from the Elizabeth Craft Designs Planner Essentials set and add color to the background with Distress Ink (Tumbled Glass, Stormy Sky)
  • cut out two wave borders from blue cardstock using the Elizabeth Craft Designs Ocean Edges and ink them up with Distress Ink Salty Ocean - add splatters with Distress Stain Salty Ocean and watered-down white acrylic paint
  • stamp the sentiment from the Elizabeth Craft Designs Splish Splash Sentiments with Versafine Clair Warm Breeze
  • dye a piece of seam binding with Distress Ink Chipped Sapphire and thread it through the hole of the tag
  • add some interest to the background with white Elizabeth Craft Designs Craft Drops 


Have a wonderful day.

Hugs,


Thursday, January 23, 2020

You are Mermazing

Hi there,

I have this sweet Mermaid Tag to share with you today and tomorrow I am going to show you how to turn this Mermaid into a Merman with the same wonderful die set designed by Joset from Elizabeth Craft Designs:

  • cut out the elements for the sweet mermaid with the help of the Elizabeth Craft Designs Mermaid set
  • color the elements with Delta, Touch Twin Brush and Copic Markers, add highlights with a white gel pen and extra sparkle with Stickles Glitter Glue Crystal
  • cut out the larger tag from the Elizabeth Craft Designs Planner Essentials set and add color to the background with Distress Ink (Tumbled Glass, Stormy Sky)
  • cut out two wave borders from blue cardstock using the Elizabeth Craft Designs Ocean Edges and ink them up with Distress Ink Salty Ocean - add splatters with Distress Stain Salty Ocean and watered-down white acrylic paint
  • stamp the sentiment from the Elizabeth Craft Designs Splish Splash Sentiments with Versafine Clair Warm Breeze
  • dye a piece of seam binding with Distress Ink Chipped Sapphire and thread it through the hole of the tag
  • add some interest to the background with white Elizabeth Craft Designs Craft Drops 


Hope to see you again tomorrow.

Hugs,


Tuesday, January 21, 2020

Snow Flurry

Hi there,

I created this adorable little winter scene using the Gerda Steiner Designs Snowman and Birds Digital Image:

  • color the Gerda Steiner Designs Snowman and Birds with Spectrum Noir Triblend Markers
  • add highlights and snowflakes with a white gel pen
  • stamp the sentiment from the Create a Smile Stamps Kleine Weihnachtsgrüße onto a strip of black cardstock with Versamark and heat-emboss it with WOW! Bright White Super Fine embossing powder
  • add a layer of purple glitter paper behind the panel and cover the cardbase with patterned paper


I hope you got inspired.

Hugs,


Have a fin-tastic Day

Hi there,

I created this cute whale card using one of Joset's upcoming new die sets for Elizabeth Craft Designs:

  • cut out the elements for the little whale with its cute little hat from the Elizabeth Craft Designs Whale set
  • color the elements with Delta, Touch Twin Brush and Copic Markers and add extra shading with Distress Oxide Ink (Black Soot, Hickory Smoke, Chipped Sapphire, Aged Mahogany)
  • add highlights with a white gel pen
  • assemble the whale and set it aside
  • for the background cut out a stitched watercolor panel using one of the Elizabeth Craft Designs Stitched Rectangles
  • cut out a cloud border with the help of the Elizabeth Craft Designs Adventure Edges and three wave borders using the Elizabeth Craft Designs Ocean Edges
  • add shading to the clouds and the waves with Distress Oxide Ink (Stormy Sky, Mermaid Lagoon)
  • stamp the sentiment from the Elizabeth Craft Designs Splish Splash Sentiments set with Versafine Clair Medieval Blue
  • add two strips of patterned paper to the left and right of the panel before adhering it to a cardbase


While I was creating this card my daughter Emily (9) crafted alongside me and she chose the Elizabeth Craft Designs Sea Turtle die set and some seaweed and stones from the Elizabeth Craft Designs Seaweed die set for her card. Here is what she came up with:


I hope you got inspired.

Hugs,


Monday, January 20, 2020

Happy New Year

Hi there,

this is my second New Year Card using the new Karten-Kunst stamp sets:

  • add color to a piece of Lanavanguard or Yupo paper using Alcohol Inks (Stream, Gunmetal Mixative)
  • stamp the firework from the Karten-Kunst Feuerwerk set and heat-emboss it with silver and turquoise embossing powder
  • stamp the sentiment from the same set with Versamark on a piece of black cardstock and heat-emboss it with white embossing powder
  • mat the panel onto a piece of black cardstock before adhering it to a cardbase


Have a wonderful New Year.

Hugs,


Sunday, January 19, 2020

Get Well Soon Bunny

Hi there,

I created this sweet Get Well Soon Card using the super sweet Clearly Besotted Stamps Under the Weather set:

  • cut out the frame from the My Favorite Things Blueprints 29 die set from watercolor paper
  • cut out two Paper Smooches Gift Tags 2 - one from watercolor paper and one from patterned paper from the My Favorite Things Rainbow Stripes 6x6 paper pad
  • stamp images and the sentiment from the Clearly Besotted Stamps Under the Weather set with Versafine (Smokey Gray) onto the little panels
  • color the images with ZIG Cleancolor Real Brush Pens and a damp watercolor brush
  • color the frame with Distress Ink (Peacock Feathers) and add water droplets for some texture
  • use a silver gel pen to add random dots around the sentiment
  • thread a string of teal twine through the holes of the tags
  • mount the frame onto a stitched panel cut from light grey cardstock before adhering it to a white cardbase

I hope you got inspired.

Hugs,


Thursday, January 16, 2020

You're my favorite Snow Buddy

Hi there,

I would like to show you this fun, clean and simple Winter Card over on the Stamping-Fairies Blog:


Have a wonderful day.

Hugs,


Wednesday, January 15, 2020

Follow the Sunshine

Hi there,

this is just a quick reminder of this month's Stencil Challenge over on the STAMPlorations Blog:

  • apply Distress Oxide Ink Black Sot through the ARTplorations Dreamer stencil
  • add rosy cheeks and lips and blue eye-shadow with PITT Artist Pencils
  • stamp the sentiment from the STAMPlorations It's a Girl Thing: Sunshine set with Versafine Clair Nocturne
  • add three little hearts from the same stamp set around the sentiment with Altenew Crisp Ink Rouge
  • decorate the border with elements from the STAMPlorations Scripply Splattery Grunge set and Altenew Crisp Ink Persian Blue


I can't wait to see your creations in the gallery.

Hugs,


Tuesday, January 14, 2020

Live, Create, Tell the Story

Hi there,

you can find the step-by-step tutorial for this Mixed Media Tag over on the Elizabeth Craft Designs Blog:


My daughter Emily (9) created a similar tag:


I hope you got inspired.

Hugs,


Monday, January 13, 2020

Happy New Year 2020

Hi there,

here is one of the Happy New Year Cards that I created with the new Karten-Kunst stamp sets:

  • add color to a piece of watercolor paper using Distress Oxide Ink (Black Soot, Chipped Sapphire, Faded Jeans, Salty Ocean)
  • stamp the 2020 from the Karten-Kunst Happy New Year set with Versamark and heat-emboss it with WOW! Metallic Silver Sparkle embossing powder
  • stamp the second part of the sentiment and the fireworks from the Karten-Kunst Feuerwerk set with Versamark and heat-emboss it with WOW! Metallic Gold Rich Super Fine embossing powder
  • add some sparkly splatters with Lawn Fawn Liquid Stardust before adhering the panel to the cardbase


Have a wonderful New Year 2020.

Hugs,


Thursday, January 9, 2020

May the little Things bring you Happiness

Hi there,

I created this sweet little Winter Card for the Stamping-Fairies Blog:


Thanks for stopping by.

Hugs,


Monday, January 6, 2020

Winter Magic

Hi there,

I created this wintery smowman card for the Karten-Kunst Blog:

  • stamp the adorable snowman from the Karten-Kunst Zaubersterne set with Memento Tuxedo Black and color the image with Delta, Touch Twin Brush and Copic Markers
  • add highlights with a white gel pen
  • create a background on a stitched watercolor panel using Distress Oxide Inks (Blueprint Sketch, Chipped Sapphire)
  • add splatters with water and Lawn Fawn Liquid Stardust
  • create a hill shape using patterned paper and one of the Karten-Kunst Torn Borders
  • stamp the sentiment from the Karten-Kunst Kalligraphie im Dezember set with Versafine Onyx Black


I hope you got inspired.

Hugs,