Tuesday, July 31, 2018

Happy Birthday Turtle Family

Hi there,

today, I would like to show you another creation using the new Gerda Steiner Designs Turtley Great stamp set:

  • color three of the turtles from the Gerda Steiner Designs Turtley Great set with Ecoline Brush Pens and a damp watercolor brush
  • cut out a stitched panel from watercolor paper and create a rainbow background using a stamp from the Flora & Fauna Texture Two set and several colors of Altenew Crisp Ink (Heart Beat, Orange Cream, Fresh Lemon, Just Green, Sapphire, Deep Iris)
  • add a vellum overlay with some cloud shapes
  • add a little hill shape cut from Neenah Desert Storm kraft cardstock
  • cut out the CUTplorations Happy from that same kraft cardstock as the first part of the sentiment
  • stamp the second and third part of the sentiment from the Avery Elle Critter Crew set with Altenew Crisp Ink Lava Rock


Have a colorful day.

Hugs,


Monday, July 30, 2018

Tropical Vibes

Hi there,

I would like to show you another watercolor creation for Elizabeth Craft Designs:

  • use a pencil to sketch in a kiwi
  • ink the finished sketch with a black Tombow Fudenosuke Brush Pen
  • add watercolors
  • use a straw to create the edges and add splatters as a finishing touch
  • stamp the sentiment from the Elizabeth Craft Designs Beach Sentiments set with Altenew Crisp Ink Moss
  • adhere the panel to a Neenah Desert Storm cardbase


Sending you tropical vibes.

Hugs,


Thursday, July 26, 2018

You're so good for my Heart

Hi there,

I created this clean and simple card for the Stamping-Fairies Facebook Group:

  • stamp the adorable image from the My Favorite Things You have my Heart set with Memento Gray Flannel and color the image with Delta, Touch Twin Brush and Copic Markers
  • stamp the sentiment from the same stamp set with the same ink
  • create a cloud background with the help of the My Favorite Things Cloud Stencil, Distress Ink Tumbled Glass and a Mini Ink Blending Tool
  • add two strips of Distress Cardstock Dusty Concord to the left and right side of the panel before adhering it to a white cardbase


I hope you got inspired.

Hugs,


Tuesday, July 24, 2018

Enjoy your Day

Hi there,

I would like to show you another creation using the fabulous new Gerda Steiner Designs Turtley Great stamp set:

  • color the largest turtle from the Gerda Steiner Designs Turtley Great set with Prismacolor Pencils
  • cover the shell with Nuvo Crystal Glaze for extra shine and dimension
  • set the turtle aside to dry
  • create a background on watercolor paper - stamp the three balloons from the Gerda Steiner Designs Happy Hoppy set with Versafine Smokey Gray
  • color the images and the background with watercolors
  • stamp the sentiment from the Gerda Steiner Designs On the Bookshelf set with Versafine Smokey Gray as well
  • adhere the panel to a piece of patterned paper before adding it to a white cardbase


Enjoy your day.

Hugs,


Monday, July 23, 2018

Hello - Peek-a-Boo Card

Hi there,

I would like to show you how to create this cute Peek-a-Boo Card over on the Elizabeth Craft Designs Blog:

  • cut out a panel from white cardstock using one of the Elizabeth Craft Designs Stitched Rectangles
  • cut out three openings into that panel using one of the Elizabeth Craft Designs Frame it - Stitched Circles
  • stamp three of the adorable little animals from the ModaScrap Puppies Boy set with Versafine Onyx Black
  • color the images with Prismacolor Colored Pencils
  • add patterned paper from the ModaScrap Color of Puppies Boy 6x6 paper pad behind the openings and at the left side of the panel before adhering it to a white cardbase with 6mm clear double-sided adhesive
  • stamp the sentiment from the Elizabeth Craft Designs Sentiments 2 - Just because set with Versafine Onyx Black and cut it out with the matching die

I hope you got inspired to create your own little Peek-a-Boo Card.

Hugs,

Thank you Flower Tag

Hi there,

I used the Karten-Kunst Blümchen-Meer stamp set to create this thank you tag:

  • cut out a stitched tag from Bristol Smooth Cardstock
  • stamp some flowers from the Karten-Kunst Blümchen-Meer set with Distress Oxide Ink (Cracked Pistachio, Broken China, Bundled Sage, Worn Lipstick, Gathered Twigs)
  • add shading with Prismacolor Colored Pencils and highlights with a white gel pen
  • cut out the Karten-Kunst Danke from grey cardstock
  • add some Nuvo Jewel Drops Sea Breeze around the flower arrangement
  • dye a piece of seam binding with Distress Oxide Ink (Broken China, Cracked Pistachio) and thread it through the hole of the tag


Thanks for stopping by.

Hugs,


Thursday, July 19, 2018

Birthday Fishes

Hi there,

I created this fish shaker card for the Stamping-Fairies Facebook Group:

  • build the shaker element from some frames layered on top of each and a piece of acetate
  • add some leaves cut with the help of two of the dies from the Sizzix Funky Floral #2 set between the acetate sheet and the top frame
  • add some Wink of Stella Clear Glitter to the top frame
  • cut out a background from watercolor paper and stamp some fish and plants from the My Favorite Things Gill Friends set with Versafine Clair Morning Mist
  • color the images and the background with Faber-Castell Albrecht-Dürer pencils and a damp watercolor brush
  • add some waves using the My Favorite Things Make Waves stencil and Distress Ink Broken China
  • fill the shaker element with Distress Embossing Powder Old Paper
  • stamp the sentiment from the same set with Versamark and heat-emboss it with WOW! Bright White Super Fine embossing powder


I hope you got inspired.

Hugs,


Tuesday, July 17, 2018

Happy Birthday

Hi there,

we are starting a new Challenge over on the Elizabeth Craft Designs Blog and this time it is all about the Blackboard Number and Letters:

  • cut out a stitched panel from watercolor paper using one of the Elizabeth Craft Designs Stitched Rectangles
  • create a gradient background using Schmincke Horadam watercolors
  • cut out the Elizabeth Craft Designs Blackboard Numbers from that panel and set it aside
  • cut out a matching panel and cover it with Elizabeth Craft Designs 5'' x 12 '' clear double-sided adhesive
  • remove the release paper an cover the whole panel with Elizabeth Craft Designs Ice Teal Microfine Glitter
  • glue the watercolor panel on top of the glitter panel
  • add a strip of patterned paper and a strip of Elizabeth Craft Designs Soft Finish Cardstock Rich Black to the panel
  • stamp the three smaller gift from the Elizabeth Craft Designs Gift Wrapped set with My Favorite Things Extreme Black and color the images with Delta, Touch Twin Brush and Copic Markers
  • adhere them on top of the strip using some double-sided foam adhesive for extra dimension

The question this month will be:
What Elizabeth Craft Designs die or stamp set would you use together with the Blackboard Alphabet or Blackboard Numbers die sets?

I hope you got inspired.

Hugs,


Monday, July 16, 2018

Enjoy Watermelon

Hi there,

I created this watercolor watermelon card for Elizabeth Craft Designs:

  • paint a watermelon using Twinkling H20 Watercolors - add white seeds and highlights with a white gel pen
  • cut the sentiment twice from black cardstock with the help of the Elizabeth Craft Designs Blackboard Alphabet - add highlights with a white gel pen as well
  • add a strip of black and white patterned paper to the left side of the panel before adhering it to a white cardbase


I hope you got inspired to draw some vibrant summer fruit and creating custom sentiments.

Hugs,


Saturday, July 14, 2018

Thank you - Danke

Hi there,

I created this sweet thank you card using the My Favorite Things The whole Herd stamp set for a special occasion. My daughter wanted to learn more about milk and what steps are necessary before it's finally ready to drink. So we assembled a little group of interested people and visited the Härle dairy farm and had the most informative and fabulous afternoon. We even got to milk a cow.

  • stamp the sweet little cow and the milk bottle from the My Favorite Things The whole Herd set with Memento Gray Flannel
  • color the image and the scene around it with Alcohol Markers
  • add one of the Lawn Fawn Puffy Cloud Borders to the top of the panel
  • cut out the Create a Smile "doppeltes Danke" as a sentiment
  • layer the panel on top of kraft cardstock before adhering it to a white cardbase


I hope that you like my creation.

Hugs,


Thursday, July 12, 2018

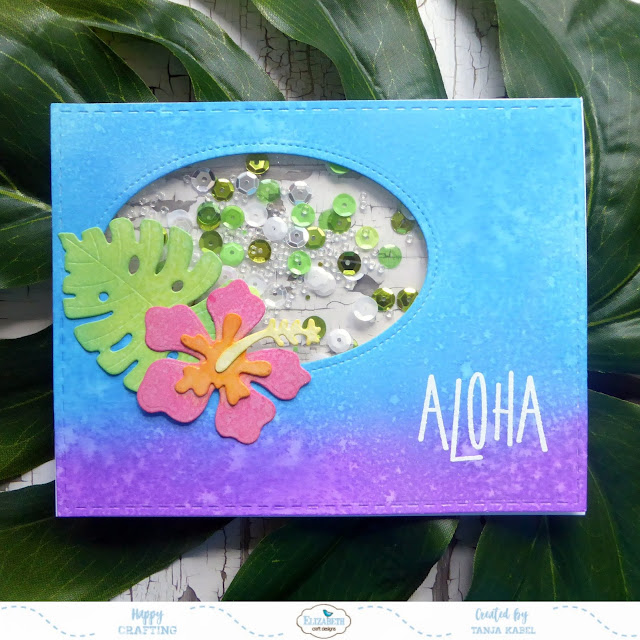
Aloha - Tropical Flower Shaker Card

Hi there,

I would like to show you how to create this tropical flower shaker card over on the Elizabeth Craft Designs Blog:

  • cut out a stitched panel from watercolor paper using the largest of the Elizabeth Craft Designs Stitched Rectangles
  • cut an oval opening into the background panel using one of the Elizabeth Craft Designs Frame it - Stitched Ovals
  • cut out the larger flower and one of the leaves from the Elizabeth Craft Designs Tropical Florals die set
  • add color to the background panel with Distress Oxide Ink (Wilted Violet, Salty Ocean)
  • color the flower and the leaf with Distress Oxide Ink (Picked Raspberry, Carved Pumpkin, Squeezed Lemonade, Twisted Citron, Peacock Feathers)
  • mist the elements with Pearlized Water (Perfect Pearls and water) for extra shine and texture
  • stamp the Aloha sentiment from the Elizabeth Craft Designs Beach Sentiments set with Versamark and heat-emboss it with white embossing powder
  • use some Elizabeth Craft Designs clear double-sided adhesive to adhere a piece of acetate behind the oval opening and surround it with two layers of double-sided foam adhesive
  • fill the shaker element with sequins and seed beads and close it with patterned paper from the ModaScrap Wood Effects 6x6 paper pad
  • adhere the finished panel to a white cardbase

Have a tropical day.

Hugs,


Tuesday, July 10, 2018

Hidden Galaxy Slider

Hi there,

my son was so excited about the hidden slider mechanism that he wanted to create a Galaxy card using this technique and what better stamp sets for this project than the Gerda Steiner Designs Blast off and Alien Invasion?

  • create a multi-layer Galaxy background using watercolor paper, the Lawn Fawn Puffy Cloud Borders and Kuretake Gansai Tambi watercolors
  • build the hidden slider mechanism as explained in the Happy Birthday Snail card blog post
  • stamp the astronaut, the space ship and the planet from the Gerda Steiner Designs Blast off and Alien Invasion sets
  • color the images with Delta, Touch Twin Brush and Copic Markers
  • add highlights with a white gel pen
  • cover the window of the space ship and the visor and the astronaut's helmet with Nuvo Crystal Glaze and let this dry thoroughly - I left it overnight


Thanks for stopping by today.

Hugs,


Monday, July 9, 2018

For you - Für Dich

Hi there,

I created this watercolor flower tag for the Karten-Kunst Blog:


  • cut out a tag from watercolor paper 
  • stamp the flower and the sentiment from the Karten-Kunst Glockenblumen-Grüße set with Versafine Clair Morning Mist
  • color the image with Derwent Inktense pencils and a damp watercolor brush
  • add dark blue splatters 
  • thread a piece of torn ribbon through the hole of the tag

Have a wonderful day.

Hugs,


Sunday, July 8, 2018
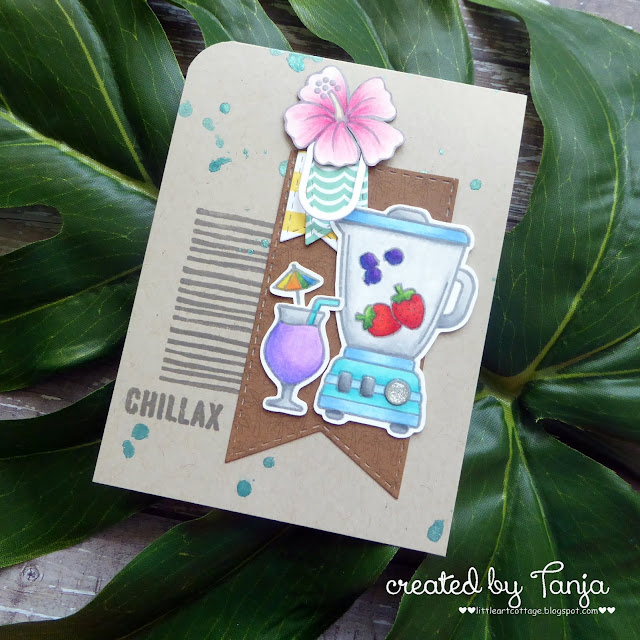
Stamp Connection #39

Hi there,

connected through our love for card making, blogging and being from Germany we (Cornelia from Stempel Spass and I) decided to create a monthly project within predefined requirements. We are going to show you the result every 2nd Sunday of the month and this is our 39th transatlantic get-together!

Our requirement for this meet-up was:
"Paper Clip"


  • stamp the blender and the cocktail glass from the Lawn Fawn So Smooth set and the hibiscus flower from the Paper Smooches Get outta Town set with Versafine Clair Morning Mist and color the images with Prismacolor Colored Pencils
  • add some shimmer and texture with Wink of Stella Clear Glitter, Nuvo Crystal Glaze and an enamel dot from the Doodlebug Design Sprinkles Silver Assortment
  • create a background on a Neenah Desert Storm cardbase with splatters of Heidi Swapp Color Shine Teal and stripes from the Flora & Fauna Texture Three set
  • cut out little fishtail banners from patterned paper from the Doodlebug Design Sweet Summer 6x6 paper pad
  • create a paper clip using a die from the My Favorite Things Hip Clips die set and add it to the upper left corner of the background banner to hold the little banners in place
  • stamp the sentiment from the STAMPlorations Beach Vibes set
  • round the top left corner with a 1'' corner rounder


Now make sure to hop over to see Cornelia's Creation.

Thanks for stopping by. We hope to see you again at the ...


Hugs,