Tuesday, July 30, 2019

You are mermazing

Hi there,

I created this lovely Mermaid Card using the Gerda Steiner Designs Mermaid Digital Stamp:

  • color the Gerda Steiner Designs Mermaid with ZIG Clean Color Real Brush Pens
  • add Stickles Glitter Glue Unicorn to her tail
  • create a background on Yupo using Alcohol Inks (Aqua, Turquoise, Silver Mixative)
  • cut out a My Favorite Things Stitched Mini Scallop Square STAX out of the Yupo
  • apply some Distress Ink Picket Fence through the Clearly Besotted Stamps Sunny Day stencil
  • cut out a hill shape from kraft cardstock and add splatters with watered-down Distress Ink Ground Espresso and white acrylic paint
  • cut out a rock and a coral from the My Favorite Things Under the Sea die set and color them with ZIG Clean Color Real Brush Pens as well
  • cut out a stitched rectangle from Neenah Desert Storm kraft cardstock
  • the sentiment from the My Favorite Things Mermazing set is heat-embossed with WOW! Bright White Super Fine embossing powder onto a strip of Neenah Desert Storm kraft cardstock


Have a wonderful day.

Hugs,


Monday, July 29, 2019

Christmas in July

Hi there,

we would like to show you some Christmas in July projects over on the Elizabeth Craft Designs Blog:

  • stamp one of the adorable little Elizabeth Craft Designs Elves and partially die cut it with its matching die
  • color the image with Derwent Inktense pencils and a damp watercolor brush
  • cut out an Elizabeth Craft Designs Stitched Rectangle from patterned paper from the ModaScrap Unconventional Christmas 6x6 paper pad
  • stamp the sentiment from the Elizabeth Craft Designs Classic Christmas Sentiments with Versamark and heat-emboss it with WOW! Metallic Gold Rich Super Fine embossing powder
  • adhere the panel onto some woodgrain paper before adding it to an off-white cardbase


Have a christmasy day.

Hugs,


Sunday, July 28, 2019

Don't just fly

Hi there,

I created this pastel hot air balloon inspired by Yana's Flower Kites:

  • stamp the hot-air balloon from the Lawn Fawn Blue Skies set with Versafine Onyx Black
  • color the image with Derwent Inktense pencils and a damp watercolor brush
  • stamp some flowers from the Neat & Tangled Bloom set with Versafine Clair Morning Mist
  • color those with Derwent Inktense pencils as well
  • create a background on a stitched panel of Neenah Desert Storm kraft cardstock using the My Favorite Things Cloud stencil and Distress Oxide Ink Broken China
  • stamp the sentiment from the STAMPlorations Noteworthy 2 set with Versamark onto a torn vellum strip and heat-emboss it WOW! Metallic Gold Rich Super Fine embossing powder
  • adhere all the layers to a pink cardbase

Thanks for stopping by.

Hugs,


Saturday, July 27, 2019

Enjoy the Ride

Hi there,

I wanted to keep this tag as masculine and simple as possible:

  • cut a CUTplorations Tag #1 from Perfect Colouring Paper
  • stamp the car and the sentiment from the STAMPlorations Enjoy the Ride set with Memento (Tuxedo Black)
  • color the image and the background with Delta, Touch Twin Brush and Copic Markers
  • thread a piece of torn beige sari silk ribbon through the hole of the tag

Have a great day.

Hugs,


Thursday, July 25, 2019

I love mew

Hi there,

hop over to the Stamping-Fairies Blog to read the step-by-step tutorial for this sweet cat project:


Thanks for stopping by.

Hugs,


Tuesday, July 23, 2019

Sea you soon

Hi there,

I created this underwater card for Gerda Steiner Designs:

  • stamp some of the images and the sentiment from the Gerda Steiner Designs Deeply set with Versafine Clair Nocturne
  • mask off the images with Masking Fluid
  • create an underwater background with Distress Ink (Mermaid Lagoon, Chipped Sapphire) and water droplets
  • remove the masking
  • color the images with watercolor pencils
  • cover a cardbase with patterned paper before adhering the panel


Have a wonderful day.

Hugs,


Monday, July 22, 2019

Ahoi

Hi there,

I created this colorful card with a Distress Oxide Ink background for the Karten-Kunst Blog:

  • cut out a stitched rectangle from watercolor paper
  • create a background using Distress Oxide Inks (Squeezed Lemonade, Carved Pumpkin, Picked Raspberry) and a Mini Ink Blending Tool
  • apply some more Distress Oxide Ink over the yellow part through a ray stencil 
  • stamp some birds from the Karten-Kunst Sommergrüße set and the sentiment from the Karten-Kunst Kalligraphie am Meer set with Versafine Onyx Black
  • adhere the panel to a black cardbase


Have a sunny day.

Hugs,


Sunday, July 21, 2019

On your Wedding Day

Hi there,

today, I would like to show you this fun wedding card:


  • stamp the little scene using stamps from the Paper Smooches Get outta town set, the masking technique and various ink pads (Versafine Onyx Black, Altenew Crisp Ink Warm Sunshine, Pure Graphite, Industrial Diamond and Silver Stone)
  • color the images with ZIG Clean Color Real Brush Pens and a damp watercolor brush
  • stamp the sentiment from the Clearly Besotted Stamps Many Mini Messages set with Versafine (Onyx Black) and add Pretty Pink Posh sequins (4mm, 6mm Sparkling Clear) as final embellishment
  • mat the stitched panel onto blue cardstock before adhering it to the cardbase

I hope you got inspired.

Yours,


Saturday, July 20, 2019

Hugs

Hi there,

I created this watercolor flower tag using lots of STAMPlorations products:

  • cut out a tag from watercolor paper using dies from the CUTplorations ATC/Tag Builder die set
  • stamp the STAMPlorations Dee's Artsy Impressions Blossom Sprays #1 with Versamark and heat-emboss the image with WOW! Bright White Super Fine embossing powder
  • color the flowers and the background with Daniel Smith and Schmincke Horadam watercolors
  • ink up the edges with Distress Oxide Ink (Broken China)
  • cut out the CUTplorations hugs directly from the tag and another three times from white cardstock
  • layer the pieces on top of each other and puzzle the sentiment back into the tag for a raised look
  • rip a piece of seam binding apart and dye it with Distress Stain (Broken China) to match the tag and thread it through the hole of the tag

Have a wonderful day.

Hugs,


Friday, July 19, 2019

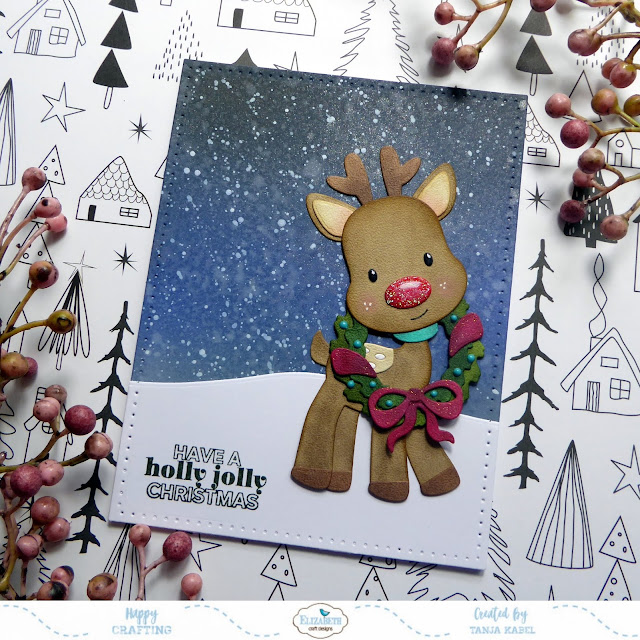
Have a holly jolly Christmas

Hi there,

I created this sweet Christmas Card with one of the new die sets from Elizabeth Craft Designs:

  • cut out all the pieces from the Elizabeth Craft Designs Reindeer die set from Elizabeth Craft Designs white Soft Finish Cardstock
  • color the elements with Delta, Touch Twin Brush and Copic Markers, add shading with Distress Ink Gathered Twigs and highlights with a white gel pen
  • add Nuvo Aqua Shimmer Midas Touch to the bow and the ribbon on the wreath, Nuvo Glitter Drops White Blizzard to the nose, Nuvo Crystal Glaze to the eyes and Nuvo Vintage Drops Bohemian Teal to create the baubles on the wreath
  • cut out a background panel from smooth white cardstock using one of the Elizabeth Craft Designs Stitched Rectangles and create a hill shape with one of the dies from the Elizabeth Craft Designs Adventure Edges set
  • add color with Distress Oxide Inks (Black Soot, Chipped Sapphire, Weathered Wood) and Blending Brushes
  • the snowflakes are created with water droplets and splatters of watered-down white acrylic paint
  • stamp the sentiment from the Elizabeth Craft Designs Joyful Wishes set with Versafine Olympia Green


Have a christmasy day.

Hugs,


Thursday, July 18, 2019

It's your Birthday

Hi there,

I created this adorable birthday card using the Avery Elle Peek a Boo Pets stamp set for the Stamping-Fairies Blog:

  • create some rectangular openings on a stitched panel of watercolor paper using masking tape
  • stamp four of the Avery Elle Peek a Boo Pets into those opening with Versafine Onyx Black and mask them off too
  • add some Distress Oxide Ink (Wilted Violet, Mermaid Lagoon, Pine Needles, Picked Raspberry) with Blending Brushes
  • stamp some confetti from the Lawn Fawn Year Nine set with Versamark and heat-emboss it with WOW! Mermaid Tails embossing powder
  • color the images with ZIG Clean Colors Real Brush Markers and the matching Blender
  • stamp the sentiment from the same set with Versafine Onyx Black, cut it out and adhere it in the center of the rectangles with double-sided foam adhesive
  • add strips of patterned paper to the left and the right side of the panel before adhering it to a white cardbase


I hope you got inspired.

Hugs,


Wednesday, July 17, 2019

Christmas Door

Hi there,

I created this card using the brand new Elisabeth Craft Designs Christmas Door die set:

  • cut out all the elements need to create the Elisabeth Craft Designs Christmas Door from Elisabeth Craft Designs white Soft Finish Cardstock
  • color all the parts with Delta, Touch Twin Brush and Copic Markers and add shading with Distress Inks (Hickory Smoke, Gathered Twigs, Forest Moss)
  • assemble the card
  • add berries and baubles with Nuvo Vintage Drops (Postbox Red, Bonnie Blue, Bohemian Teal)
  • adhere some clear glitter to the snow
  • stamp the sentiment from the Elisabeth Craft Designs Joyful Wishes set with Versamark and heat-emboss it with WOW! Metallic Gold Rich Super Fine embossing powder
  • use woodgrain paper as a backdrop before adhering everything to an off-white cardbase


Have a christmasy day.

Hugs,

Monday, July 15, 2019

Hello Poppies

Hi there,

I created this rainbow tag using some brand new Karten-Kunst stamp sets:

  • cut out a tag from watercolor paper using the largest of the Karten-Kunst Tags dies
  • stamp some poppies from the Karten-Kunst Scribble Poppies set with Versafine Smokey Gray
  • stamp the sentiment from the Karten-Kunst Kalligraphie am Meer set with Versafine Onyx Black
  • color the poppies with Zig Clean Color Real Brush Markers
  • dye a piece of torn seam binding with Distress Oxide Ink Tumbled Glass and thread it through the hole of the tag


I hope you got inspired.

Hugs,


Sunday, July 14, 2019

Stamp Connection #51

Hi there,

connected through our love for card making, blogging and being from Germany we (Cornelia from Stempel Spass and I) decided to create a monthly project within predefined requirements. We are going to show you the result every 2nd Sunday of the month and this is our 51st transatlantic get-together!

Our requirement for this meet-up was:
"stripes"

I created this bookmark using the new Create a Smile Floral Decorations stamp set and a subtle Distress Oxide Ink Striped Background:

  • cut out an Avery Elle bookmark from watercolor paper
  • stamp several images from the Create a Smile Floral Decorations set with Versamark and heat-emboss them with WOW! Bright White Super Fine embossing powder
  • add some Distress Oxide Ink (Cracked Pistachio, Faded Jeans, Dusty Concord) with Blending Brushes
  • the sentiment is a sticker from the Tim Holtz Big Chat set
  • thread twine through the hole of the tag


Now make sure to hop over to see Cornelia's Creation.

Thanks for stopping by. We hope to see you again at the ...


Hugs,


Friday, July 12, 2019

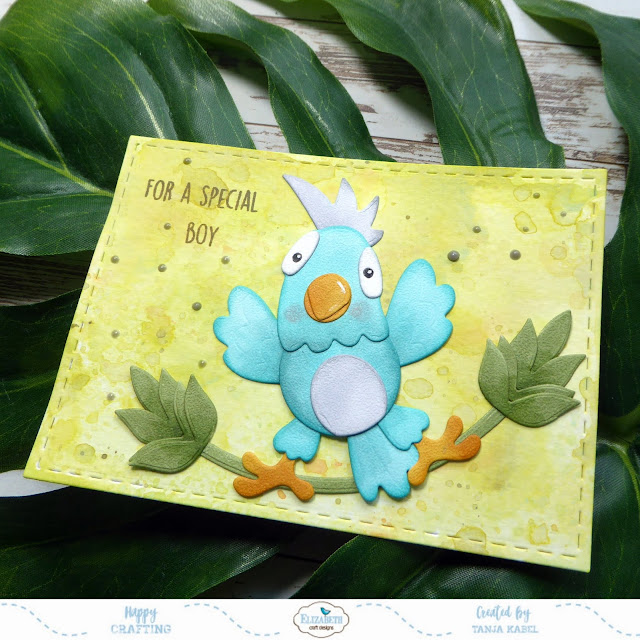
For a special Boy

Hi there,

I really think the new Elizabeth Craft Designs Parrot is one of my favorites from the new die release:


  • cut out all the elements needed to create a parrot and some greenery using the Elizabeth Craft Designs Parrot and the Elizabeth Craft Designs Jungle Leaves sets
  • add color with Delta, Touch Twin Brush and Copic Markers and add extra shading with Distress Ink and a Mini Ink Blending Tool
  • create a background on a stitched panel of watercolor paper using Distress Oxide Ink
  • stamp the sentiment from the Elizabeth Craft Designs Build your own Sentiments 1 with Distress Oxide Ink Forest Moss
  • add some Nuvo Vintage Drops Earl Grey as final embellishments


Have a wonderful day.

Hugs,