Monday, June 24, 2019

Invitation - Einladung

Hi there,

I created this cute invitation for the Karten-Kunst Blog:

  • cut out the Karten-Kunst Brückentext Einladung and three oval windows from a stitched rectangle die cut from patterned paper
  • use stamps from the Karten-Kunst Viecher auf Ballonfahrt to fill the openings
  • color the images with Lyra Rembrandt Polycolor Pencils
  • adhere all the layers to a kraft cardbase
  • add little dots of Nuvo Vintage Drops (Earl Grey, Bonnie Blue) as final embellishments


Have a wonderful day.

Hugs,


Friday, June 21, 2019

Hello Unikitty

Hi there,

the new Elizabeth Craft Designs Cat and Hats die sets allows you to create the most adorable Unikitty:


  • cut out all the elements necessary to create a Unikitty with the dies from the Elizabeth Craft Designs Cat and Hats die sets
  • add color with Delta, Touch Twin Brush and Copic Markers and add extra shading with Distress Ink
  • add Nuvo Glitter Drops White Blizzard to the star and the horn
  • create a background on a stitched panel of watercolor paper using Glitter Spray, Nuvo Expanding Mousse and a star stencil
  • adhere the sentiment cut from purple glitter paper with the help of one of the Elizabeth Craft Designs Words 2 Thinking of you dies


I hope you got inspired.

Hugs,


Thursday, June 20, 2019

It's your Birth-Yay

Hi there,

I created this colorful birthday card for the Stamping-Fairies Blog:

  • stamp the toucan and the cake from the My Favorite Things Birth-Yay set - use the masking technique
  • add some leaves from the Waffle Flower Jungle B-Day set
  • color the image with Lyra Rembrandt Polycolor pencils
  • stamp the sentiment with Versamark on a strip of black cardstock and heat-emboss it with WOW! Bright White Super Fine embossing powder
  • create a background on smooth white cardstock using Distress Oxide Ink Twisted Citron and a Blending Brush - add speckles with watered-down Distress Ink Pine Needles
  • add some Pretty Pink Posh 4 mm Mossy Green sequins as final embellishments
  • add a strip of patterned paper from the Basic Grey Fresh Cut 6x6 paper pad to the right side of the panel before adhering it to a cardbase


And again my little daughter Emily created a similar card for you:


Have a colorful day.

Hugs,


Monday, June 17, 2019

Duck Family

Hi there,

I would like to show you how to create this adorable duck family card over on the Elizabeth Craft Designs Blog:


I hope you have a wonderful day.

Hugs,


Thursday, June 13, 2019

Live your Dream with Passion

Hi there,

I would like to show you how to create this Mixed Media ATC for the Stamping-Fairies Blog:

  • cut an ATC from patterned paper
  • add Ecoline Liquid Watercolors and Alcohol Ink Mushroom
  • mist the panel with Alcohol for more texture
  • stamp the butterflies and some script from the Stampers Anonymous Papillon set with Archival Ink Black Soot
  • add some shine to the edges with a Distress Crayon Tarnished Brass
  • stamp some texture with the help of Prima Marketing Stamps and Archival Ink Watering Can
  • make some marks with a white paint marker
  • add a sentiment using stickers from the Tim Holtz Small Talk Sticker set and distress them with a black Stabilo All pencil and the Distress Crayon used on the edges of the ATC


I hope you got inspired.

Hugs,


Tuesday, June 11, 2019

Halli Hallo! - Hello!

Hi there,

Gerda Steiner has released the fabulous new Frogs stamp set with English, Spanish and German sentiments and over the next three weeks I will show you my creations with the Gerda Steiner Designs German Froesche set. This colorful lake scene is my third creation:

  • color one of the frogs and two flies from the Gerda Steiner Designs Frogs set with Alcohol Markers - add extra shading with Faber-Castell Polychromos Pencils
  • add highlights to the eyes and some freckles to the cheeks with a white gel pen
  • add shimmer to the wings of the flies with Wink of Stella Clear Glitter
  • stamp some fish and some reed from the Gerda Steiner Designs Lucky Duck set into the background - use masking fluid to mask them
  • add color to the background with the Derwent Inktense Paint Pan Set and a watercolor brush
  • remove the masking and color those images with the Derwent Inktense Paint Pan Set as well
  • adhere  the sentiment strip with double-sided foam adhesive
  • before gluing the panel down onto the cardbase add a strip of green cardstock and of striped patterned paper to the left side


Have a colorful day.

Hugs,


Monday, June 10, 2019

From the Heart - Von Herzen

Hi there,

I created this sparkly shaker card with the help of the new Karten-Kunst Wavy Heart:

  • cut out the Karten-Kunst Wavy Heart from a stitched panel of smooth white cardstock
  • stamp the sentiment from the Karten-Kunst Große Worte Überraschung set and some hearts from the Karten-Kunst Kränze & Kreise set with Altenew Crisp Ink (Heartbeat, Vineyard Berry)
  • cover the opening with acetate and create a shaker element with double-sided foam adhesive
  • fill the shaker with sequins and cover it with another layer of acetate
  • adhere the panel onto a cardbase


Have a colorful day.

Hugs,


Sunday, June 9, 2019

Stamp Connection #50

Hi there,

connected through our love for card making, blogging and being from Germany we (Cornelia from Stempel Spass and I) decided to create a monthly project within predefined requirements. We are going to show you the result every 2nd Sunday of the month and this is our 50th transatlantic get-together!

Our requirement for this meet-up was:
"try a new technique"

I created this sweet Father's Day Card using a slightly altered image from the Clearly Besotted Stamps Baby Love stamp set and tried the Split Card Design perfectly explained by the fabulous Jennifer McGuire in this blog post and video:

  • stamp the lion family from the Clearly Besotted Stamps Baby Love set with My favorite Things Hybrid Ink Chocolate Brown - leave out one of the little lions with the help of some masking tape
  • color the image with Delta, Touch Twin Brush and Copic Markers
  • add extra shading with Prismacolor Colored Pencils
  • add cloud borders cut from blue cardstock and vellum at the top and grass borders cut from green cardstock and vellum at the bottom
  • use Blending Brushes and Distress Ink (Faded Jeans, Lucky Clover) to add shading to those borders
  • stamp the sentiment from the Lawn Fawn Reveal Wheel Sentiments set onto a sentiment banner cut from kraft cardstock with that same brown ink used for the lion family
  • on the inside I added a sentiment from the My Favorite Things Bring out the Sunshine Set and the clouds and the sun die cut with the help of the WPlus9 Sunshine Layers die set


I hope you got inspired to try this awesome technique too. 

Now make sure to hop over to see Cornelia's Creation.

Thanks for stopping by. We hope to see you again at the ...


Hugs,


Friday, June 7, 2019

I Woof You!

Hi there,

I created this sweet little scene using some of Joset's terrific new die sets from Elizabeth Craft Designs:

  • cut out the elements necessary to create the Elizabeth Craft Designs Dog House and the Elizabeth Craft Designs Dog 
  • add color using Delta, Touch Twin Brush and Copic Markers and extra-shading with Distress Ink and a Mini Ink Blending Tool
  • create a background on a stitched panel of watercolor paper using Distress Oxide Ink, a Blending Brush and a cloud stencil
  • add a grass border cut with the help of die from the Elizabeth Craft Designs Tree set
  • stamp the sentiment and the paws from the Elizabeth Craft Designs Furrever Friends set and Versafine Clair Fallen Leaves
  • adhere everything to a cardbase


Which one is your favorite from the new die release?

Hugs,


Thursday, June 6, 2019

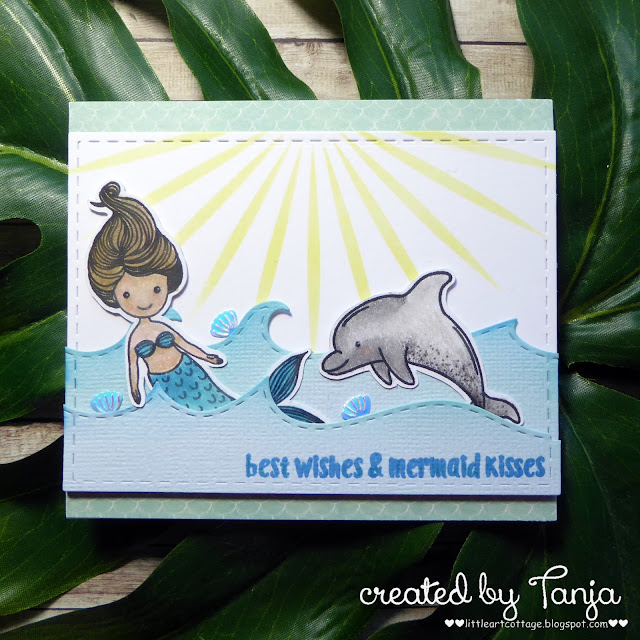
Mermaid Kisses

Hi there,

I created this sweet card for the Stamping-Fairies Blog:

  • stamp one of the mermaids and the dolphin from the Uniquely Creative Mermaid Kisses set and color the images with Faber-Castell Polychromos pencils
  • add highlights with a white gel pen and some sparkle with Wink of Stella Clear Glitter
  • cut out a stitched rectangle from smooth white cardstock and add sun rays with Distress Oxide Ink Squeezed Lemonade
  • cut out some waves from light blue cardstock and add shading with Distress Oxide Ink Salty Ocean
  • stamp the sentiment from the same set with Versafine Deep Lagoon
  • add three shell-shaped sequins as final embellishments
  • cover the cardbase with patterned paper from the Authentique Sea-Maiden 6x6 paper pack before adhering the scene


Today, I have a special treat for you: My little daughter Emily (8) created a similar card for you. Didn't she do an amazing job?


Have a wonderful day.

Hugs,


Tuesday, June 4, 2019

Best Dad Tag

Hi there,

we are starting a new TAGplorations Challenge over on the STAMPlorations Blog and this month it is All about Dad and the Optional Twist is Stencils:

  • cut out one of the CUTplorations Manila Tags from watercolor paper
  • create a background using Distress Inks (Broken China, Rusty Hinge, Peeled Paint)
  • add some water droplets for more texture
  • apply some Distress Ink (Walnut Stain) through the ARTplorations Foiled again Mini stencil and ink up the edges of the tag with that same ink as well
  • cut out the base of the CUTplorations Shaker Balloon #1 Heart directly from the tag and cut the other elements for a shaker from acetate and foam rubber
  • before closing the shaker add some Little Things from Lucy's Cards Fairy Dust 
  • add a balloon string and a little bow from natural twine
  • create the sentiment with the help of a Dymo Laber Maker
  • thread a piece of beige Sari Silk Ribbon through the hole of the tag

I hope you got inspired.

Hugs,


Monday, June 3, 2019

Mr and Mrs

Hi there,

today we are showing you all kinds of Wedding Projects on the Elizabeth Craft Designs Blog and this is my creation:

  • cut out a stitched panel from watercolor paper using one of the Elizabeth Craft Designs Stitched Rectangles 
  • stamp the flower circle and the sentiment from the ModaScrap Wedding Stamps set with Versamark and heat-emboss it with WOW! Metallic Platinum embossing powder
  • color the background with Schmincke Horadam watercolor and add pink and Perfect Pearls splatters
  • add a strip of dark green cardstock and of pink glitter paper to the left side of the panel before adhering it to a white cardbase


I hope you got inspired.

Hugs,