Showing posts with label CUTplorations. Show all posts

Tuesday, June 30, 2026

STAMPlorations Birthday Celebration

Hi there,

it’s time to celebrate! The STAMPlorations Birthday Celebration is officially here, and I’m thrilled to show you the projects I created for this wonderful milestone.

While my heart is full of joy for this celebration, it is also heavy with emotion, as this will be my very last post as a member of the Design Team. I joined this amazing team back in July 2015, and looking back at the past 11 years, I am filled with immense gratitude.

Shery, thank you for welcoming me into this beautiful community all those years ago. Your warmth and generosity have meant the world to me.

Thank you to my fellow team members who have supported me along the way. Let’s shower STAMPlorations with love during this Birthday Celebration (June 29 – July 3) and help ensure this wonderful business thrives for many years to come!


Love and Hugs,


Monday, May 11, 2026

STAMPlorations Spring Fling

Hi there,

it's time for our Spring Fling Event over on the STAMPlorations Blog:


  • cut out a CUTplorations Manila Tag from watercolor paper
  • create a background with Frau von Bommel watercolors and dye a piece of torn seam binding with those colors as well
  • adhere one of the STAMPlorations Color Me Spring ATCs to the tag 
  • add a sentiment from the STAMPlorations Hello Spring Clear Sticker set - use a white gel pen on the black letters of the sticker for better legibility
  • thread the seam binding through the hole of the tag

Have a wonderful day.

Hugs,


Monday, April 20, 2026

Birthday Cupcake

Hi there,

this is just a quick reminder of this month's Anything Goes Challenge over on the STAMPlorations Blog:

  • cut out the CUTplorations ATC/Gift Card Envelope from patterned paper
  • build the CUTplorations Cupcake Builder #2 from colored cardstock and add extra shading with Distress Inks
  • stamp the sentiment from the STAMPlorations Kathryn's Big Wishes set with Versamark onto a banner cut from turquoise cardstock and heat-emboss it with WOW! Bright White Super Fine embossing powder 
  • add some heart-shaped sequins as final embellishments

I hope you got inspired.

Hugs,


Monday, April 6, 2026

Thanks Butterfly

Hi there,

it is time for our monthly Anything Goes Challenge over on the STAMPlorations Blog and this is my creation:

  • create a rainbow background on a piece of watercolor paper using Distress Oxide Inks
  • cut out the CUTplorations Flutter Zen 1 Butterfly
  • create a shaker element with the help of acetate, double-sided foam adhesive and sequins
  • cut out the CUTplorations Skinny Sentiments Thanks from vellum and black cardstock 
  • add strips of colored cardstock and of patterned paper to the left and right side of the panel before adhering it to a cardbase
  • add some clear sequins as final embellishments

I can't wait to see your creation.

Hugs,


Sunday, March 22, 2026

New STAMPlorations ATCs

Hi there,

I just wanted to let you know that there are some fabulous new STAMPlorations ATC packs out in the shop. On these projects I used the Retro Femme, Color Me Spring and the Whimsical Homes:

  • create a background on a piece of watercolor paper using acrylic paint, the STAMPlorations Mixed Media Grunge set, Versafine Clair Pinecone and clear embossing powder
  • distress the edges of one of the STAMPlorations Retro Femme ATCs and add a sentiment from the STAMPlorations Hey Sunshine Clear Sticker set

  • cut out the CUTplorations Butterfly Cover Plate from colored cardstock, ink up the edges with Distress Ink Picked Raspberry and add splatters with watered-down white acrylic paint
  • stamp the sentiment from the STAMPlorations So loved set with Versafine Clair Nocturne
  • round two corners of one of the STAMPlorations Color Me Spring ATCs and adhere it to the background

  • create a background on a piece of watercolor paper using Distress Oxide Ink (Worn Lipstick, Dried Marigold, Forest Moss) and one of the CUTplorations Lacy Edges and Borders 
  • adhere one of the STAMPlorations Whimsical Houses ATC to a piece of dotted cardstock
  • stamp the sentiment from the STAMPlorations Subway Art Builder Create with Versafine Clair Portobello

I hope you got inspired.

Hugs,


Friday, March 20, 2026

Awesome

Hi there,

this is just a quick reminder of this month's Anything Goes Challenge over on the STAMPlorations Blog:

  • stamp the STAMPlorations In Bloom: Heartfelt Hibiscus with Versafine Onyx Black and fuzzy cut the image
  • create a background on a panel of smooth white cardstock by applying Distress Ink (Salvaged Patina, Peacock Feathers) through the ARTplorations Leaf Prints stencil
  • add splatters with watered-down black acrylic paint
  • cut out the CUTplorations awesome twice from white cardstock and once from black cardstock - ink up the bottom with Distress Ink Peacock Feathers
  • add a strip of black cardstock and of patterned paper to the left side of the panel before adhering it to a cardbase

Thanks for stopping by.

Hugs,


Friday, March 6, 2026

Make each Day your Masterpiece

Hi there,

it is time for our monthly Anything Goes Challenge over on the STAMPlorations Blog and this is my creation:

  • cut out one of the CUTplorations Stitched Tags from watercolor paper
  • glue on a picture of mountains and trees with multi medium
  • add some white gesso to let the picture appear to be more in the background
  • apply some texture paste through the ARTplorations Flair slimline stencil
  • add some color using a brown and turquoise Stabilo Woody and Ecoline Liquid Watercolor in gold
  • apply brown Stabilo All pencil at the edges of the tag
  • alter some corrugated cardboard with the same colors and dye a piece of cheesecloth with Distress Ink Ground Espresso
  • stamp the sentiment from the STAMPlorations Softly set with Versamark and heat-emboss it with WOW! Bright White Super Fine embossing powder
  • ink up the edges of the sentiment strip with that same brown Distress Ink used to dye the cheesecloth
  • thread torn Sari Silk Ribbon through the hole of the tag

I hope you got inspired.

Hugs,


Tuesday, February 24, 2026

Wanderlust Wayside Collage Paper Pack

Hi there,

today I am using the new Wanderlust Wayside collage paper pack, one of 9 brand-new packs in the STAMPlorations Anthology collection:

  • adhere one of the STAMPlorations Collage Papers from the Wanderlust Wayside set to a cardbase
  • ink up the edges with Distress Ink Walnut Stain
  • add some texture using the dot pattern from the STAMPlorations Scribbly Splattery Grunge set and Distress Oxide Ink Tattered Rose
  • add some CUTplorations Dragonflies cut from colored cardstock
  • add the sentiment from the Hey Sunshine Clear Sticker set

  • cut out the Crealies Postage Frame Odette from one of the STAMPlorations Collage Papers from the Wanderlust Wayside set
  • use some white acrylic paint and Distress Ink Walnut Stain to give it a worn look
  • stamp some texture with Distress Oxide Ink Walnut Stain using stamps from the STAMPlorations Mixed Media Grunge and Art Marks sets and from the Waffle Flower Postage Collage set 
  • cut out the CUTplorations Relax from woodgrain paper and ink up the bottom of each letter with Distress Ink Walnut Stain
  • layer the postage stamps on a kraft panel before adhering it to a cardbase

You have until March 4th to grab the full collection at the special pre-order price -- a huge 45% OFF! 

Hugs,


Thursday, September 12, 2024

Celebrate Jellyfish

Hi there,

on this card for Mennys Bastelshop I used the My Favorite Things Ocean-Sized Hugs stamp set:

  • stamp an image from the My Favorite Things Ocean-Sized Hugs set with Gina K. Designs Obsidian and color it with Derwent Inktense Pencils and a waterbrush
  • add highlights with a white gel pen and a Karin Decogel Star Sparks pen
  • create a background using Distress Ink (Chipped Sapphire, Black Soot), foiled cardstock, vellum and colored cardstock
  • run blue cardstock through your Big Shot in the Spellbinders Tiny Dots embossing folder
  • add the sentiment using black cardstock, vellum and one of the CUTplorations Skinny Sentiments

Have a wonderful day.

Hugs,


Sunday, May 19, 2024

Hello Watercolor Flowers

Hi there,

I created this lovely Flower Card for Anjas Basteltraum:

  • stamp some flowers and leaves from the Anjas Basteltraum Blumengrüße set with Versamark onto a square panel of watercolor paper and heat-emboss them with WOW! Metallic Silver Super Fine embossing powder
  • watercolor the images with Frau von Bommel watercolors
  • cut out the panel with a My Favorite Things Wonky Stitched Square and layer it on top of a peach cardbase
  • cut out the Hello from the CUTplorations Skinny Sentiments from vellum and peach cardstock and add it as a sentiment

I hope you are having a wonderful day.


Thursday, April 18, 2024

Happy Jungle Birthday

Hi there,

I created this wild Birthday Card for Mennys Bastelshop:

  • stamp a bird and some flowers from the Avery Elle Toucan Party set with Gina K. Designs Obsidian
  • color the images with Spectrum Noir Triblend Markers, add extra shading with Faber-Castell Polychromos pencils and highlights with a white gel pen
  • run kraft cardstock through your Big Shot in the Sizzix Tropical Leaves embossing folder
  • ink up the edges of the panel with Distress Ink Walnut Stain
  • cut out the CUTplorations Skinny Sentiments Happy Birthday from vellum and colored cardstock
  • add texture to the flower centers with the Karin Decogel Milky Way Orange pen


Thanks for stopping by.

Hugs,


Monday, December 19, 2022

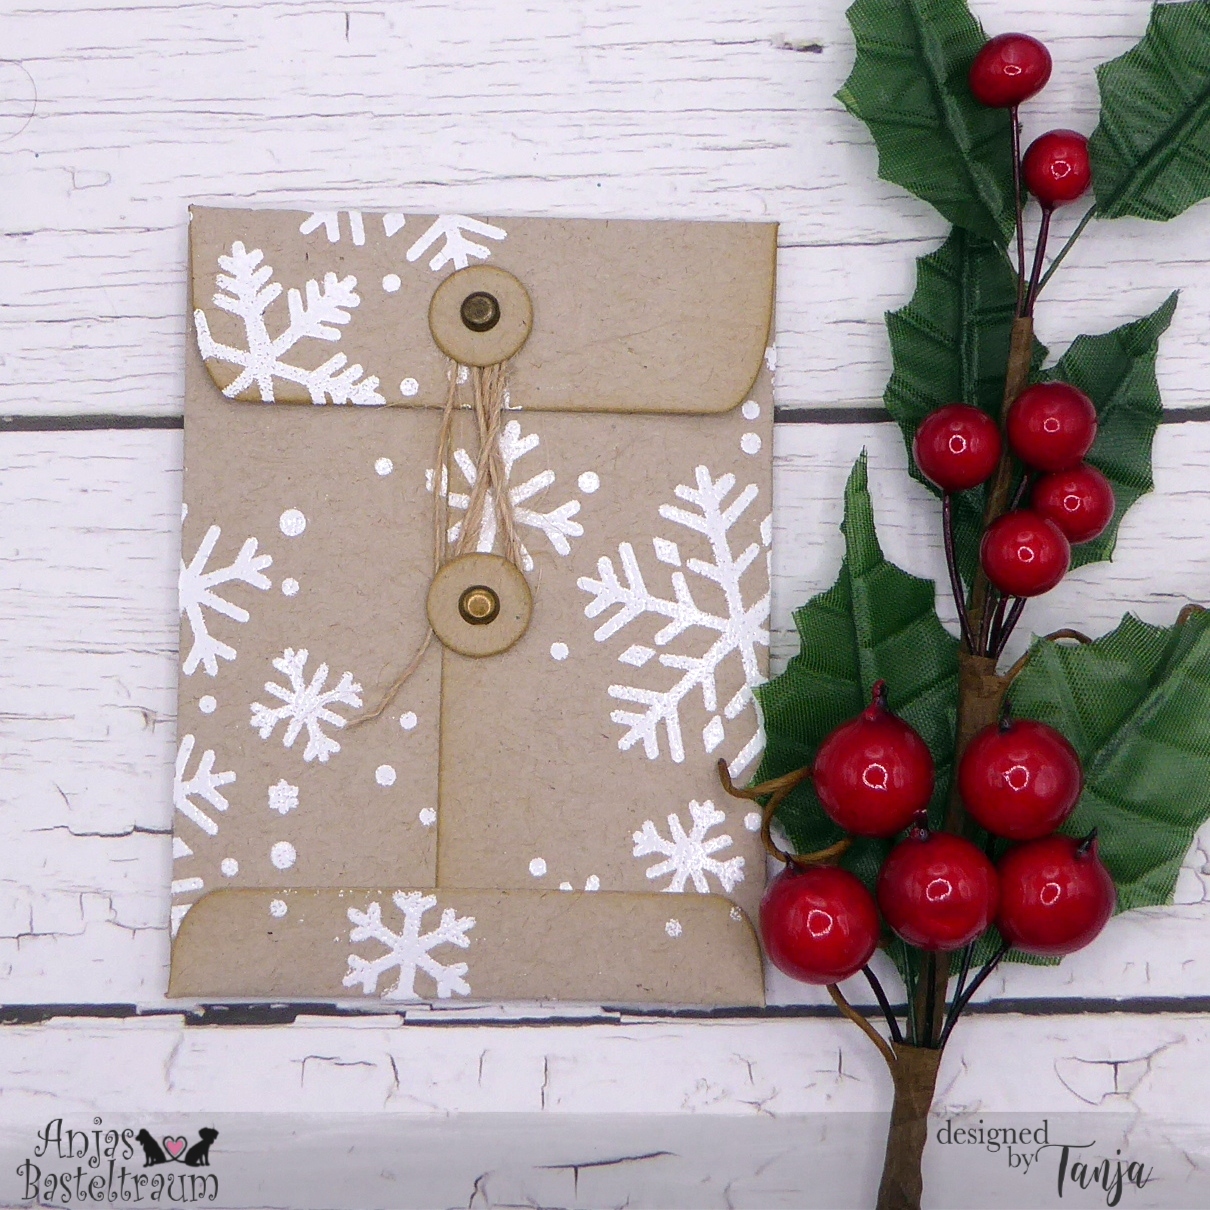
Gift Card Pocket

Hi there,

I created this Gift Card Pocket for the Karten-Kunst Blog:

  • cut out the CUTplorations ATC/Gift Card Envelope from kraft cardstock
  • stamp the Karten-Kunst Script Weihnachtsgedicht with Versamark and heat-emboss it with clear embossing powder
  • add color to the Gift Card Pocket with Distress Ink (Chipped Sapphire, Faded Jeans)
  • create a closing mechanism using two die cut circles, two mini brads and some twine
  • cut out the 24 with the help of the Karten-Kunst Lucky Numbers set - once from silver foiled cardstock and once from white glitter paper
  • adhere the number in the middle of the pocket
  • embellish the envelope with the Karten-Kunst Mini Snowflake 2 also cut from white glitter paper

Have a wonderful Christmas Time.

Hugs,


Wednesday, September 7, 2022

Reindeer Gift Card Pocket

Hi there,

I created this Gift Card Pocket using the Anjas Basteltraum Rentierpost stamp set:


  • stamp one of the reindeer from the Anjas Basteltraum Rentierpost set with Lawn Fawn Crunchy Leaf and color the image with Spectrum Noir Triblend Markers
  • use Faber-Castell Polychromos pencils for extra shading and a white gel pen for the highlights
  • cut out the CUTplorations ATC/Gift Card Pocket from Neenah Desert Storm kraft cardstock
  • apply Versamark through the Lawn Fawn Snowflake Background stencil and heat emboss the snowflakes with WOW! Bright White Super Fine embossing powder
  • add a closing mechanism using die cut circles, brads and a string of twine
  • ink up the edges of the pocket with Distress Ink Gathered Twigs
  • decorate the envelope with die cuts from the Tim Holtz Holiday Greens and Funky Festive sets
  • add a foiled die cut number "24" from the Spellbinders Be Bold Lowercase Alphabet and Numbers set


I hope you got inspired.

Hugs,


Tuesday, July 26, 2022

Celebrate

Hi there,

I created this colorful Birthday Card using the Gerda Steiner Designs Birthday Bear stamp set:

  • stamp the image from the Gerda Steiner Designs Birthday Bear set with Lawn Fawn Jet Black
  • color the image with Spectrum Noir Triblend Markers, add extra shading with Faber-Castell Polychromos pencils and highlights with a white gel pen
  • create a background with the help of the Clearly Besotted Stamps Splat It stencil and Distress Oxide Ink (Picked Raspberry, Salty Ocean)
  • add some glittery water droplets for more texture
  • cut out the Celebrate from the CUTplorations Skinny Sentiments die set - the background layer from vellum and the letters from white cardstock colored with Distress Ink Picked Raspberry
  • add a strip of holographic paper to the left and right of the panel before adhering it to a cardbase


Have a colorful day.

Hugs,


Wednesday, June 15, 2022

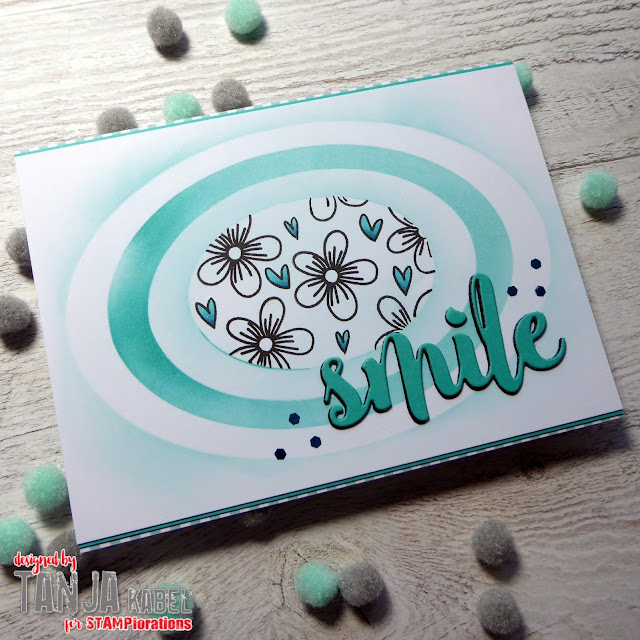
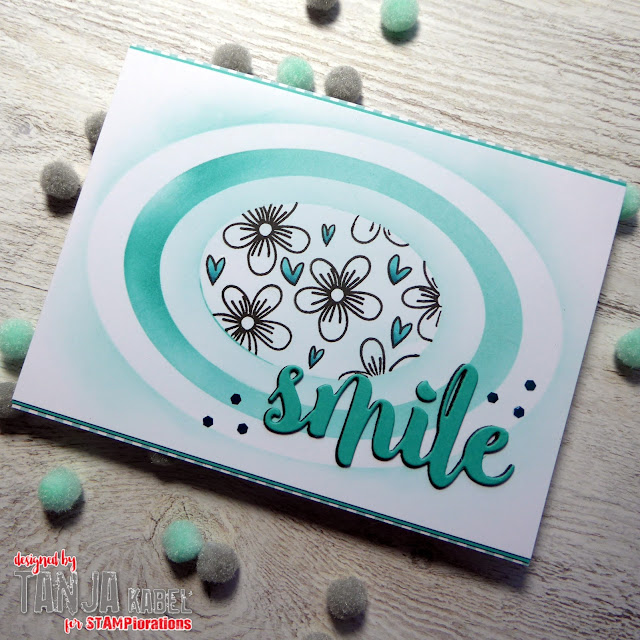
Smile Ovals

Hi there,

it's time for another Wednesday - STAMPday feature. Today the fabulous Monika from Tinkercards Designs is joining me and we decided to use the Flexi Ovals stencil set to create our projects:

  • create a backdrop using the ARTplorations Flexi Ovals stencils and masks and Distress Oxide Ink (Salvaged Patina, Peacock Feathers)
  • stamp some flowers and hearts from the STAMPlorations It's a Girl Thing: Sunshine set with Lawn fawn Jet Black into the inner opening 
  • color the hearts with Spectrum Noir Triblend Markers
  • add a strip of turquoise cardstock and of patterned paper to the top and bottom of the panel before adhering it to a cardbase
  • cut out the CUTplorations Smile from black and turquoise cardstock and layer them slightly offset on top of each other for a shadow effect
  • embellish the card with some hexagon sequins


And this is Monika's vibrant and colorful project. I just love the bright and cheery vibes of this virtual hug.


Thanks for stopping by.

Hugs,


Wednesday, May 25, 2022

Beautiful Day

Hi there,

on today's Wednesday - STAMPday feature the wonderful Nancy from Scandinancy Creates is joining me and we created these Birthday Projects for you:

  • stamp one of the cupcakes from the STAMPlorations Happy Everything set with Lawn Fawn Jet Black and color the image with Spectrum Noir Triblend Markers
  • embellish the cupcake with the Stardust Gelly Roll Pen and Nuvo Crystal Drops Carnation Pink
  • stamp the sentiment from the same set with Distress Oxide Ink (Salvaged Patina, Peacock Feathers) for an ombre look
  • add strips a turquoise cardstock and patterned paper cut with one of the CUTplorations Lacy Borders dies before adhering the panel to a cardbase


And this is Nancy's project - love that pretty ombre effect:


I hope you got inspired.

Hugs,