Showing posts with label ZIG Clean Color Real Brush Pens. Show all posts

Monday, August 31, 2020

My thoughts are with you

Hi there,

I created this pastel watercolor card with the brand new Karten-Kunst Scribble Roses stamp set:

  • stamp several of the roses from the Karten-Kunst Scribble Roses set with Versamark onto a panel of watercolor paper and heat-emboss them with WOW! Bright White Super Fine embossing powder
  • color the roses with ZIG Clean Color Real Brush Pens
  • add splatters with watered-down black acrylic paint
  • stamp the sentiment from the Karten-Kunst Aus der Schreibmaschine 2 set with Versamark onto a strip of black paper and heat-emboss it with that same white embossing powder
  • add a strip of black cardstock to the left and right of the panel before adhering it to a cardbase

Thanks for stopping by.

Hugs,


Sunday, January 19, 2020

Get Well Soon Bunny

Hi there,

I created this sweet Get Well Soon Card using the super sweet Clearly Besotted Stamps Under the Weather set:

  • cut out the frame from the My Favorite Things Blueprints 29 die set from watercolor paper
  • cut out two Paper Smooches Gift Tags 2 - one from watercolor paper and one from patterned paper from the My Favorite Things Rainbow Stripes 6x6 paper pad
  • stamp images and the sentiment from the Clearly Besotted Stamps Under the Weather set with Versafine (Smokey Gray) onto the little panels
  • color the images with ZIG Cleancolor Real Brush Pens and a damp watercolor brush
  • color the frame with Distress Ink (Peacock Feathers) and add water droplets for some texture
  • use a silver gel pen to add random dots around the sentiment
  • thread a string of teal twine through the holes of the tags
  • mount the frame onto a stitched panel cut from light grey cardstock before adhering it to a white cardbase

I hope you got inspired.

Hugs,


Saturday, December 28, 2019

Season's Greeting Slider Card

Hi there,

I created this Christmas Slider Card using lots of Lawn Fawn goodies:

  • cut out the all the elements for a slider card from watercolor paper using the Lawn Fawn Double Slider Surprise die set
  • add color to the background using Distress Oxide Inks (Blueprint Sketch, Chipped Sapphire)
  • use watered-down white gouache to create snowfall splatters
  • build a scene using the Mama Elephant Snow Capped Mountains and the Lawn Fawn Road Border and white, light grey and dark grey cardstock
  • add shading to the mountains with Distress Ink Pumice Stone
  • stamp the little car from the Lawn Fawn Home for the Holidays set and some houses, a lantern and a tree from the Lawn Fawn Winter Village set with Versafine Onyx Black onto watercolor paper
  • color the images with Clean Color Real Brush Pens, Distress Markers and a damp watercolor brush
  • adhere patterned paper from the Pinkfresh Studio December Days 6x6 paper pad to the cardbase 
  • stamp the sentiment from the Lawn Fawn Home for the Holidays set with Versafine Onyx Black 
  • add little hearts die cut from red glitter cardstock with the help of the Mama Elephant Confetti die
  • heat-emboss the little garland onto the tree using Versamark and WOW! Metallic Gold Rich Pale embossing powder
  • punch a little hole into the slider panel and add silver thread


I hope you got inspired.

Hugs,


Tuesday, December 17, 2019

Magical Snowman

Hi there,

this is another Gerda Steiner Designs Christmas Project and on this card I used the adorable Gerda Steiner Designs Happy Snowman Stamp Set:

  • stamp the snowman and the bird from the Gerda Steiner Designs Happy Snowman set with Versafine Clair Morning Mist
  • color the image with ZIG Clean Color Real Brush Pens
  • color the background with watered-down Distress Re-Inker Stormy Sky and a watercolor brush
  • apply Nuvo Glacier Paste Frostbite through the Memory Box Tiny Snowflakes stencil and let this layer dry thoroughly
  • cut out the STAMPlorations Magical word die from silver cardstock and add it to the top of the panel as a sentiment
  • add to strips of patterned paper to the left and the right of the panel before adhering it to a cardbase


Have a christmasy day.

Hugs,


Friday, December 13, 2019

Joy

Hi there,

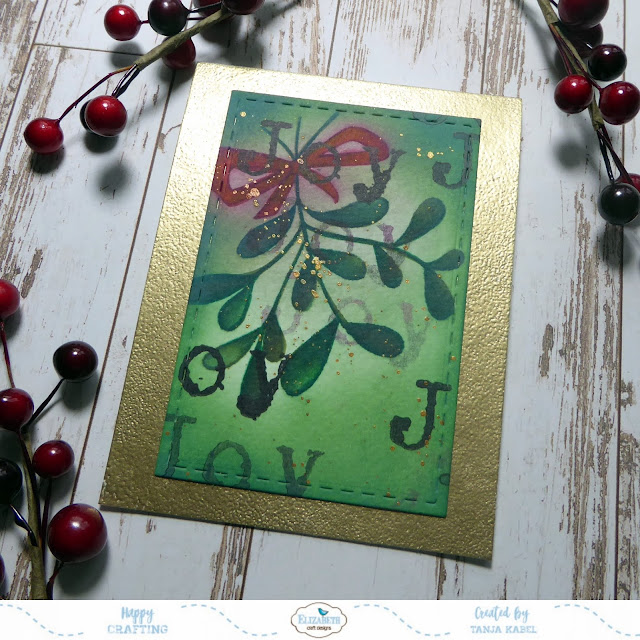
I created this Christmas Card using one of the wonderful Charlene van der Vorst stamp sets from Elizabeth Craft Designs:

  • cut out a stitched panel from watercolor cardstock using one of the Elizabeth Craft Designs Stitched Rectangles 
  • stamp the mistletoe from the Elizabeth Craft Designs Oh the Joy of Christmas set with Ink on 3 Fadeout Ink  and color the image with ZIG Clean Color Real Brush Pens
  • ink up the background with Distress Ink Pine Needles and a Blending Brush
  • add some splatters with Finetec Mica Watercolors Inca Gold
  • stamp the sentiment from the same set with Versafine Clair Nocturne - use first, second and even third generation stamping
  • cover the edges of the cardbase with Versamark and heat-emboss them with WOW! Metallic Gold Rich embossing powder


Have a christmasy day.

Hugs,


Tuesday, September 3, 2019

Gnome Couple

Hi there,

today, I would like to show you this sweet little Gerda Steiner Designs Gnome Couple:

  • color the Gerda Steiner Designs Gnome Couple with ZIG Clean Color Real Brush Pens
  • take a white rectangular piece of cardstock and stamp the Purple Onion Designs Sign and color it with Delta, Touch Twin Brush and Copic Markers
  • create some grass using the My Favorite Things Grassy Edges and Distress Oxide Ink Bundled Sage and some clouds with the help of the My Favorite Things Mini Cloud Edges stencil and Distress Oxide Ink Tumbled Glass
  • stamp the sentiment from the Create a Smile Kleine Sprüche set into the wooden sign with Versafine Onyx Black ("Für Immer" is German and means "for ever")


Have a wonderful day.

Hugs,

Monday, September 2, 2019

Hello Red Poppies

Hi there,

I created this bright poppy card for the Karten-Kunst Blog:

  • cut out a stitched rectangle from watercolor paper
  • stamp the poppies from the Karten-Kunst Scribble Poppies set and the sentiment from the Karten-Kunst Kalligraphie am Meer set with Versafine Onyx Black
  • color the images with ZIG Clean Color Real Brush Markers
  • add some splatters with watered-down black acrylic paint
  • add a strip of black cardstock and some red glitter paper to the left side of the panel before adhering it to a cardbase


I hope you got inspired.

Hugs,


Tuesday, August 27, 2019

Let's meet Mouse Tag

Hi there,

I created this sweet little mouse tag using the Gerda Steiner Designs Tea-riffic Mouse Digital Stamp:

  • color the Gerda Steiner Designs Tea-riffic Mouse with Faber-Castell Polychromos pencils
  • add details with a white gel pen
  • cut out a tag from Neenah Desert Storm kraft cardstock and apply Distress Ink Ground Espresso to the Scrapberry's Mini Hearts stencil
  • cut out a speech bubble and stamp the sentiments from the STAMPlorations Hello you set with Versafine Vintage Sepia
  • ink up the edges of the speech bubble and the whole tag with that same brown Distress Ink
  • thread two strands of twine through the hole of the tag


Have a wonderful day.

Hugs,


Tuesday, August 20, 2019

Sweet Ice Cream Tag

Hi there,

I created this fun summer tag using the Gerda Steiner Designs I Scream Ice Cream Digital Stamp:

  • color the Gerda Steiner Designs I Scream Ice Cream with ZIG Clean Color Real Brush Pens and add details with a white gel pen
  • cut out a CUTplorations Luggage Tag from watercolor paper and create a background wash with Prima Marketing Metallic Pastel Accents
  • stamp the altered sentiment from the Lawn Fawn Sweetest Flavor set with Versafine Onyx Black
  • thread a strand of twine through the hole of the tag


Have a sunny day.

Hugs,


Monday, August 19, 2019

Summer Dream

Hi there,

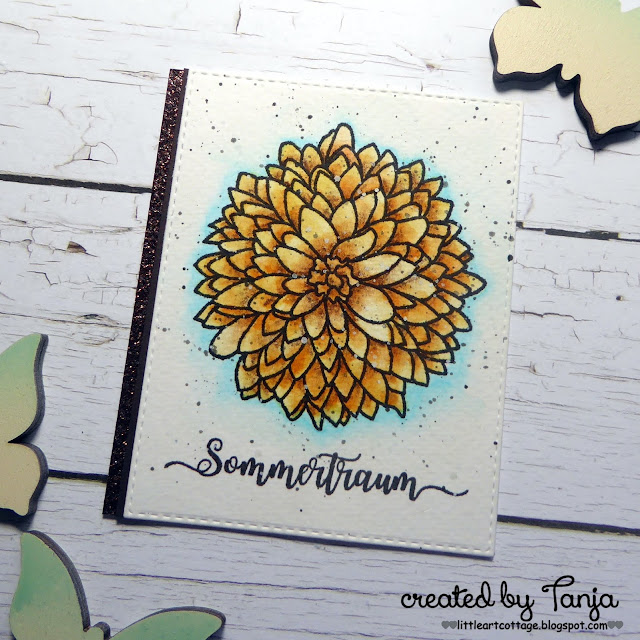
I created this bright summer card for the Karten-Kunst Blog:

  • stamp the beautiful large Chrysanthemum from the Karten-Kunst Chrysanthemum set and the sentiment from the Karten-Kunst Kalligraphie am Meer set with Versafine Clair Fallen Leaves
  • color the image and the background with ZIG Clean Color Real Brush Markers and add extra shading with a brown PITT Pastel pencil
  • add some splatters with watered-down black and white acrylic paint
  • add a strip of brown cardstock and some brown glitter paper so the left side of the panel before adhering it to a cardbase


Have a wonderful day.

Hugs,


Tuesday, August 13, 2019

Long Live Snailmail

Hi there,

the card I created using the Gerda Steiner Designs Snailmail Digital Stamp is suitable for almost every occasion:

  • color the Gerda Steiner Designs Snailmail Snail with Zig Clean Color Real Brush Pens and add extra details with fineliners
  • create a background on a stitched panel of watercolor paper with the help of envelope stamps from the Lawn Fawn You've got Mail set and from the Create a Smile Bärmail set, Versamark, WOW! Bright White Super Fine embossing powder and Prima Marketing Metallic Accents watercolors
  • cut out a grass border from green cardstock and add shading and splatters with Distress Oxide Ink Mowed Lawn 
  • stamp the sentiment from the Concord & 9th Perfectly Penned set onto a strip of Neenah Desert Storm kraft cardstock with Versamark and heat-emboss it with WOW! Bright White Super Fine embossing powder
  • adhere the panel to a piece of patterned paper before gluing everything to the cardbase


I hope you got inspired.

Hugs,


Tuesday, August 6, 2019

Ha-Bee Birthday!

Hi there,

I created this super sweet Birthday Card using the Gerda Steiner Designs Ha-bee Birthday! Digital Stamp:

  • color the Gerda Steiner Designs Ha-bee Birthday! Bee with Zig Clean Color Real Brush Markers
  • add Stickles Glitter Glue Unicorn to the wings
  • cut out a stitched panel from Neenah Desert Storm kraft cardstock 
  • apply Distress Oxide Ink Wild Honey through the Clearly Besotted Stamps Honeycomb stencil with a Blending Brush
  • add to strips of patterned paper from the Lawn Fawn Knit Picky Fall 6x6 paper pad to the left and the right of the panel before adhering it to a cardbase


Have a wonderful day.

Hugs,


Tuesday, July 30, 2019

You are mermazing

Hi there,

I created this lovely Mermaid Card using the Gerda Steiner Designs Mermaid Digital Stamp:

  • color the Gerda Steiner Designs Mermaid with ZIG Clean Color Real Brush Pens
  • add Stickles Glitter Glue Unicorn to her tail
  • create a background on Yupo using Alcohol Inks (Aqua, Turquoise, Silver Mixative)
  • cut out a My Favorite Things Stitched Mini Scallop Square STAX out of the Yupo
  • apply some Distress Ink Picket Fence through the Clearly Besotted Stamps Sunny Day stencil
  • cut out a hill shape from kraft cardstock and add splatters with watered-down Distress Ink Ground Espresso and white acrylic paint
  • cut out a rock and a coral from the My Favorite Things Under the Sea die set and color them with ZIG Clean Color Real Brush Pens as well
  • cut out a stitched rectangle from Neenah Desert Storm kraft cardstock
  • the sentiment from the My Favorite Things Mermazing set is heat-embossed with WOW! Bright White Super Fine embossing powder onto a strip of Neenah Desert Storm kraft cardstock


Have a wonderful day.

Hugs,