Showing posts with label Distress Stains. Show all posts

Thursday, August 15, 2024

You are Sew Amazing

Hi there,

I created this card with real stitching for Mennys Bastelshop. I used the Lawn Fawn Embroidery Hoop and the Embroidery Hoop Flower Add-On and the Lawn Fawn Sew Very Mice stamp set.

  • cut out the Lawn Fawn Embroidery Hoop and the Embroidery Hoop Flower Add-On from Grass Cardstock
  • stitch the flower with yellow and two shades of pink embroidery floss
  • alter the frame with Distress Ink (Vintage Photo, Walnut Stain), Distress Stains Tarnished Brass and Distress Embossing Powder Vintage Photo
  • stamp two mice from the Lawn Fawn Sew Very Mice set with Gina K. Designs Obsidian
  • color the images with Spectrum Noir Triblend Markers, add extra shading with Faber-Castell Polychromos pencils and highlights with a white gel pen
  • create a background using the Spellbinders Mandala Blooms embossing folder on grass cardstock and ink up the edges with Distress Ink Walnut Stain
  • cut out a sentiment banner from grass cardstock, stamp the sentiment from the same set with Versafine Clair Fallen Leaves and heat-emboss it with clear embossing powder

Have a wonderful day.

Hugs,


Thursday, July 11, 2024

Hello Koala

Hi there,

I used the adorable Avery Elle Sending Hugs stamp set to create this card for Mennys Bastelshop:

  • cut out the Mama Elephant Oval Deco Frame, some leaves and flowers from watercolor paper
  • stamp the little koala from the Avery Elle Sending Hugs set with Versafine Smokey Gray onto the oval and color the image, the background, the leaves, the flowers and the frame with Frau von Bommel watercolors
  • add highlights with a white gel pen and little drops of Nuvo Crystal Drops Buttermilk to the center of the flowers
  • for more texture tap the frame with a sponge and Distress Stain Antiqued Bronze
  • for the background use the Spellbinders Leafy embossing folder on grass cardstock and ink up the edges with Distress Ink Gathered Twigs
  • cut out the My Favorite Things Essential Hello from grass cardstock, ink up the edges with Distress Ink Gathered Twigs and cover the bottom part with Ranger Copper embossing powder


I hope you got inspired.

Hugs,


Monday, April 24, 2023

Elegant Flower Tag

Hi there,

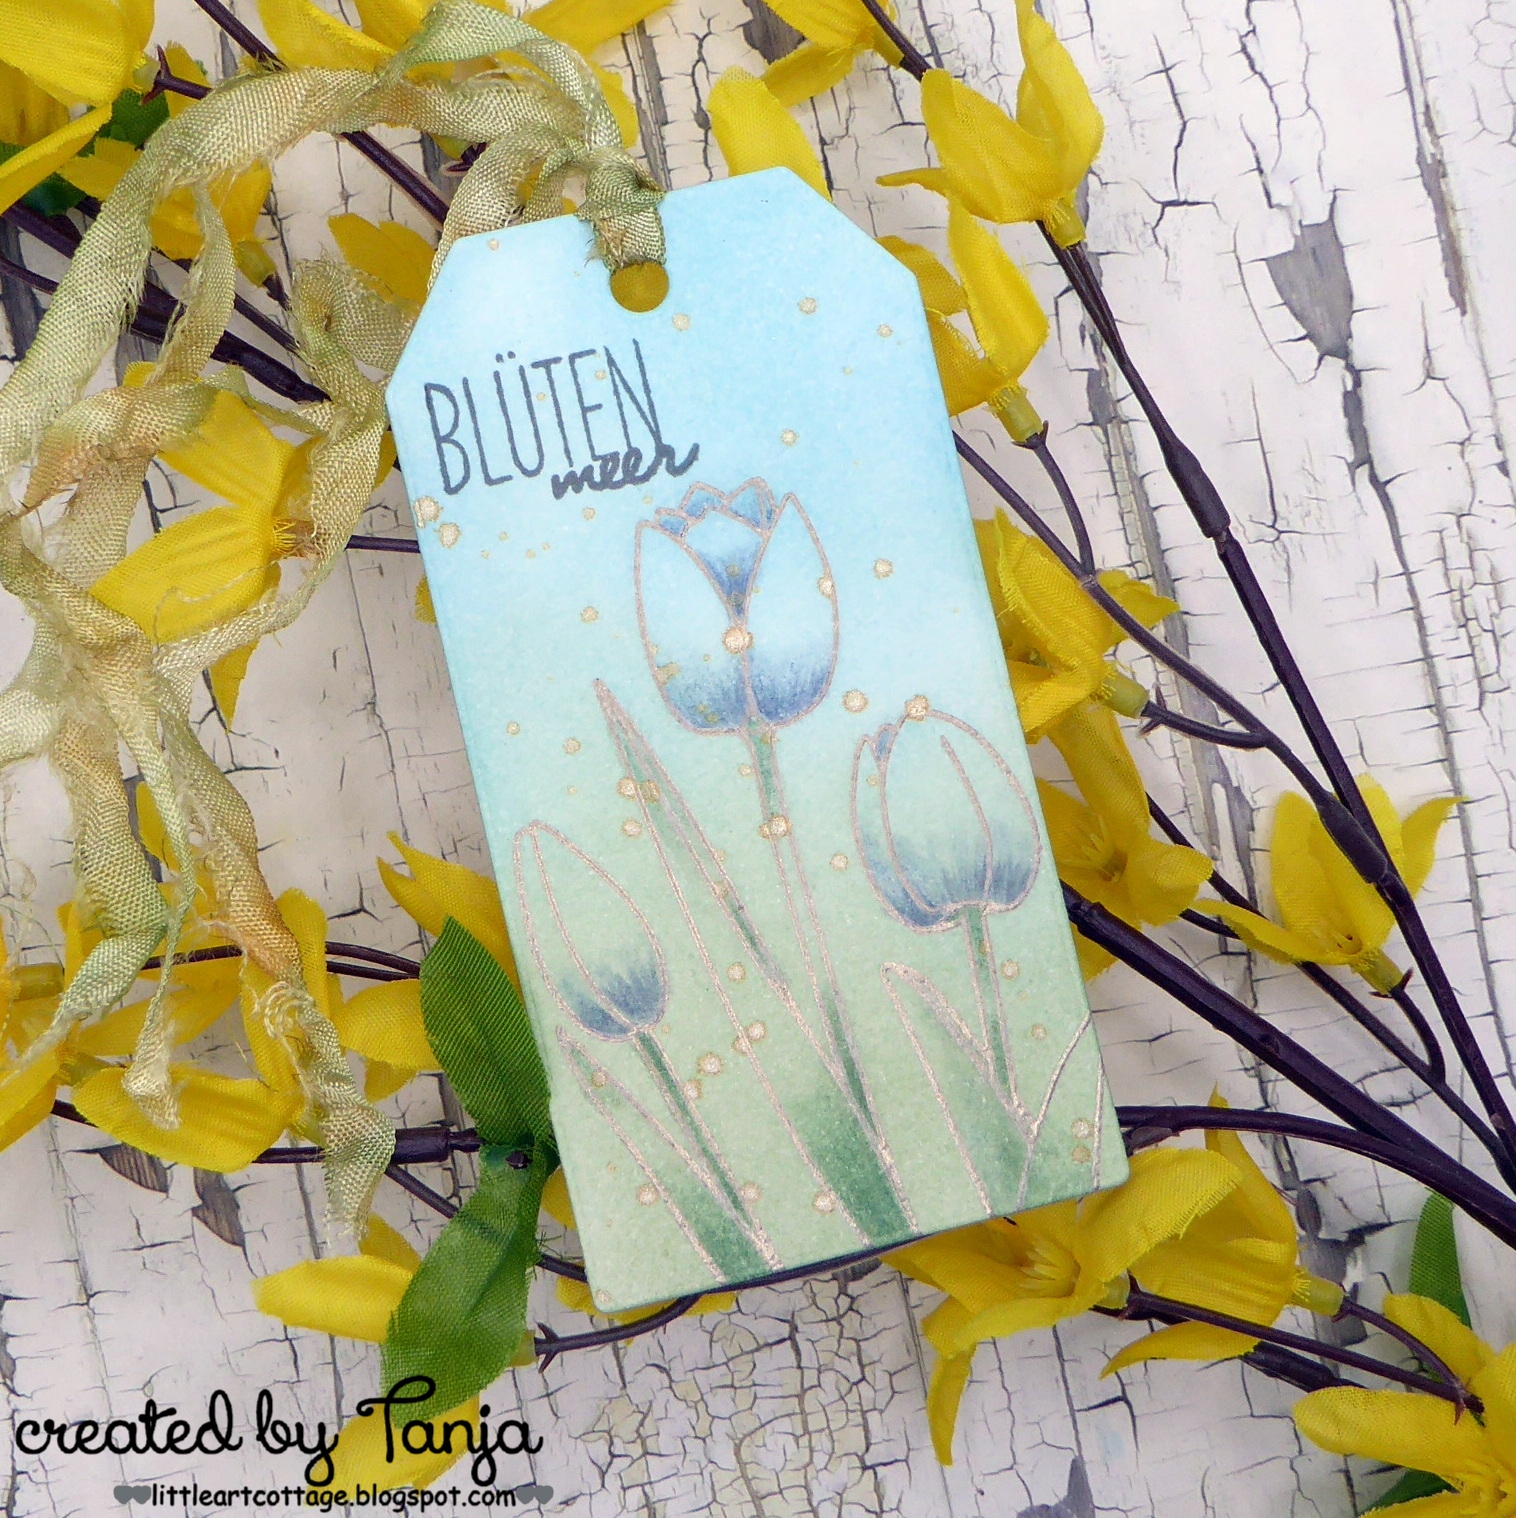
I created this elegant flower tag for the Karten-Kunst Blog:

  • cut out the largest of the Karten-Kunst Tags from white cardstock
  • stamp the Karten-Kunst Scribble Tulips with Versamark and heat-emboss them with WOW! Metallic Platinum Super Fine embossing powder
  • stamp the sentiment from the Karten-Kunst Capri Frühlingserwachen with Versafine Smokey Gray
  • ink up the tag with Distress Ink (Tumbled Glass, Bundled Sage)
  • add splatters with watered-down Distress Stain Tarnished Brass
  • add details to the flowers with Faber-Castell Polychromos pencils
  • dye a piece of seam binding with watered-down Distress Ink Bundled Sage and Distress Stain Tarnished Brass and thread it through the hole of the tag


I hope you got inspired.

Hugs,


Monday, August 22, 2022

Be Bold

Hi there,

I created this beach tag using the new Karten-Kunst Muscheln stamp set:

  • stamp some shells from the Karten-Kunst Muscheln, Ammonit and Meeres-Schnecken sets with Versafine Onyx Black onto watercolor paper
  • color the images with watercolors
  • add highlights with Finetec Mica Watercolors Moon Gold
  • cut out a tag from watercolor paper using one of the Karten-Kunst Tags set
  • randomly stamp the Karten-Kunst Script Background with Versamark and heat-emboss it with WOW! Metallic Platinum Super Fine embossing powder
  • add color with the help of Distress Inks (Peacock Feathers, Salvaged Patina)
  • dye a piece of torn seam binding with watered-down Distress Ink Peacock Feathers and Distress Stain Tarnished Brass and thread it to the hole of the tag
  • add a sticker as the sentiment and outline it with Finetec Mica Watercolors Moon Gold


Have a wonderful day.

Hugs,


Monday, October 18, 2021

Stay the Way you are

Hi there,

I created this card using the amazing Karten-Kunst Ash Leaf die set:

  • stamp one of the Karten-Kunst Scribble Roses with Memento Tuxedo Black
  • color the image with Spectrum Noir Triblend Markers
  • run a piece of turquoise cardstock through your Big Shot in a woodgrain embossing folder
  • add Distress Stain Brushed Pewter splatters to that background
  • cut out the Karten-Kunst Ash Leaf from vellum and its outline from silver glitter paper
  • stamp the sentiment from the Karten-Kunst Aus der Schreibmaschine 3 set with Versamark onto a strip of black cardstock and heat-emboss it with silver embossing powder
  • add a strip of black cardstock to the left and right side of the panel before adhering it to a cardbase


I hope you got inspired.

Hugs,


Monday, March 1, 2021

Be strong

Hi there,

we are starting a new Stencil Challenge over on the STAMPlorations Blog and this is my creation:

  • add some color to a white canvas with Dylusions Paint
  • apply white embossing paste through the ARTplorations Trees stencil and let this layer dry thoroughly
  • add some shading to the trees with Derwent Inktense Pencils and a damp watercolor brush
  • stamp the dot pattern from the STAMPlorations Mixed Media Grunge set with Versafine Clair Nocturne along some parts of the border
  • color a piece of white cardstock with Distress Oxide Ink Evergreen Bough and adhere a sticker from the STAMPlorations Inspirational #1 set
  • add some splatters with watered-down Distress Paint Pumice Stone and Distress Stain Tarnished Brass
  • adhere the sentiment to a layer of linen and burlap before adding it to the canvas

I hope you got inspired.

Hugs,


Monday, January 11, 2021

Mogli

Hi there,

today, we would like to show you all kinds of Scrapbook Projects over on the Elizabeth Craft Designs Blog

My Scrapbook Page shows our newest family member - Mogli. We found him at the roadside all alone only weighing 700 grams. He has been with us since October and is a really lovely little fellow now weighing almost 3 kilos.

  • use a kraft page as a background and add some dots and splatters with Distress Stain Tarnished Brass
  • ink up the edges of the kraft background with Distress Oxide Ink Black Soot
  • take one of the wonderful papers from the Elizabeth Craft Designs Rusty Weathered paper pack and cut of a strip on the right
  • draw some circles with the Derwent Onyx Dark pencil
  • stamp some greenery from the Elizabeth Craft Designs Spring Fling set with Versafine Clair Fallen Leaves and heat-emboss them with WOW! Midas Touch embossing glitter
  • mount the photo onto a piece of Neenah Desert Storm kraft cardstock
  • add two paper clips cut from black cardstock using a die from the Elizabeth Craft Designs Snowy Windows die set
  • cut out three leaves from the Elizabeth Craft Designs Snowy Windows set from vellum and add some color with left-over blue and green Distress Oxide Ink from a Blending Brush
  • cut out the word Mogli from black cardstock with the help of the Elizabeth Craft Designs Blackboard Alphabet die set


I hope you got inspired.

Hugs,


Tuesday, December 1, 2020

Joyful Christmas Reindeer

Hi there,

we are starting a new Stencil Challenge over on the STAMPlorations Blog and I created this Christmas Tag for you:

  • cut out a CUTplorations Manila Tag from sturdy kraft cardstock
  • apply Grit Paste through the ARTplorations Christmas Reindeer stencil and let it dry thoroughly
  • add some color to the background with Distress Paint (Gathered Twigs, Speckled Egg)
  • color the reindeer with Finetec Mica Watercolors Tibet Gold
  • stamp the script from the STAMPlorations Mixed Media Elements set with Versamark and heat-emboss it with WOW! Gold Rich Pale embossing powder
  • dye a piece of seam binding with Distress Stain Tarnished Brass and thread it through the hole of the tag
  • layer burlap, corrugated cardboard, twine, pine twine and some berries and adhere one on top of each other with hot glue
  • stamp the sentiment from the STAMPlorations Joyful set with Versamark onto a strip of kraft cardstock and heat-emboss it with WOW! Bright White Super Fine embossing powder


I hope you got inspired.

Hugs,


Thursday, May 28, 2020

Throwback Thursday - Dots 'n Beans

Hi there,

this is my second Throwback Thursday Special Feature for the STAMPlorations Blog.
The inspiration for my projects was a tag that I created in April for a Stencil Sunday:


I liked the stenciled background for this coffee-themed tag and I decided to explore more ways of using this stencil and also create coffee-related projects.


  • apply Nuvo Expanding Mousse Worn Linen through the ARTplorations Dots 'n Beans stencil and heat it with a heat tool
  • add color with watered-down Distress Ink Ground Espresso
  • cut out three stitched circles from smooth white cardstock with the die includes in the STAMplorations Coffee Petites set
  • stamp three items from the same set with Memento Espresso Truffle and color them with Delta, Touch Twin Brush and Copic Markers
  • add Nuvo Crystal Glaze to the coffee bean and Nuvo Glitter Accents Snowfall to the donut
  • the sentiment is from the STAMPlorations Just Caffeinate sticker set
  • add a strip of patterned paper from the My Favorite Things Dots & Stripes 6x6 paper pad to the left and the right of the panel before adhering it to a cardbase

  • use a strip of leftover background from the previous project - distress one edge and cut the other with one of the CUTplorations Lacy Edges and Borders dies
  • use the ARTplorations Dots 'n Beans stencil to emboss a piece of torn vellum 
  • distress a piece of kraft cardstock and layer it behind the vellum before adhering it to a cardbase
  • stamp the coffee cup from the STAMPlorations What's brewing set and color it with Derwent Inktense pencils and a damp watercolor brush
  • stamp the sentiment from the same set with Versafine Clair Fallen leaves onto a sentiment strip and adhere it to the card
  • add some splatters to the layered background with Distress Stain Tarnished Brass

  • create a rainbow background on two CUTplorations Manila Tags using Distress Oxide Inks (Picked Raspberry, Carved Pumpkin, Squeezed Lemonade, Twisted Citron, Peacock Feathers, Salty Ocean) and some Blending Brushes
  • use some stickers from the STAMPlorations Coffee Time set
  • dye two pieces of torn seam binding with Distress Ink (Peacock Feathers, Salty Ocean) and thread them through the holes of the tags

I hope you got inspired.

Hugs,


Wednesday, May 20, 2020

It's all Perspective

Hi there,

I created this Mixed Media Canvas for STAMPlorations as a reminder for you to join the Spring Fling:


  • apply Embossing Paste through the ARTplorations Bloom Succulently stencil and add some WOW! Under the Sea embossing glitter to certain areas
  • use a heat-tool to melt the embossing powder and dry the embossing paste - this will bubble up the embossing paste but I like the extra texture that gives
  • use some green and grey-green acrylic paints to add color
  • add some splatters with Distress Stain Tarnished Brass
  • stamp some stems and leaves from the STAMPlorations Bloom Doodles set on the left and right border with green ink, add some Distress Embossing Powder Vintage Photo and melt it with a heat-tool
  • ink up the edges with Distress Ink Walnut Stain
  • add a sentiment strip created on a vintage typewriter


There are fabulous prizes to be won:


  • THREE (3) winners of a $10 gift code will be drawn from the comments left on the main blog and designers' blogs
  • TWO (2) winners will get her choice of a STAMPlorations product with a value of up to $10 and will be drawn from the comments left on the main blog and designers' blogs
  • TWO (2) winners will get her choice of a STAMPlorations product with a value of up to $15 and will be drawn from the entries in the linky party
  • ONE (1) winner of a $25 gift code will be drawn from entries in the linky party

Commenting and linking up end on Sunday, May 31 and the winners will be announced on June 10th in the May winners post.

All throughout May, products in the SPRING FLING section are 15% off instantly together with my special code STAMPGIRLTANJA you can get up to 35% off.

I hope you like my creation and enjoy the rest of the hop.

Hugs,


Monday, March 16, 2020

Watercolor Mandala Card Duo

Hi there,

new stamps are available in the Karten-Kunst Shop and over the next few weeks I would like to show you some projects using some of the new products.

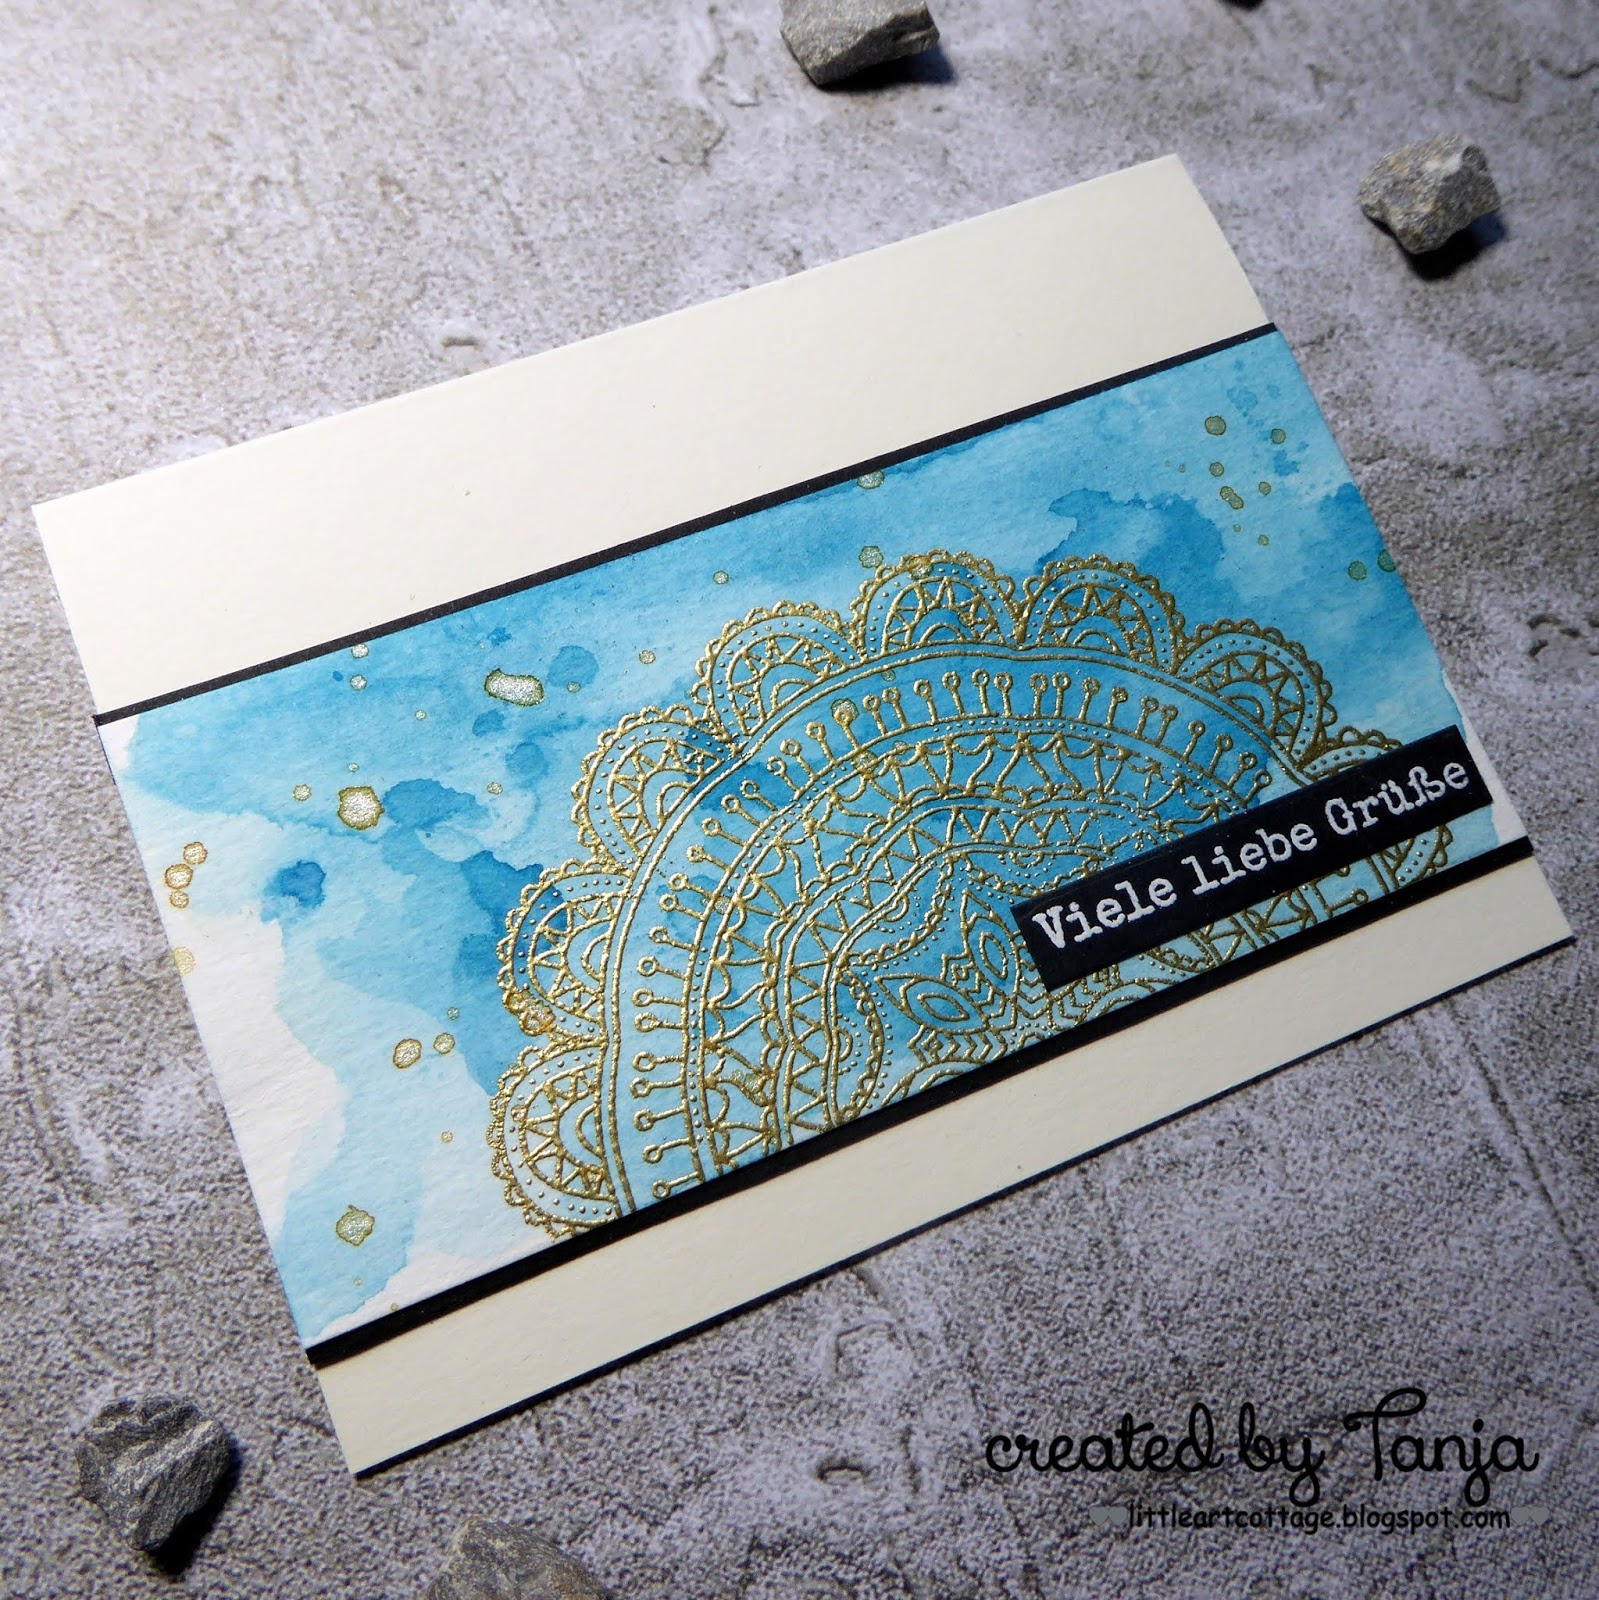
My first creation is this Watercolor Mandala Card Duo:

  • create a watercolor background on a strip of watercolor paper with the help of Mijello Misiion Gold watercolors
  • stamp the Mandala from the Karten-Kunst Mandala Leben set with Versamark and heat-emboss it with WOW! Metallic Gold Rich or Silver super fine embossing powder
  • add some splatters with Distress Stain Brushed Pewter and Tarnished Brass
  • stamp the sentiments from the Karten-Kunst Aus der Schreibmaschine set with Versamark onto a strip of black cardstock and heat-emboss them with WOW! Bright White super fine embossing powder
  • add a strip of black cardstock to the top and bottom of the watercolor panel before adhering it to a cardbase


I hope you got inspired.

Hugs,


Sunday, February 23, 2020

In you is a Dragon

Hi there,

today I would like to show you this sweet dragon bookmark:

  • stamp some cute dragons from the Clearly Besotted Stamps Hot Stuff set with Ink on 3 Fadeout Ink and color the images with Faber-Castell Polychromos Pencils
  • add highlights with a white gel pen and color their faces back in with a black fineliner
  • stamp the sentiment from the Mama Elephant Dragon Wishes set with Versafine Onyx Black
  • dye a piece of torn seam binding with Distress Stain Salty Ocean and thread it through the hole of the tag


Have a colorful day.

Hugs,


Friday, January 24, 2020

Splish Splash Merman

Hi there,

as promised, I am back today with this Merman Tag for Elizabeth Craft Designs:

  • cut out the elements for the cute merman with the help of the Elizabeth Craft Designs Mermaid set
  • color the elements with Delta, Touch Twin Brush and Copic Markers, add highlights with a white gel pen and extra sparkle with Stickles Glitter Glue Crystal
  • cut out the larger tag from the Elizabeth Craft Designs Planner Essentials set and add color to the background with Distress Ink (Tumbled Glass, Stormy Sky)
  • cut out two wave borders from blue cardstock using the Elizabeth Craft Designs Ocean Edges and ink them up with Distress Ink Salty Ocean - add splatters with Distress Stain Salty Ocean and watered-down white acrylic paint
  • stamp the sentiment from the Elizabeth Craft Designs Splish Splash Sentiments with Versafine Clair Warm Breeze
  • dye a piece of seam binding with Distress Ink Chipped Sapphire and thread it through the hole of the tag
  • add some interest to the background with white Elizabeth Craft Designs Craft Drops 


Have a wonderful day.

Hugs,