Showing posts with label Ribbon. Show all posts

Thursday, October 19, 2023

Yummy Drink

Hi there,

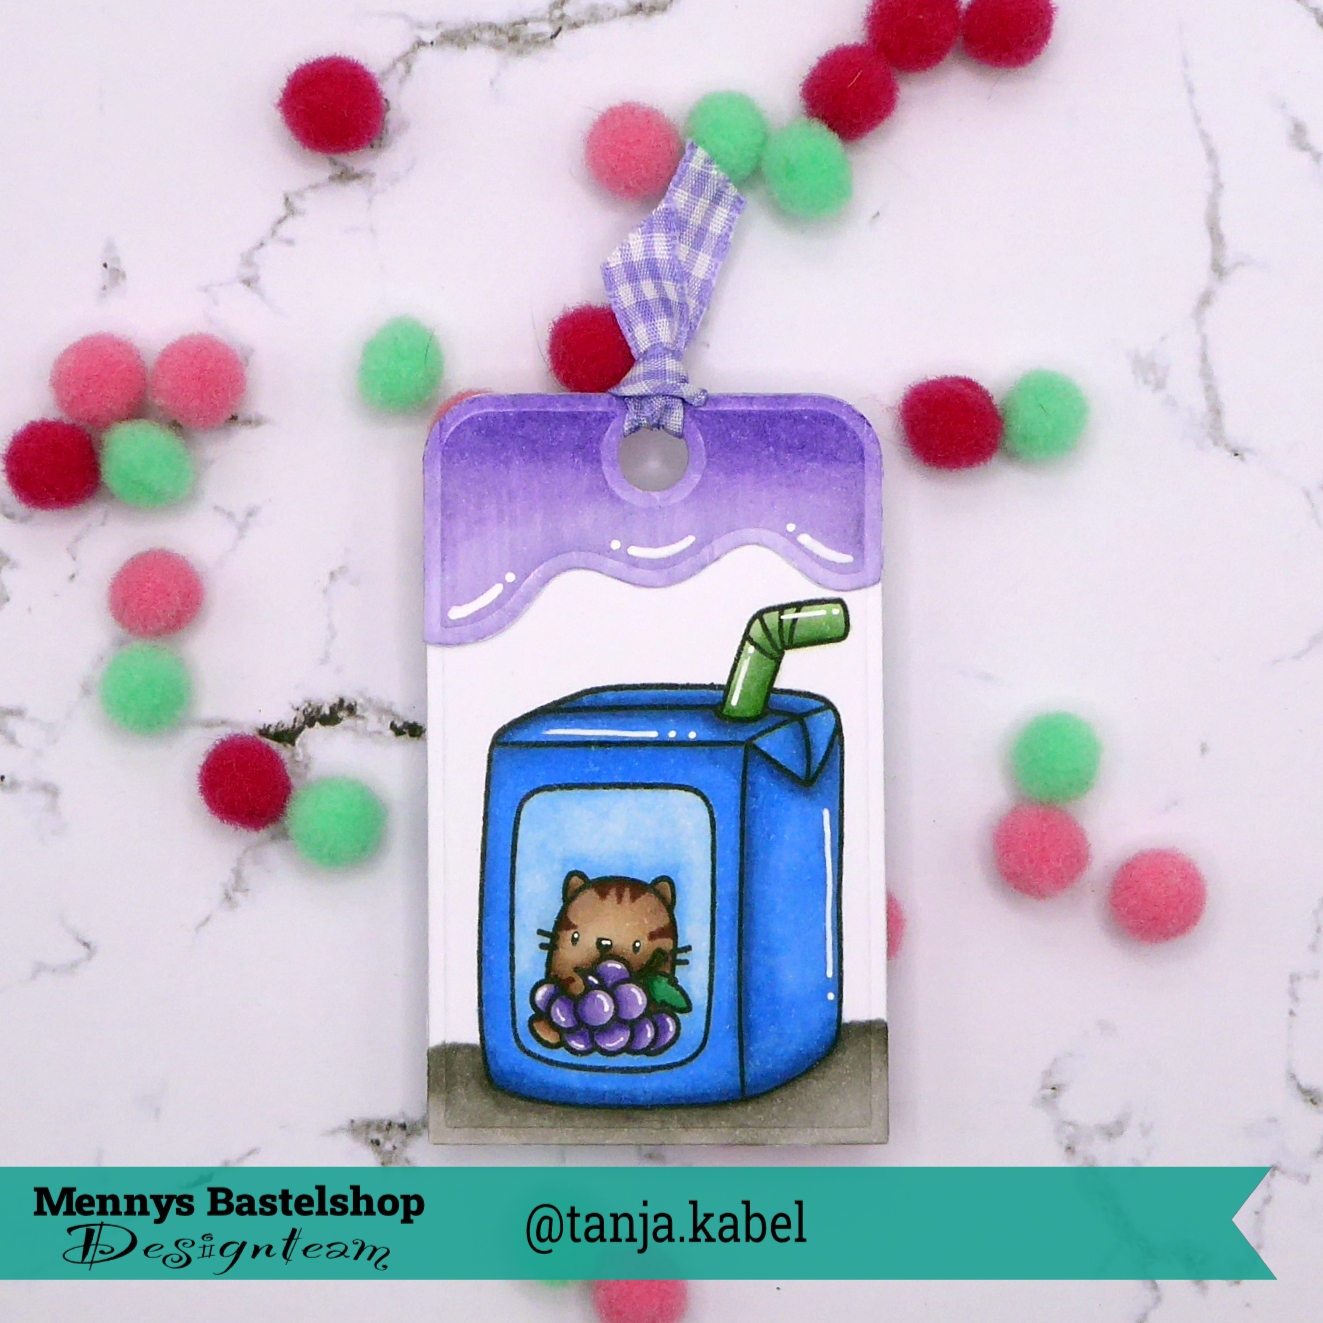
I just love the adorable images from the Mama Elephant Boxed Drinks stamp set and I created this tag for Mennys Bastelshop:

  • cut out a tag from white cardstock
  • stamp the images from the Mama Elephant Boxed Drinks set with Gina K. Designs Obsidian
  • color the little scene with Spectrum Noir Triblend Markers, add extra shading with Faber-Castell Polychromos pencils and highlights with a white gel pen
  • add a little wavy topper and thread a piece of ribbon through the hole of the tag

Have a colorful day.

Hugs,


Thursday, October 12, 2023

You are Cute

Hi there,

I created this fun black and white bug tag with leftover pieces from two other projects:

  • I used some leftover stamped bugs from the A Really Bug Deal project and some leftover die cuts from the Love You Window Project
  • the bugs are from the Lawn Fawn A Bug Deal set and the dies cuts are from the Lawn Fawn Secret Garden Window set
  • adhere all the pieces to a white tag, create a sentiment using a Dymo Label Maker and thread a piece of ribbon through the hole of the tag
I hope you got encouraged to use your leftover pieces to create even more fun projects.

Have a wonderful day.

Hugs,


Tuesday, April 12, 2022

Happy Easter

Hi there,

I created this Easter Card using the Gerda Steiner Designs Easter Bunnies stamp set:

  • stamp one of the bunnies from the Gerda Steiner Designs Easter Bunnies set with Lawn Fawn Jet Black
  • color the image with Spectrum Noir Triblend Markers, add extra shading with Faber-Castell Polychromos pencils and highlights with a white gel pen
  • cut out a Clearly Besotted Stamps Rounded Tag from kraft cardstock and add a grass border
  • embellish the tag with a ribbon bow
  • create a backdrop using strips of colored and kraft cardstock
  • finish the card with a patterned paper sentiment strip


Have a wonderful Easter Time.

Hugs,


Friday, March 18, 2022

Always in our Hearts

Hi there,

I created this sweet tag using the Magengo Designs You are Purrfect stamp set for my beloved Cookie who sadly died in January and left a big hole in our lives:

  • cut out a tag using dies from the Heffy Doodle Tag along die set
  • create a cloud background with the help of the My Favorite Things Micro Cloud Edges and Distress Oxide Ink Tumbled Glass
  • cut out the rainbow from the Sokai Girl die set from different colored cardstocks and from holographic cardstock
  • stamp one of the adorable cats and some yarn from the Magengo Designs You are Purrfect set with lawn Fawn Jet Black and color the images with Spectrum Noir Triblend Markers
  • add extra shading and details with Faber-Castell Polychromos pencils
  • stamp the sentiment from the Waffle Flower Rainbow Bridge set with Versamark onto a banner cut from kraft cardstock and heat-emboss it with WOW! Bright White Super Fine embossing powder
  • thread a piece of ribbon through the hole of the tag


Have a wonderful day.

Hugs,


Thursday, October 1, 2020

Happy Thoughts

Hi there,

welcome back to the STAMPlorations Stencil Challenge. As you surely know the only requirement is to use a stencil on your project. 

I played around with some alcohol inks on a ceramic tile for this one:

  • apply some Alcohol Pearl Inks onto a ceramic tile and create a rainbow background
  • apply Prima Marketing Light Paste through the ARTplorations Flair stencil and let this layer dry thoroughly
  • add color to the paste with Distress Ink Black Soot
  • add some splatters with watered-down black acrylic paint
  • adhere some burlap and ribbon to the tile using hot glue and add a sentiment from the STAMPlorations Shine Bright sticker set on top

Have a colorful day.

Hugs,


Sunday, August 25, 2019

I'll fix it Beaver

Hi there,

today, I would like to show you this cute beaver tag:

  • cut out one of the tags from the My Favorite Things Tag Builder Blueprints 5 two times - once from Dani Peuss white cardstock and once from patterned paper from the Maja Design Walking in the Forest 6x6 paper pad
  • stamp one of the beavers and the sentiment from the Clearly Besotted Stamps Build it Beaver set with Versafine Vintage Sepia
  • color the image with Lyra Rembrandt Polycolor Pencils
  • add highlights with a white gel pen
  • add a hole enforcer from kraft cardstock and linen ribbon to the hole of the tag

I hope you got inspired.

Hugs,


Sunday, May 5, 2019

Dare Create Inspire

Hi there,

we are starting a new Mixed Media Challenge over on the STAMPlorations Blog and this is my creation:

  • use one of your premade ATC backgrounds
  • apply Texture Paste through the ARTplorations Rose Garden stencil and let it dry thoroughly
  • stamp some script from the STAMPlorations Mixed Media Elements set with Archival Ink Watering Can
  • grunge up the edges with watered-down black Stabilo All pencil
  • color the rose with Derwent Graphitint pencils
  • adhere a piece of coarse ribbon to the top of the ATC and glue down some word stickers


Thanks for stopping by today.

Hugs,


Friday, January 25, 2019

Thanks Kitty

Hi there,

on this project for Elisabeth Craft Designs I simply turned a tiger into a tabby cat:

  • cut out all the elements from the Elisabeth Craft Designs Lion/Tiger die set from white Soft Finish Cardstock, add color with Delta, Touch Twin Brush and Copic Markers and shading with Distress Ink Black Soot
  • use a white gel pen and a black fineliner for the details in the cat's face
  • cut out a little flower from the Elisabeth Craft Designs Adventure Edges 2 die set and adhere it at the cat's right ear 
  • use Elisabeth Craft Designs clear double-sided adhesive to adhere a piece of ribbon to white cardstock and cut out the Elisabeth Craft Designs Thanks from this "ribbon paper"
  • set the die cuts aside and create the background on a stitched panel of watercolor cardstock
  • stamp the flowers from the Elisabeth Craft Designs Patterns 1 stamp set twice with Versamark and heat-emboss them with WOW! Bright White Super Fine embossing powder
  • add color using Distress Oxide Inks (Picked Raspberry, Dusty Concord) and a Blending Brush
  • add splatters with watered-down Distress Re-Inker Dusty Concord


I hope you like my creation.

Hugs,


Monday, October 8, 2018

Fall in Love

Hi there,

I would like to show you how to create this Lavender Art Journal Page step by step over on the STAMPlorations Blog:


Thanks for stopping by.

Hugs,


Monday, July 9, 2018

For you - Für Dich

Hi there,

I created this watercolor flower tag for the Karten-Kunst Blog:


  • cut out a tag from watercolor paper 
  • stamp the flower and the sentiment from the Karten-Kunst Glockenblumen-Grüße set with Versafine Clair Morning Mist
  • color the image with Derwent Inktense pencils and a damp watercolor brush
  • add dark blue splatters 
  • thread a piece of torn ribbon through the hole of the tag

Have a wonderful day.

Hugs,


Tuesday, June 26, 2018

STAMPlorations 5th Birthday

Hi there,

we are celebrating 5 years of STAMPlorations and I would like to show you my three favorite projects that I created over the past few years and this new tag. I chose the sentiment especially for the wonderful Shery.


  • cut out a CUTplorations Stitched Tag from watercolor paper
  • stamp the STAMPlorations In Bloom: Fancy Frangipanis with Versamark and heat-emboss these beautiful flowers with WOW! Bright White Super Fine embossing powder
  • stamp the sentiment from the STAMPlorations Strong Women set with Versafine Smokey Gray
  • color the image and the background with Derwent Inktense Pencils and a damp watercolor brush
  • apply Versamark through the ARTplorations Dots all over stencil and heat-emboss the pattern with Ranger Aqua Tinsel embossing powder
  • add some texture using the grid from the STAMPlorations Mixed Media Grunge set and Archival Ink Watering Can and the script from the STAMPlorations Mixed Media Elements set and Distress Ink Hickory Smoke
  • ink up the edges of the whole tag with Distress Ink Hickory Smoke as well
  • dye a piece of seam binding with Distress Ink Dusty Concord and Distress Stain Brushed Pewter and thread it together with a piece of grey ribbon through the whole of the tag

And here are the three promised favorites from the last couple of years:


I would like to invite you to CASE one of these projects. I can't wait to see your creations.

Hugs,


Thursday, May 31, 2018

Elephant Tag

Hi there,

today, I would like to show you this cute little elephant tag as inspiration for this month's Happy Little Stampers Watercolor Challenge:


  • cut out a base from watercolor paper, a frame from patterned paper from the Heidi Swapp Dreamy 6x6 paper pad, a foam layer and a shaker window from acetate using dies from the My Favorite Things Tag Builder Blueprints 4 set
  • stamp an image with the help of the Lawn Fawn Elphie Selfie set and Versafine (Onyx Black) - I used the masking technique
  • color the animals and the umbrella with Daniel Smith and Schmincke Horadam watercolors
  • add color and texture to the background with Distress Oxide Ink (Broken China) and water droplets from a mister bottle
  • fill the shaker element with Pretty Pink Posh Sequins (4 mm Sparkling Clear, 4 mm Cornflower, 4 mm Aquamarine)
  • thread a piece of ribbon through the hole of the tag

I hope you got inspired.

Yours,


Friday, May 4, 2018

Merry Christmas Tree

Hi there,

we are starting a new Christmas Challenge over on the Happy Little Stampers Blog and this time it's all about stars:


  • stamp one of the trees from the Lili of the Valley Snowflakes and Christmas Trees set with Memento Tuxedo Black and color the image and the background with Delta, Touch Twin Brush and Copic Markers
  • add silver stars with a silver gel pen and snow flakes with a white paint marker
  • use the My Favorite Things Tag Builder Blueprints 5 set to cut out a tag from the main panel and a background from patterned paper from the My Mind's Eye Sugar Plum 6x6 paper pad
  • stamp the sentiment from the same Lili of the Valley set and layer a piece of glitter paper behind the sentiment strip
  • thread a piece of ribbon through the hole of the tag and add a cute little bow from natural twine


Have a christmasy day.

Yours,


Tuesday, April 24, 2018

Guinea Pig Tag

Hi there,

today, I would like to show you another creation using the adorable new Wheek, wheek, wheek ... Guinea Pig stamp set:

  • color one of the sweet little guinea pigs from the Gerda Steiner Designs Wheek, wheek, wheek ... Guinea Pig stamp set with Derwent Drawing Pencils and Lyra Rembrandt Polycolor Pencils 
  • add highlights with a white gel pen
  • cut out a tag from patterned paper from the Maja Design Walking in the Forest 6x6 paper pad with the help of one of the dies from the My Favorite Things Tag Builder Blueprints 5 set
  • cut a stitched banner shape around the sentiment from the same set and add some color with Distress Oxide Ink Peacock Feathers
  • add kraft hole enforcer and a piece of linen ribbon to the hole of the tag

Have a wonderful day.

Hugs,


Sunday, February 11, 2018

Stamp Connection #34

Hi there,

connected through our love for card making, blogging and being from Germany we (Cornelia from Stempel Spass and I) decided to create a monthly project within predefined requirements. We are going to show you the result every 2nd Sunday of the month and this is our 34th transatlantic get-together!

Our requirement for this meet-up was:
"Inspired by Nature"

  • cut out a tag from watercolor paper using one of the CUTplorations Manila Tag dies
  • add color with the help of Distress Inks (Weathered Wood, Fossilized Amber, Stormy Sky, Weathered Wood)
  • add texture using water droplets from the Mini Mister
  • stamp some trees from the Stampers Anonymous Great Outdoors set and the sentiment from Scrapbook Werkstatt with Versafine Onyx Black 
  • add some stars using another stamp from the Stampers Anonymous set and Delicata Silver Shimmer
  • thread some purple linen ribbon through the hole of the tag

Now make sure to hop over to see Cornelia's Creation.

Thanks for stopping by. We hope to see you again at the ...


Yours,