Showing posts with label Gouache. Show all posts

Monday, February 16, 2026

Circle Birthday

Hi there,

I created this Birthday Card for the Karten-Kunst Blog:

  • cut out some Karten-Kunst 1/8 Inch Circles from colored cardstock
  • stamp the sentiment from the Karten-Kunst Schriftzug-Set Zum Geburtstag with Versamark onto a blue cardbase and heat-emboss it with WOW! Bright White Super Fine embossing powder
  • add splatters with watered-down white gouache

Thanks for stopping by.

Hugs,


Thursday, January 8, 2026

Happy New Year

Hi there,

it's time for our Inspiration Week over at Mennys Bastelshop and this week our topic is "Menny's Stamps". I used the Mennys Bastelshop Winter Wonderland stamp set on my project:

  • stamp the snowman from the Mennys Bastelshop Winter Wonderland set with Distress Oxide Ink Lost Shadow
  • color the image and the background with Frau von Bommel watercolors
  • ink up the edges with Distress Ink Stormy Sky
  • stamp the sentiment from the Karten-Kunst Weihnachten Modern set with Versafine Clair Morning Mist
  • add stars with the Molotow Liquid Chrome pen and snowflakes with a white gel pen and white gouache
  • add strips of colored cardstock and glitter paper to the left and right side of the panel before adhering it to a cardbase

Have a wonderful New Year.

Hugs,


Monday, November 24, 2025

Warm Winter Wishes

Hi there,

here is another project that I created with the Karten-Kunst Winterliche Häuser stamp set:

  • stamp the Karten-Kunst Winterliche Häuser with Distress Oxide Ink Pumice Stone on a piece of watercolor paper
  • color the image and the background with watercolors
  • add details with a pencil and splatters with white gouache
  • distress the edges and ink them up with Distress Ink Walnut Stain
  • stamp the sentiment from the same set onto a kraft cardbase with Versafine Clair Portobello

Hope to see you again next week.

Hugs,


Thursday, October 23, 2025

Chai There!

Hi there,

I created this fun fall card with my daughter Emily for Mennys Bastelshop using lots of Lawn Fawn goodies. Once again we got inspired by the fabulous Marine.

  • stamp images from the Lawn Fawn Treat Cart, Treat Cart Add-On Coffee, Butterfly Kisses, Simply Celebrate Santa, Christmas Fishes, Crazy Antics, Happy Harvest and Porcu-pine for you sets with Gina G. Designs Obsidian
  • color all the images with Ohuhu Markers, add extra shading with Faber-Castell Polychromos pencils and highlights with a white gel pen
  • cut out a stitched rectangle from watercolor paper and create a background using Distress Ink Tumbled Glass and Peeled Paint and the Lawn Fawn Hill Hillside stencils
  • add splatters with watered-down white gouache
  • adhere the panel to a kraft cardbase

I hope you got inspired.

Hugs,


Monday, October 13, 2025

All my Love for your Birthday

Hi there,

I created this cute Birthday Card for the Karten-Kunst-Blog:

  • cut out four Karten-Kunst Small Frames from smooth white cardstock
  • stamp images from the Karten-Kunst Mini Frames Congratulations with Lawn Fawn Jet Black and color the images with Spectrum Noir Triblend Markers
  • stamp the sentiment from the Karten-Kunst Aus der Schreibmaschine set with Versamark onto a strip of kraft cardstock and heat-emboss it with WOW! Bright White Super Fine embossing powder
  • create a background using kraft cardstock and the Spellbinders Scribbled Letter embossing folder
  • ink up the edges of the background panel with Distress Ink Ground Espresso and add some white splatters before adhering it to a cardbase

Hope to see you again next week.

Hugs,


Saturday, June 7, 2025

Lucky Day Toucan

Hi there,

I created this tropical card using the little toucan from the Anjas Basteltraum Strandbar stamp set:

  • stamp the toucan from the Anjas Basteltraum Strandbar set with Gina K. Designs Obsidian
  • color the image with Ohuhu Markers and add highlights with a white gel pen
  • cut out the My Favorite Things Rainbow Whimsy from colored cardstock
  • dye a piece of smooth white cardstock with Distress Ink Rustic Wilderness and Peeled Paint and run it through your Spellbinders Platinum Six in the Spellbinders Leafy embossing folder
  • add some splatters with watered-down white gouache
  • adhere the panel to a kraft cardbase
  • stamp the sentiment from the Anjas Basteltraum Glückwünsche set with Versamark onto a piece of vellum, heat-emboss it with WOW! Bright White Super Fine embossing powder and cut it out
  • adhere the sentiment with tiny pieces of double-sided foam adhesive

I hope you have a wonderful day.

Hugs,


Sunday, January 19, 2025

Winter Fox

Hi there,

I created this winter card using the Anjas Basteltraum Winter Wanderlust stamp set:

  • create a background using kraft cardstock, the Sizzix Pine Needles embossing folder, a brayer, white pigment ink, Distress Ink Forest Moss and splatters of white gouache
  • stamp the skiing fox from the Anjas Basteltraum Winter Wanderlust set with Gina K. Designs Obsidian
  • color the image with Spectrum Noir Triblend Markers, add extra shading with Faber-Castell Polychromos pencils and highlights with a white gel pen
  • cut out a Lawn Fawn Fancy Wavy Banner from kraft cardstock
  • stamp the sentiment from the Lawn Fawn Winter Wavy Sayings set with Versamark and heat-emboss it with WOW! Bright White Super Fine embossing powder

Have a wonderful day.

Hugs,


Tuesday, January 7, 2025

Frosty Snowballs

Hi there,

I created this Winter Card using the Anjas Basteltraum Frostige Schneeballschlacht stamp set:

  • stamp the fox, the birds and the snowballs from the Anjas Basteltraum Frostige Schneeballschlacht set with Lawn Fawn River Rock
  • color the images with Spectrum Noir Triblend Markers, add extra shading with Faber-Castell Polychromos pencils and highlights with a white gel pen
  • create a background using elements from the Sizzix Forever Journal Essentials, the Sizzix Bird Song set, the Spellbinders Holiday Blooms set, Distress Ink (Antique Linen, Ground Espresso), Distress Oxide Ink (Antique Linen, Ground Espresso), Versafine Clair Sand Dune and colored cardstock
  • arrange all the elements and put them onto a woodgrain background splattered with watered-down white gouache

I hope you got inspired.

Hugs,


Monday, December 30, 2024

Winter Greetings

Hi there,

I created this Winter Card for the Karten-Kunst Blog:

  • create a DIY stencil using some tree dies
  • add Distress Ink (Rustic Wilderness, Pine Needles) through the stencil
  • ink up the edges with that same green inks
  • add some splatters with watered-down white gouache and some golden watercolor
  • create some DIY striped cardstock
  • cut the Karten-Kunst Das rockt Winter Grüße from vellum and that striped cardstock

Have a wonderful day.

Hugs,


Monday, November 18, 2024

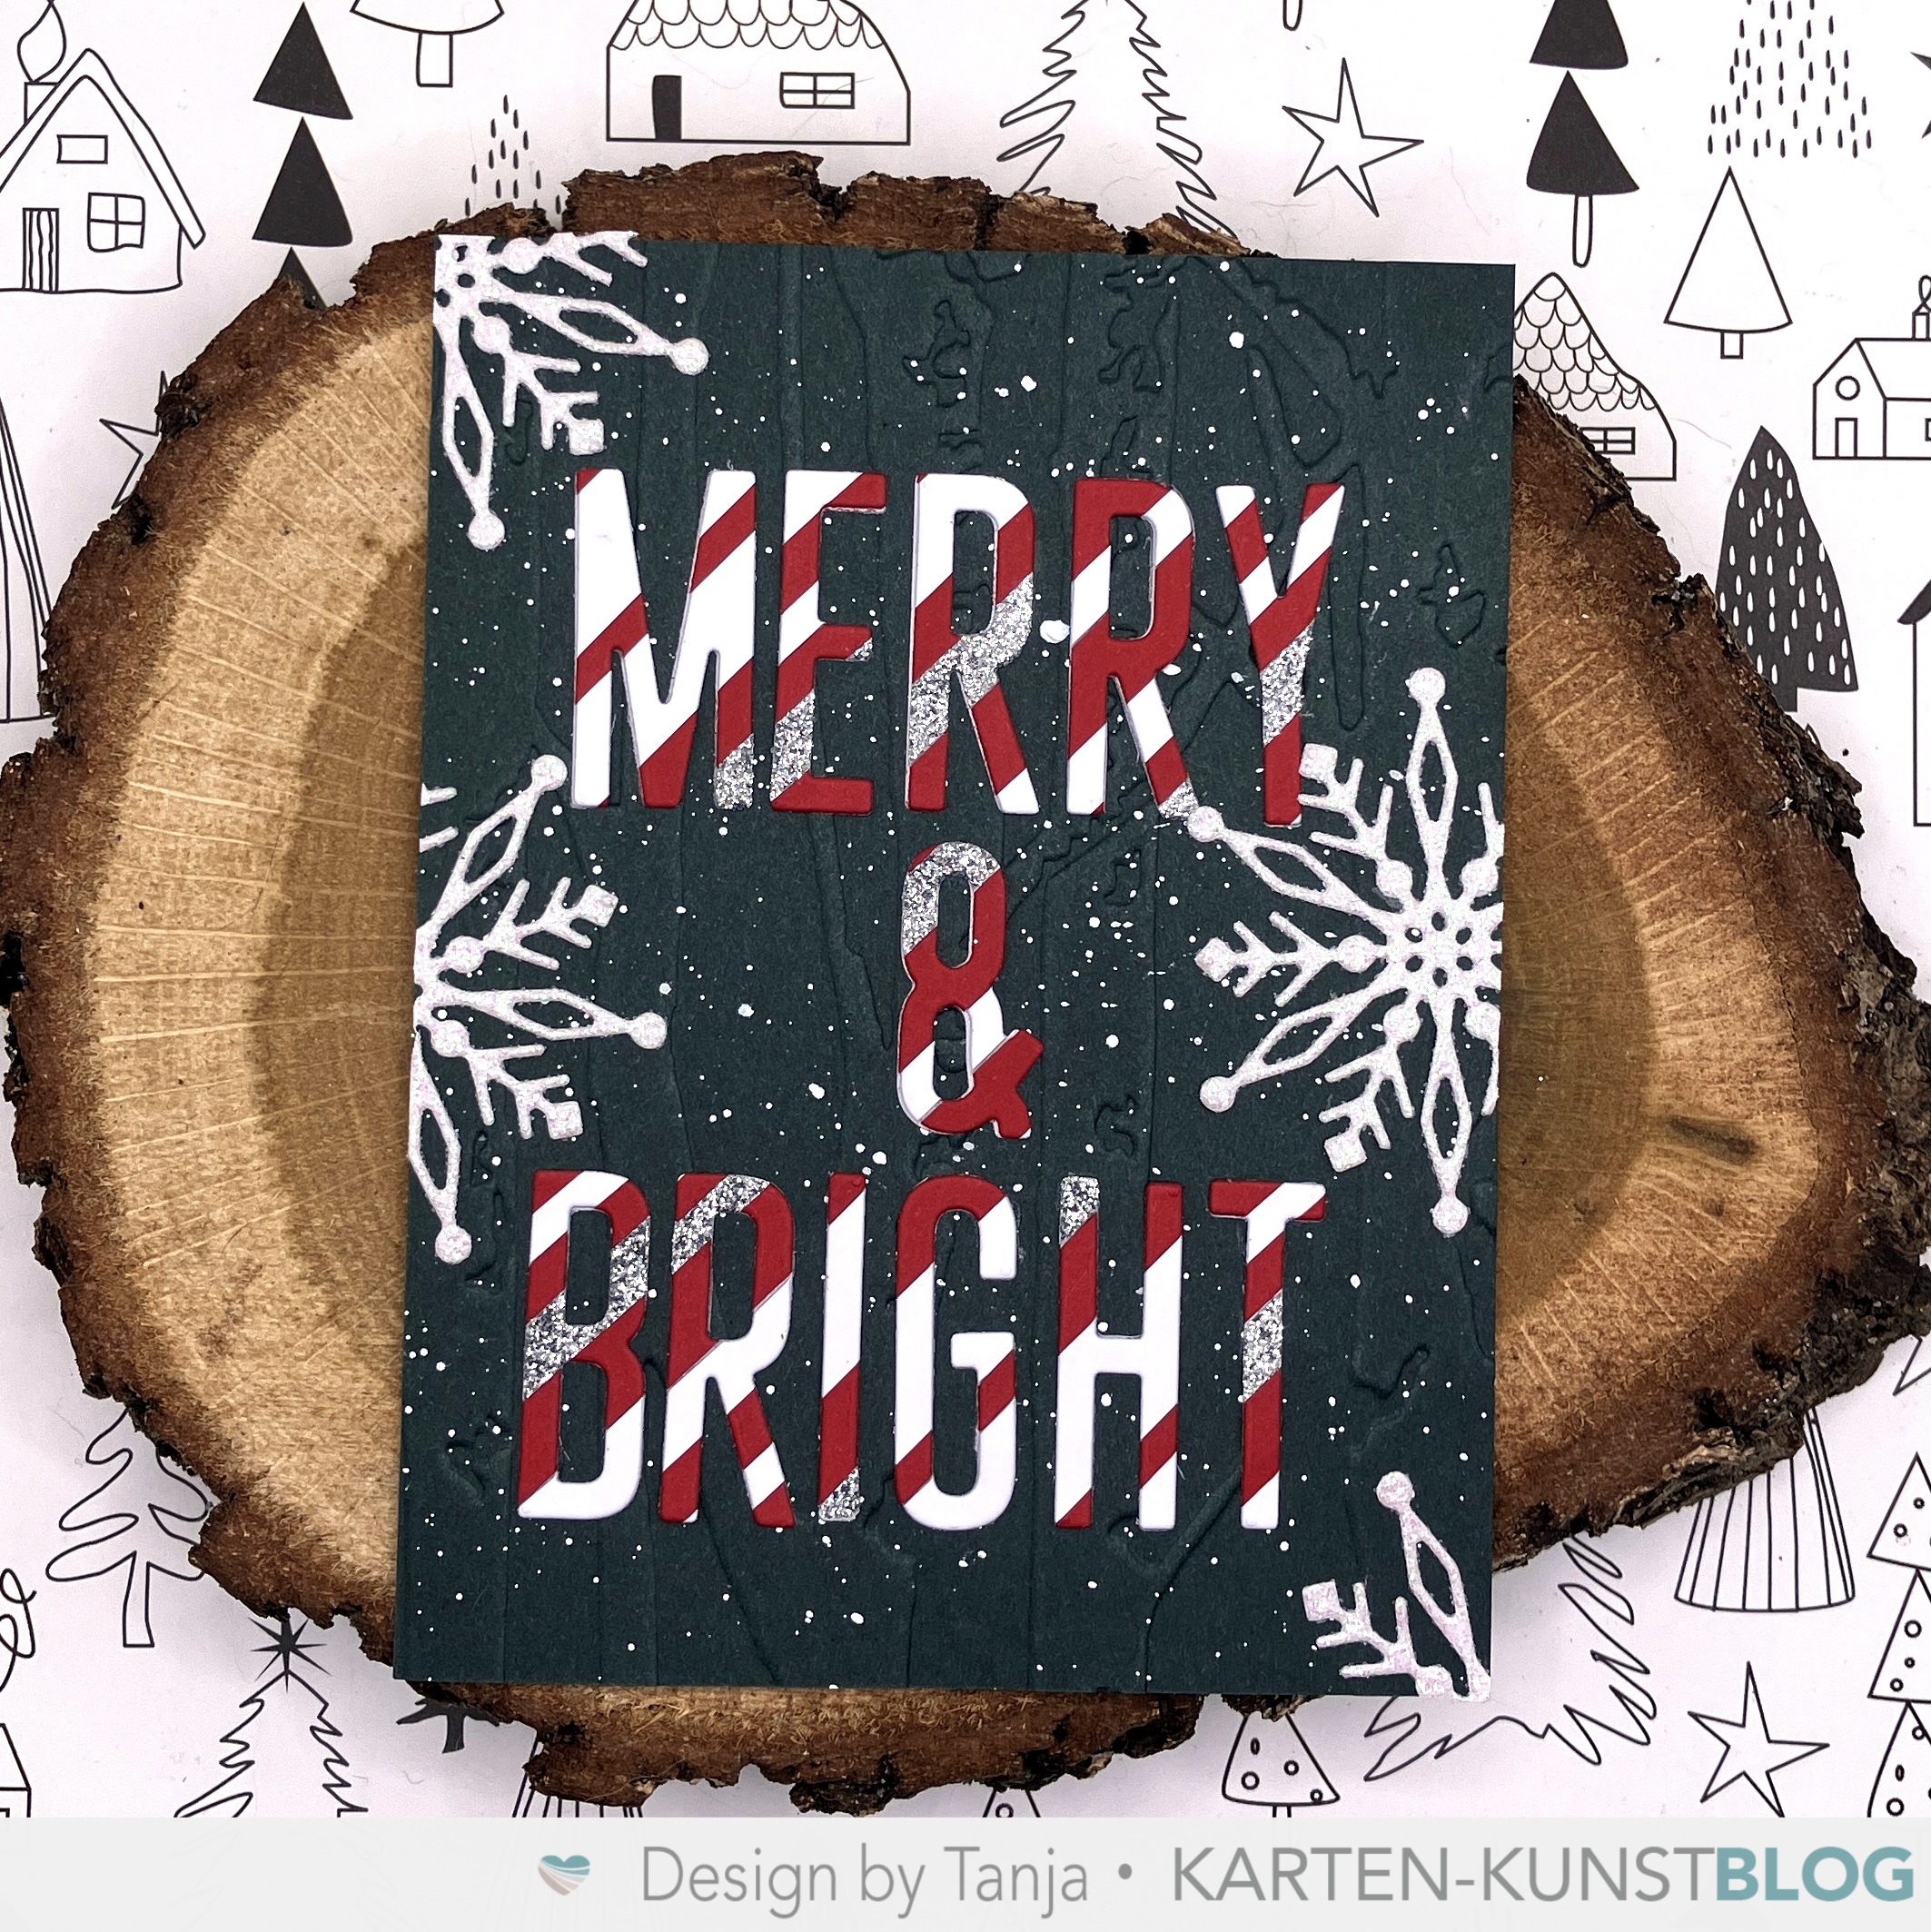
Merry & Bright

Hi there,

I created this Classic Christmas Card for the Karten-Kunst Blog:

  • create a background using dark green cardstock, an embossing folder and watered-down white gouache
  • cut out the sentiment from DIY striped cardstock using the Karten-Kunst Joy Alphabet and the Karten-Kunst Joy Alphabet Add-On die sets
  • add some Karten-Kunst Mini Snowflakes 2 cut from white glitter paper as final embellishments

Have a wonderful day.

Hugs,


Thursday, October 31, 2024

Too Cute to Spook

Hi there,

I created this cute Halloween Card for Mennys Bastelshop using the Gerda Steiner Designs Ghosts and Halloween Ghosts stamp sets:

  • stamp four ghosts from the Gerda Steiner Designs Ghosts and Halloween Ghosts sets with Lawn Fawn River Rock
  • color the images with Spectrum Noir Triblend Markers, add extra shading with Faber-Castell Polychromos pencils and highlights with a white gel pen
  • create a background with the help of Distress Ink (Wilted Violet, Black Soot), watered-down white gouache and the Elizabeth Craft Designs Spiderweb cut from black cardstock
  • add the Time for Tea Designs Too Cute to Spook as a sentiment cut from vellum and black cardstock - apply Wink of Stella Clear Glitter for extra sparkle 

Have a Happy Halloween.

Hugs,


Thursday, February 22, 2024

Easter Basket

Hi there,

I created this Easter Gift Basket using the brand new Anjas Basteltraum Geschenkekörbchen die set:


  • cut out the Anjas Basteltraum Geschenkekörbchen from kraft cardstock
  • ink up the edges with Distress Ink Scorched Timber
  • add splatters with watered-down white gouache
  • stamp two images from the Anjas Basteltraum Osternest set with Versafine Clair Pinecone
  • color the images with watercolors from the Frau von Bommel Boho Set
  • add extra shading with faber-Castell Polychromos pencils
  • thread natural twine through the holes of the basket


I hope you got inspired.

Hugs,


Monday, February 5, 2024

Handmade Dandelions

Hi there,

I created this layered Wax Seal card for the Karten-Kunst Blog:

  • create a background using kraft cardstock, an embossing folder, a brayer, white pigment ink and some watered-down white gouache
  • cut out three Karten-Kunst Dandelion Hearts from kraft and colored cardstock
  • add some texture with a white gel pen
  • create a wax seal and highlight the letters with the Molotow Liquid Chrome pen


Have a wonderful day.

Hugs,


Sunday, January 7, 2024

Happy New Year

Hi there,

I created this cute Happy New Year Card using the Anjas Basteltraum Unter dem Mistelzweig stamp set:

  • stamp the little bird from the Anjas Basteltraum Unter dem Mistelzweig set with Distress Oxide Ink Lost Shadow onto a piece of black watercolor paper
  • color the image with gouache and add a wreath around the bird
  • stamp the sentiment from the Karten-Kunst Feuerwerk set with Versamark and heat-emboss it with WOW! Bright White Super Fine embossing powder
  • add some dots with Finetec Mica Watercolors and the Molotow Liquid Chrome pen
  • round the corners of the panel before adhering it to a cardbase covered with patterned paper

Have a wonderful and creative New Year.

Hugs,


Thursday, December 28, 2023

Christmas Holidays

Hi there,

I created this sweet Christmas Card for Menny's Bastelshop:

  • create a window scene with the help of the Tim Holtz Tree Line die, the Clearly Besotted Stamps Window die, Distress Ink Tumbled Glass and watered-down white gouache
  • create a background using Distress Ink Pumice Stone, the Clearly Besotted Stamps Build it stencil, the Hero Arts Designer Woodgrain stamp and Distress Oxide Ink Pumice Stone
  • stamp all the elements from the Lawn Fawn Christmas Dreams set with Gina K. Obsidian, cut them out and color them with Schmincke Horadam Watercolors
  • add strips of patterned paper to the top and bottom of the panel before adhering it to a cardbase

I hope you had wonderful Christmas Days.

Hugs,


Sunday, December 24, 2023

Merry Christmas Santa

Hi there,

I created this vintage Christmas Card using one of the adorable Anjas Basteltraum Weihnachtsmänner:

  • cut out a circle from watercolor cardstock
  • stamp one of the Anjas Basteltraum Weihnachtsmänner with InkOn3 Fadeout Ink 
  • color the image with watercolors and add extra shading with Faber-Castell Polychromos pencils
  • cut out the Sunny Studio Stamps Mini Mat 2 from patterned paper
  • create a background on Neenah Desert Storm kraft cardstock using snowflakes from the Anjas Basteltraum Weihnachtssprüche set, white pigment ink, white gouache and Distress Ink Walnut Stain
  • cut out a poinsettia and some leaves from the Spellbinders Christmas Bird Poinsettia die set and add extra shading with Distress Ink (Forest Moss, Aged Mahogany)
Have a wonderful Christmas Time.

Hugs,


Sunday, December 17, 2023

Christmas Beaver

Hi there,

today is the 3rd Advent Sunday and I would like to show you this cute Forest Scene created with the Anjas Basteltraum Weihnachtsbiber stamp set:

  • stamp the adorable beaver and the little bow from the Anjas Basteltraum Weihnachtsbiber set with Gina K. Designs Obsidian
  • color the images with Spectrum Noir Triblend Markers and add highlights with a white gel pen
  • cut out the Memory Box Evergreen Window from dark green cardstock
  • add Distress Oxide Ink Chipped Sapphire to the background
  • stamp the sentiment from the same set with Versamark and heat-emboss it with WOW! Bright White Super Fine embossing powder
  • splatter the whole card with watered-down white gouache and Finetec Mica Watercolors Tibet Gold
Thanks for joining me on this Advent Sunday.

Hugs,


Monday, December 11, 2023

Winter Greetings Snowflakes

Hi there,

this is another card using one of the new Karten-Kunst Das Rockt die sets:

  • create a background using Distress Oxide Ink Stormy Sky and Shabby Shutters and stamp some snowflakes from the Karten-Kunst Zauberhafte Schneeflocken set with that same ink colors
  • add some droplets with watered-down white gouache
  • cut out the Karten-Kunst Das rockt Wintergrüße outline from vellum and the sentiment from white cardstock
  • add color to the white sentiment with Distress Oxide Ink Spun Sugar and Worn Lipstick

Have a wonderful Christmas Time.


Sunday, December 10, 2023

Santa's Little Helpers

Hi there,

I created this sweet Rooftop Scene using images from the Anjas Basteltraum Weihnachten bei Katz und Maus and the Anjas Basteltraum Weihnachtsmänner stamp sets:

  • stamp some mice from the Anjas Basteltraum Weihnachten bei Katz und Maus set and the chimney and the presents from the Anjas Basteltraum Weihnachtsmänner set with Lawn Fawn River Rock
  • color the images with Spectrum Noir Triblend Markers, add extra shading with Faber-Castell Polychromos pencils and highlights with a white gel pen
  • use the Lawn Fawn Rooftop Border, grey cardstock and Distress Ink Pumice Stone to create a roof
  • for the sky background I used blue cardstock, the Spellbinders Sparkling Snow embossing folder, a brayer, white pigment ink, Distress Ink Faded Jeans and splatters of white gouache
  • cut out the Creative Expressions Merriest Christmas as a sentiment from the same grey cardstock that you already used on the roof
Have a wonderful Advent Sunday.

Hugs,


Monday, December 4, 2023

Candy-Striped Merry Christmas

Hi there,

here is another Christmas Card using the Karten-Kunst Das rockt Frohes Fest die set:

  • create your own striped cardstock using green, red and white cardstock stripes
  • cut out the background from the Karten-Kunst Das rockt Frohes Fest die set from this DIY paper
  • cut out the letters from Neenah Desert Storm kraft cardstock, stamp the Karten-Kunst Sternenschweif with Versamark and heat-emboss it with WOW! Bright White Super Fine embossing powder
  • cut out two green frames and two kraft circles using the Karten-Kunst Small Frames die set
  • stamp images from the Karten-Kunst Mini Frames Christmas into the circles and color them with Spectrum Noir Triblend Markers
  • add little snow dots with a white gel pen
  • cut out a background panel from Neenah Desert Storm kraft cardstock using one of the Karten-Kunst Stitched DIN lang dies
  • cover a cardbase with patterned paper and add the other layers on top
  • use watered-down white gouache to create some splatters


I hope you got inspired.

Hugs,