Showing posts with label Slider. Show all posts

Sunday, May 24, 2020

Happy Birthday Pals

Hi there,

I created this cute double slider card for my husband's birthday:

  • create a slider mechanism using smooth white cardstock, the My Favorite Things Stitched Rounded Rectangle STAX die set, a piece of plastic and double-sided adhesive
  • stamp the bear, the hearts, the bunny, the sentiment and the balloons from the following Avery Elle sets (Birthday Bus, Peek-a-Boo Pals, Polar Peek-a-Boo Pals) with Memento Espresso Truffle
  • add a little flower to the bunny's ear from the Clearly Besotted Stamps Make a Splash set
  • color the images with Delta, Touch Twin Brush and Copic Markers, add extra shading with Prismacolor Colored pencils and highlights with a white gel pen
  • create a polaroid around the bunny with the help of  one of the My Favorite Things Polaroid dies
  • stamp a woodgrain onto the polaroid frame using the Lawn Fawn Woodgrain Backdrops, Versamark and WOW! Bright White Super Fine embossing powder
  • offset another polaroid frame cut from patterned paper from the Avery Elle The Sorbet Collection 6x6 paper pad
  • add a little pulling device cut with the help of one of the dies from the Lawn Fawn Magic Color Slider die set from that same pink cardstock
  • thread a piece of twine through the little hole on the pulling device
  • add Nuvo Glitter Drops as final embellishment


I hope you got inspired.

Hugs,


Saturday, December 28, 2019

Season's Greeting Slider Card

Hi there,

I created this Christmas Slider Card using lots of Lawn Fawn goodies:

  • cut out the all the elements for a slider card from watercolor paper using the Lawn Fawn Double Slider Surprise die set
  • add color to the background using Distress Oxide Inks (Blueprint Sketch, Chipped Sapphire)
  • use watered-down white gouache to create snowfall splatters
  • build a scene using the Mama Elephant Snow Capped Mountains and the Lawn Fawn Road Border and white, light grey and dark grey cardstock
  • add shading to the mountains with Distress Ink Pumice Stone
  • stamp the little car from the Lawn Fawn Home for the Holidays set and some houses, a lantern and a tree from the Lawn Fawn Winter Village set with Versafine Onyx Black onto watercolor paper
  • color the images with Clean Color Real Brush Pens, Distress Markers and a damp watercolor brush
  • adhere patterned paper from the Pinkfresh Studio December Days 6x6 paper pad to the cardbase 
  • stamp the sentiment from the Lawn Fawn Home for the Holidays set with Versafine Onyx Black 
  • add little hearts die cut from red glitter cardstock with the help of the Mama Elephant Confetti die
  • heat-emboss the little garland onto the tree using Versamark and WOW! Metallic Gold Rich Pale embossing powder
  • punch a little hole into the slider panel and add silver thread


I hope you got inspired.

Hugs,


Tuesday, October 8, 2019

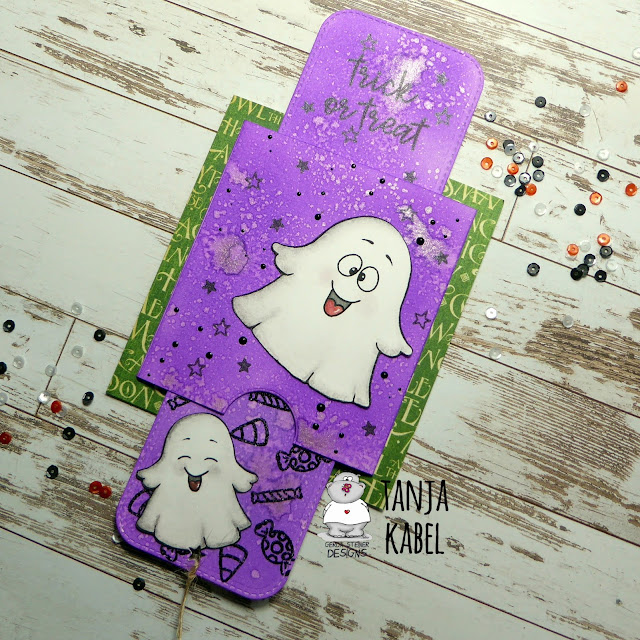
Trick or Treat Ghosts

Hi there,

I created this double slider card using the new Gerda Steiner Designs Boo for you stamp set:

  • create a double slider mechanism using the My Favorite Things Stitched Rounded Rectangle STAX, watercolor paper, one of the Kesi'Art Encoches and a piece of plastic
  • add color with Distress Oxide Ink Wilted Violet and a Mini Ink Blending Tool
  • mist the panels with Pearlized Water for extra texture and shimmer
  • color the adorable little ghosts from the Gerda Steiner Designs A Boo for you set with Derwent Graphitint pencils and a damp watercolor brush
  • add highlights with a white gel pen
  • decorate the bottom panel with candy from the Gerda Steiner Designs Where is the Candy? set using Versamark and WOW! Black Twinkle embossing glitter
  • stamp the sentiment from the same set with Delicata Black Shimmer onto the top panel
  • add some stars from the Gerda Steiner Designs Alien Invasion set with that same black ink 
  • Nuvo Crystal Drops in Ebony Black are the final embellishment on the front and top panel
  • punch a star-shaped hole into the bottom panel and thread a piece of natural twine through it
  • cover a cardbase with patterned paper from the Graphic 45 An eerie Tale 6x6 paper pad before adhering the slider panel


I hope you got inspired.

Hugs,

Monday, January 28, 2019

Huuiii!

Hi there,

I created this fun winter slider card for the Karten-Kunst Blog:

  • stamp the adorable Karten-Kunst Barney der Eisläufer with Versafine Onyx Black and color the image with Derwent Inktense pencils and a damp watercolor brush
  • add Wink of Stella Clear Glitter to the mane and the tail and Wink of Stella Silver Glitter to the horn
  • create a slider background using watercolor paper, the Memory Box Stitched Rectangles Layers, the My Favorite Things Stitched Snow Drifts, double-sided foam adhesive and some plastic
  • add color with Distress Inks (Chipped Sapphire, Tumbled Glass) and a Mini Ink Blending Tool
  • stamp the sentiment from the same set with Versafine Onyx Black onto the snow drift
  • add a trail onto the snow drift with Finetec Mica Watercolor Dragon Silver
  • stamp some stars from the same set into the evening sky with Delicata Silvery Shimmer
  • stamp the Pull Here from the Lawn Fawn Push Here set onto he pull tap
  • adhere a piece of patterned paper from the Maja Design Home for the Holidays 6x6 paper pad to the cardbase before adding the slider panel


I hope you got inspired.

Hugs,


Tuesday, December 25, 2018

Merry Christmas Surprise Slider Card

Hi there,

inspired by Jennifer McGuire I created this Surprise Christmas Slider card for Elizabeth Craft Designs:

  • cut out the Elizabeth Craft Designs Elegant Christmas Tree from patterned paper from the ModaScrap Christmas Holidays 6x6 paper pad
  • cut the outline of the tree from a piece of Elizabeth Craft Designs white Soft Finish Cardstock covered with Elizabeth Craft Designs clear double-sided adhesive
  • add Silk Microfine Glitter Ice Teal to the shape and glue the tree cut from patterned paper on top
  • cut out the Elizabeth Craft Designs Merry Christmas Small from silver foiled cardstock
  • create a background on a white panel using stamps from the Elizabeth Craft Designs Poinsettia set and Versafine Clair Morning Mist
  • cut out one of the Elizabeth Craft Designs Dotted Scallop Circles from that same patterned paper and stamp the sentiment from the Elizabeth Craft Designs Classic Christmas Sentiments with Versafine Clair Morning Mist
  • assemble the surprise slider as shown in Jennifer's video
  • stamp the "Pull Here" from the Lawn Fawn Push here set with that same grey ink

I hope you have a wonderful Christmas Time.

Hugs,


Tuesday, July 3, 2018

Happy Birthday Snail

Hi there,

did you see the lovely new Gerda Steiner Designs Turtley Great stamp set? I created this hidden slider channel card using the cute little snail from the set:

  • create a hidden slider card using watercolor cardstock, Distress Ink Tumbled Glass and the My Favorite Things Cloud stencil for the background; the Memory Box Modern Landscape die, the Lawn Fawn Grassy Border die, one of the My Favorite Things Stitched Snowdrift dies, kraft cardstock and patterned paper from the ModaScrap Color of Puppies Boys 6x6 paper pad for the landscape
  • furthermore, you need one of the Lawn Fawn Slide on over dies to cut the hidden slider channel
  • I followed these instructions by Karolyn Loncon from Paper Therapy to create the mechanism
  • stamp the "Pull Here" from the Lawn Fawn Push Here set with Versafine Clair Morning Mist
  • stamp the snail and the present from the new Gerda Steiner Designs Turtley Great set and color the images with Derwent Inktense pencils and a damp watercolor brush
  • add some sparkle with the Nuvo Midas Touch Shimmer Pen
  • cut out the CUTplorations happy from kraft cardstock and patterned paper from the same patterned paper pad and add the "Birthday" using a label maker


You should really try to create this stunning mechanism. Who doesn't love an interactive card?

Hugs,


Monday, August 1, 2016

Happy Birthday Human Slider Card

Hi there,

today, I would like to show you this super fun slider card on the Karten-Kunst Blog:


  • create a Galaxy background using Distress Paints (Tumbled Glass, Broken China, Shaded Lilac, Chipped Sapphire, Picket Fence)
  • stamp several solid stars from the Gerda Steiner Desings Alien Invasion stamp set with Versamark and heat-emboss them with Judi Kins Egyptian Gold embossing powder 
  • cut out a slider slot using one of the Lawn Fawn Slide on over dies
  • stamp the space ship, the alien and two planets from the same stamp set with Versafine (Onyx Black) and color the images with Derwent Inktense pencils and a waterbrush
  • add Spectrum Noir Clear Overlay to the planet and the space ship
  • use hot glue to adhere two plastic beeds (I didn't want to use a coin or foam tape) to the back of the spaceship and close the slider with a paper strip after putting the beads through the slider slot
  • stamp the sentiment from the same set with Versamark onto a stitched kraft banner and heat-emboss it with WOW! Bright White Super Fine embossing powder
  • mat the Galaxy panel onto a slightly larger panel of Neenah Desert Storm Kraft cardstock embossed with a star pattern - cover the visible strip at the bottom with Spectrum Noir Clear Overlay
  • ahere all the layers to a dark kraft cardbase


Seize the Birthday Challenge 


Steckenpferdchen Challenge #75 -Aquarell


A Bit more Time to Craft Challenge #25 - Anything goes

Simon Says Stamp Wednesday Challenge - Simon says anything goes

613 Avenue Create Challenge #187 - Anything goes

Craft your Passion Challenge #323  - Anything goes

Creative Craft Cottage Challenge #68 - Anything goes


I hope you got inspired.

Yours,


Monday, May 30, 2016

Shine On Slider Card

Hi there,

I created this fun slider card for the Karten-Kunst Blog:

  • stamp the cute little sun from the My Favorite Things Things with Wings stamp set with black ink
  • cut the image out with the My Favorite Things Stitched Mini Scallop Circle STAX and color it with Delta and Touch Twin Brush Markers
  • create a background on a stitched watercolor paper panel using Distress Inks (Squeezed Lemonade, Mustard Seed, Fossilized Amber)
  • spritz it with clean water, let it sit for a minute and remove the excess with a paper towel
  • stamp the sentiment from the same stamp set with Versafine Onyx Black
  • cut out slider slot
  • place one little coin behind the panel, place a piece of foam tape on top and add the second coin above the panel - your slider mechanism is ready now
  • adhere the sun using hot glue

Here is a short video showing you the sliding sun:


Little Red Wagon Challenge #343 - Round and round

Simon Says Stamp Wednesday Challenge - Simon says anything goes

Send a Smile 4 Kids Challenge - Bright Colors

Creative with Stamps Challenge #2 - Clean and Simple

Craft Rocket Challenge #16 - Monochrome


I hope that you like my creation.

Yours,