Tuesday, April 30, 2019

Celebrate Birthday Bear

Hi there,

I created this sweet Birthday Card using the Gerda Steiner Designs Birthday Bear:

  • color the Gerda Steiner Designs Birthday Bear with ZIG Clean Color Real Brush Pens and a damp watercolor brush
  • add Nuvo Crystal Glaze to the candle and the icing on the cake
  • stamp the sentiment from the Altenew Label Love with Versafine Onyx Black
  • apply Distress Oxide Ink (Picked Raspberry, Carved Pumpkin, Squeezed Lemonade) through the Clearly Besotted Stamps Heart Confetti stencil onto a stitched panel with Blending Brushes
  • prepare a piece of cardstock with Versamark and WOW! Silver Bells embossing powder and cut out three hearts with the help of the Sizzix Magical Unicorn die set
  • adhere the panel to a yellow cardbase


Hope to see you again soon.

Hugs,


Monday, April 29, 2019

For you - Für Dich

Hi there,

I created this watercolor card using the new Karten-Kunst Scribble Daisies and the Karten-Kunst Labelwriter Geburtstag stamp sets:

  • stamp three flowers from the Karten-Kunst Scribble Daisies set and the sentiment from the Karten-Kunst Labelwriter zum Geburtstag set with Versafine Onyx Black
  • color the images and the background with Ecoline Liquid Watercolor and add some dark blue splatters
  • add a strip of black cardstock and of striped patterned paper to the left side of the panel before adhering it to a cardbase


Thanks for stopping by.

Hugs,


Friday, April 26, 2019

Hello Sunshine

Hi there,

I created this rainbow spring card for Elizabeth Craft Designs:

  • stamp the sentiment from the Elizabeth Craft Designs Spring Sentiments set and the pattern from the Elizabeth Craft Designs Patterns 2 set with Versafine Clair Nocturne
  • color the petals with colors from the Derwent Inktense Paint Pan Set
  • embellish the panel with different colors of Nuvo Crystal Drops
  • add a strip of washi tape to the top and bottom of the cardbase before adhering the panel


Have a colorful day.

Hugs,


Thursday, April 25, 2019

Somebunny Sends Smiles

Hi there,

I created this sweet little tag for the Stamping-Fairies Facebook Group:

  • cut out a stitched tag from smooth white cardstock
  • create a little image using stamps from the My Favorite Things Somebunny set and Versafine Onyx Black - use the masking technique
  • color the image with Clean Color Real Brush Pens and the Colorless Blender
  • stamp the first part of the sentiment using two colors of Altenew Crisp Ink (Purple Wine, Cosmic Berry) for an ombre look
  • stamp the second part of the sentiment onto a strip of turquoise cardstock with Versamark and heat-emboss it with WOW! Bright White Super Fine embossing powder
  • cut out some grass from green cardstock
  • adhere all the elements to the tag
  • thread a piece of matching twine through the hole of the tag


Thanks for stopping by.

Hugs,


Tuesday, April 23, 2019

Miss you

Hi there,

today I would like to show you this sweet Miss You Card created with the Gerda Steiner Designs Dog and Butterfly Digital Stamp set:

  • color the Gerda Steiner Designs Dog and Butterfly Digital Stamp set with Zig Clean Color Real Brush Pens and a damp watercolor brush
  • stamp the sentiment from the Create a Smile Kleine Sprüche set with Versafine Onyx Black 
  • cut out a scalloped stitched panel around the image
  • adhere the panel to a cardbase covered with patterned paper from the Little Yellow Bicycle Fern & Forest 6x6 paper pad


Hope to see you again soon.

Hugs,


Monday, April 22, 2019

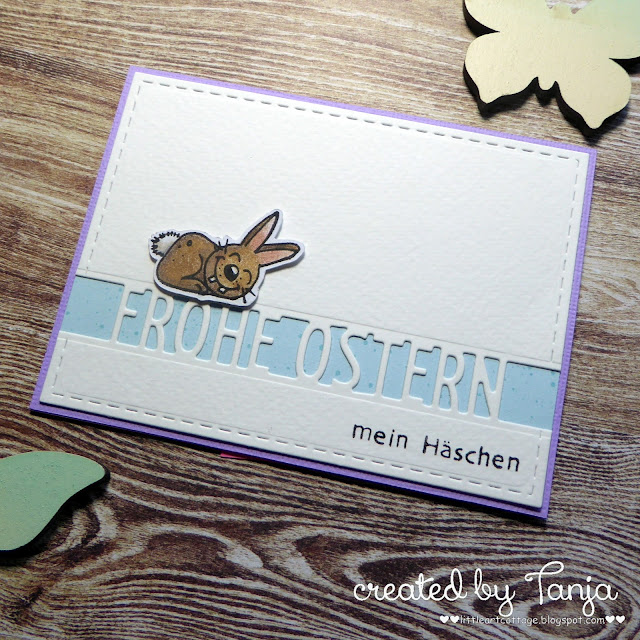
Happy Easter Bunny - Frohe Ostern mein Häschen

Hi there,

I hope you have a wonderful Easter Time!
Today, I would like to show you this sweet card that I created for the Karten-Kunst Blog:

  • cut out the Karten-Kunst Brückentext Frohe Ostern from a stitched panel of white cardstock
  • stamp the second part of the sentiment with the help of the Stampendous Tiny Alphabet and Versafine Onyx Black
  • layer a piece of patterned paper from the Lawn Fawn Spiffy Speckles 6x6 paper pad behind the panel before adhering it to a purple cardbase
  • stamp the bunny from the Karten-Kunst Viecher im Winter set with Versafine Onyx Black and color the image with Faber-Castell Polychromos pencils
  • adhere it to the panel with double-sided foam adhesive


Thanks fro stopping by today.

Hugs,


Sunday, April 21, 2019

STAMPlorations Stencil Sunday

Hi there,

today, I have the huge honor to present four projects using the fabulous ARTplorations Stencils in this Stencil Sunday Feature over on the STAMPlorations Blog.

My first project is this Coffee Tag:

  • stamp the STAMPlorations Coffee Bags & Donut with Versafine Vintage Sepia
  • color the image with Faber-Castell Polychromos pencils
  • add highlights with a white gel pen and extra dimension with Nuvo Crystal Glaze
  • cut out one of the CUTplorations Stitched Tags from kraft cardstock
  • stamp the sentiment from the STAMPlorations What's Brewing set with Versamark and heat-emboss it with WOW! Bright White Super Fine embossing powder
  • apply Distress Oxide Ink Ground Espresso through the ARTplorations Dots 'n' Beans stencil with a Mini Ink Blending Tool
  • use that same ink color to dye a piece of torn seam binding
  • add some droplets of pearlized water
  • thread the seam binding through the hole of the tag


My second project is this Mixed Media Canvas:

  • apply Modeling Paste through the ARTplorations Peeking Dahlias stencil and let it dry thoroughly
  • add color with watered-down Distress Paints (Spun Sugar, Peacock Feathers, Shaded Lilac, Tumbled Glass)
  • use some Charcoal Powder mixed with water to grunge up the edges
  • stamp the dot texture from the STAMPlorations Mixed Media Grunge set with Archival Ink Watering Can for even more texture
  • stamp some dots using Distress Paint Peacock Feathers and bubble wrap
  • add the sentiment from the STAMPlorations Say it big: Collect Moments set with Versafine Smokey Gray and heat-emboss it with DIY Glitter embossing powder
My third project uses a summer color combination:

  • create a background strip on watercolor paper with the help of the ARTplorations A Whale's Tale stencil, Distress Oxide Inks (Carved Pumpkin, Twisted Citron, Wilted Violet) and water from your Mini Mister
  • stamp the beach chair with Versafine Vintage Sepia and color the image with Faber-Castell Polychromos pencils
  • add some sparkle and shine using Wink of Stella Clear Glitter
  • cut out the CUTplorations Relax from kraft cardstock and use the negative on the card
  • add some splatters with watered-down black Stabil All pencil
  • cut the top right corner with a 1'' corner rounder


On my fourth and final project I used one of the beautiful new ARTplorations Faces stencils:

  • create a watercolor background on a piece of watercolor paper using Avery Elle Liquid Watercolors
  • apply Distress Oxide Ink Black Soot through the ARTplorations Faces: Pensive stencil
  • add a little two-layered flower cut with the help of one of the dies from the CUTplorations Trendy Spring Blossoms set - one layer is cut from glitter paper and one from vellum
  • add a little glitter enamel dot in the center of the flower
  • stamp the sentiment from the STAMPlorations Noteworthy 2 set with Versafine Onyx Black
  • add a strip of pink glitter paper to the left side of the panel before adhering it to a cardbase


I hope you got inspired and are looking forward to our next Stencil Sunday.


Hugs,


Saturday, April 20, 2019

Happy Easter Plushy

Hi there,

I created this cute Easter card using the adorable little bunny from the Clearly Besotted Stamps Spring Plushies set:

  • cut out an Elizabeth Craft Designs Dashing Square from Confetti White Cardstock
  • stamp the bunny from the Clearly Besotted Stamps Spring Plushies set with Altenew Crisp Ink Almond Butter and mask off the image
  • create a background using the circles from the Flora & Fauna Texture 2 set and Altenew Crisp Ink (Caribbean Sky, Sweet Leaf, Coral Berry)
  • remove the masking and color the image with Prismacolor Colored Pencils 
  • add a grass border cut with the help of the Elizabeth Craft Designs Adventure Edges
  • create a background on a kraft panel using the JudiKins Papyrus stamp, Versamark and WOW! Seafoam White Super Fine embossing powder
  • stamp the sentiment from the Neat & Tangled Cottontail Cuties set with Distress Oxide Ink Picked Raspberry onto a strip cut from kraft cardstock and heat-emboss it with clear embossing powder


Have a wonderful Easter Time.

Hugs,


Friday, April 19, 2019

Pastel Felt Easter Egg

Hi there,

I created another cute little felt Easter Egg for Elizabeth Craft Designs:

  • cut out two Easter Eggs from felt using dies from the Elizabeth Craft Designs Elegant Easter Eggs Small set
  • embellish the egg with a little wreath cut with the help of one of the dies from the Lawn Fawn Mini Wreath die set and some tiny flowers from the Elizabeth Craft Designs Adventure Edges 2 die set
  • add sequins and seed beads for sparkle and even more dimension


Have a wonderful day.

Hugs,


Thursday, April 18, 2019

Stay Unique

Hi there,

I fell in love with the unicorns from the Uniquely Creative Stay Unique stamp set and that is why I created another card using them for the Stamping-Fairies Facebook Group:

  • stamp two of the the adorable unicorns from the Uniquely Creative Stay Unique set with Versafine Onyx Black
  • color the images with Derwent Inktense Pencils and a damp watercolor brush
  • add some sparkle with Wink of Stella Clear Glitter and some dimension to the horns with Nuvo Crystal Drops Gold Coast
  • cut out some rainbows and clouds from glitter cardstock using dies from the Sizzix Magical Unicorn set
  • cut out a stitched panel and a cloud border from smooth white cardstock and add color with Distress Oxide Inks (Tumbled Glass, Spun Sugar, Milled Lavender) and a Blending Brush
  • apply Distress Oxide Ink Picked Raspberry on top off that background through a heart stencil
  • stamp the first and second part of the sentiment from that same stamp set with Versafine Clair Morning Mist
  • adhere all the layers to a white cardbase
  • add some Little Things from Lucy's Cards Itty Bitty Stars in Matt Silver


Leave a little sparkle wherever you go.

Hugs,


Tuesday, April 16, 2019

Eggstra-Special

Hi there,

this week I would like to show you another Easter Card that I created with an image from the Gerda Steiner Designs Easter Bunnies Digital Stamp Bundle:

  • color the image from the Gerda Steiner Designs Easter Bunnies Digital Stamp Bundle with Zig Clean Color Real Brush Pens and a damp watercolor brush
  • stamp the sentiment from the Doodlebug Design Happy Easter Doodle Stamps with Versafine Onyx Black right onto the sign
  • create a background with Prima Marketing Vintage Pastels watercolor onto a stitched panel cut from watercolor paper
  • stamp some Easter Eggs from the Gerda Steiner Designs Peeking Easter Friends and the Gerda Steiner Designs Easter Bunnies sets with Versamark onto that background and heat-emboss them with WOW! Bluetiful embossing powder
  • adhere the panel to a cardbase covered with patterned paper
  • add two Altenew Fine Rectangles cut from grey cardstock around the image 


Have a wonderful Easter Time.

Hugs,