Showing posts with label Felt. Show all posts

Monday, May 17, 2021

Good Night

Hi there,

I created this sweet card using the Karten-Kunst Mini Sheep die set:

  • cut out the Karten-Kunst Mini Sheep from white cardstock
  • add color with Spectrum Noir Triblend Markers
  • cut out the fur from felt and adhere it to the cardstock
  • create a background using Distress Oxide Ink Speckled Egg, a Blending Brush and a cloud stencil
  • cut out the sentiment from kraft cardstock using the Karten-Kunst Stencil Alphabet
  • stamp some stars from the Karten-Kunst Kränze & Kreise set with Versafine Onyx Black


Have a wonderful day.

Hugs,


Friday, April 19, 2019

Pastel Felt Easter Egg

Hi there,

I created another cute little felt Easter Egg for Elizabeth Craft Designs:

  • cut out two Easter Eggs from felt using dies from the Elizabeth Craft Designs Elegant Easter Eggs Small set
  • embellish the egg with a little wreath cut with the help of one of the dies from the Lawn Fawn Mini Wreath die set and some tiny flowers from the Elizabeth Craft Designs Adventure Edges 2 die set
  • add sequins and seed beads for sparkle and even more dimension


Have a wonderful day.

Hugs,


Monday, April 1, 2019

Felt Easter Egg

Hi there,

I created this dimensional felt Easter Egg for Elizabeth Craft Designs. Over on the ECD Blog you can find 14 more Hoppy Easter Projects.

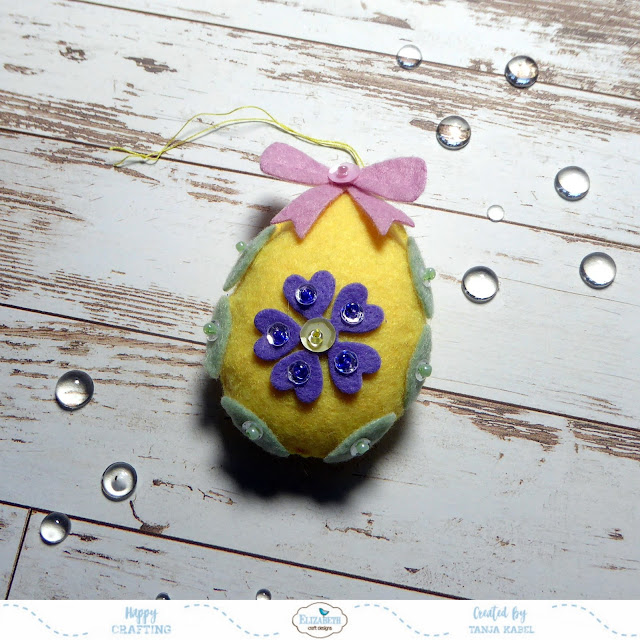
  • cut out two Easter Eggs and the bow from felt using dies from the Elizabeth Craft Designs Elegant Easter Eggs Small set
  • embellish the egg with leaves from the Elizabeth Craft Designs Jungle Leaves set and a flower from the Elizabeth Craft Designs Small Flower set
  • add sequins and seed beads for sparkle and even more dimension


Thanks for stopping by.

Hugs, 


Tuesday, December 4, 2018

Fa La La La Llamas

Hi there,

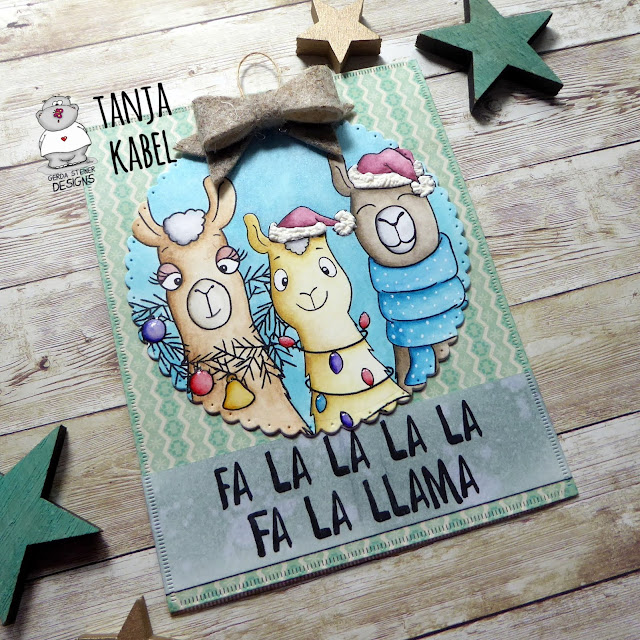
I created this Christmas Card using the new Gerda Steiner Designs Fa-La-La-La-Llamas:

  • cut out Dotted Scallop Circle around the Gerda Steiner Designs Fa-La-La-La-Llamas to make it look like an ornament
  • color the image with Inktense Pencils and a damp watercolor brush
  • add highlights and details with a white gel pen 
  • use white Liquid Applique on the rims and the pompoms of the hats and Nuvo Crystal Glaze on the ornaments and the lights for more dimension and texture
  • add color to the sentiment strip from the same digital stamp set with Distress Oxide Ink Iced Spruce
  • layer the circle onto patterned paper from the Crate Paper Bundled up 6x6 paper pad
  • use felt to create a little bow at the top and natural twine as a little hanger


Have a christmasy day.

Hugs,


Tuesday, November 20, 2018

Peace, Love, Joy Tag

Hi there,

we are starting a new Challenge over on the Elizabeth Craft Designs Blog and this time the topic is "A floral Christmas":

  • cut out all the pieces you need to assemble two pine cones and some foliage using the Elizabeth Craft Designs Pine Cone die set, white Soft Finish Cardstock and kraft cardstock
  • add shading to the kraft cardstock using Distress Ink Gathered Twigs
  • color the foliage with Delta, Touch Twin Brush and Copic Markers
  • cove a pre-cut tag with white gesso and create a background using Distress Paint (Stormy Sky, Walnut Stain)
  • add splatters with watered-down white acrylic paint
  • stamp the sentiment from the Elizabeth Craft Designs Classic Christmas Sentiments with Archival Ink Coffee
  • shape the pine cone elements with the Elizabeth Craft Designs Metal Tool Set and adhere them directly to the tag
  • cut out a bow from felt using dies from the Elizabeth Craft Designs Spring Basket set
  • dye a piece of seam binding with Distress Stain Tarnished Brass and thread it through the hole of the tag
  • add some snow effects using Elizabeth Craft Designs Cool Diamond Silk Microfine Glitter


The question for this month is - Which Elizabeth Craft Designs flower or foliage die or stamp set would you chose to create a Christmas card or decoration?

Hugs,


Monday, March 19, 2018

Flower Wreath

Hi there,

I created this flower wreath using some of the amazing Susan's Garden dies from Elizabeth Craft Designs:


  • cut a circle frame from brown cardstock using two of the Elizabeth Craft Designs Stitched Circles as a base
  • use the larger leaf from the Elizabeth Craft Designs Love in a Mist to cut the branches of the wreath from brown cardstock and glue them to the base
  • cut some Elizabeth Craft Designs Leafy Berry Branches from Elizabeth Craft Designs Soft Finish Cardstock and add color with Alcohol Markers
  • add the berries using Nuvo Crystal Drops Crushed Grape
  • add Elizabeth Craft Designs Anemones and Elizabeth Craft Designs Jasmines also cut from Elizabeth Craft Designs Soft Finish Cardstock and colored with Alcohol Markers
  • achieve the realistic texture by using the most amazing Susan's Garden Tool Set
  • cut the bow from the Elizabeth Craft Designs Spring Basket die set from cream felt and add it to the top of the wreath using hot glue


I hope you got inspired.

Hugs,


Sunday, March 11, 2018

Stamp Connection #35

Hi there,

connected through our love for card making, blogging and being from Germany we (Cornelia from Stempel Spass and I) decided to create a monthly project within predefined requirements. We are going to show you the result every 2nd Sunday of the month and this is our 35th transatlantic get-together!

Our requirement for this meet-up was:
"Easter Egg"

Cornelia has invited the wonderful Mac Mable from The Sweetest of Peas. Make sure to visit her blog and see her creation.


  • cut out the larger and the smaller egg shape from patterned paper using the Elizabeth Craft Designs Color my Easter Eggs die set
  • cut two bows from felt with the die from the same set
  • cut out an Elizabeth Craft Designs Stitched Rectangle from white cardstock and add some color with Mister Huey's Gold spray
  • stamp the sentiment from the Gerda Steiner Designs Nerdy Easter Bunny set with Altenew Crisp Ink Industrial Diamond
  • add some natural twine behind the Easter eggs and adhere the strands to the back of the panel before adhering all the layers to a white cardbase

Now make sure to hop over to see Cornelia's Creation.

Thanks for stopping by. We hope to see you again at the ...


Yours,


Thursday, February 9, 2017

Flower Hair Clip

Hi there,

I would like to show you this Mixed Media Project for big and small flower fairies over on the Stamping-Fairies Blog:

  • dye a piece of cheesecloth with Dylusions Sprays (Bubblegum Pink, Funky Fuchsia)
  • roll the cheesecloth into a strip and apply a generous amount of Prima Marketing Sculpture Medium Clear
  • create a rose and let it dry thoroughly
  • cut out two leaves from green felt using the Tim Holtz Tiny Tattered Florals
  • use the Bosch GluePen to adhere the little flower arrangement to a white hair clip

Have a wonderful day.

Yours,


Tuesday, October 11, 2016

Herbstgrüße - Fall Greetings

Hi there,

I would like to show you this adorable Fall Card using one of the new Gerda Steiner Designs Digital Stamps:

  • color the Gerda Steiner Designs Pumpkin Bear which is still available as part of the Gerda Steiner Designs Digital Stamp Bundle September with Delta and Touch Twin Brush Markers
  • add Glossy Accents to the pumpkin for extra dimension
  • cut out a stitched panel from Neenah Desert Storm kraft cardstock and create a background with the help of the My Favorite Things Whimsical Woodgrain stamp and Avery Elle Pigment Ink (Kraft)
  • cut out a wreath, leaves and berries from brown, green and red felt and adhere the pieces to the background panel
  • stamp the sentiment from Karten-Kunst Capri Herbstgrüße with Versafine (Vintage Sepia)
  • adhere the panel to a dark kraft cardbase

Cute Card Thursday Challenge #446 - Anything goes

Sweet Stampin' Challenge - Autumn

Uniko Challenge #36 - Autumn


Animal Friends Challenge #43 - Halloween/Autumn

Allsorts Challenge #384 - Colors of Autumn

A Bit more Time to Craft Challenge #29 - Anything goes


I hope you got inpsired.

Yours,


Wednesday, July 13, 2016

Unicorn Birthday Invitation

Hi there,

why don't you join us for our Make your Mark Challenge over at Addicted to Stamps and More? This is the birthday invitation that I created for my little daughter:


Come and get it Challenge - Make your own Background

613 Avenue Create Challenge #184 - Anything goes

A Bit More Time to Craft Challenge #23 - Anything goes 

Cut it up Challenge #100 - Anything goes

Die Cut Divas Challenge  - Make it Glitter

Pile it on Challenge #112 - Use your favorite Colors

I hope you got inspired.

Yours,


Friday, April 22, 2016

Get Well Roses

Hi there,

the topic of our new Challenge over at A Day for Daisies is "Anything but a Card" and of course I had to create a tag:


Craft your Passion Challenge #308 - Anything goes

A Bit more Time to Craft Challenge #18 - Anything goes

Have a day for daisies.

Yours,


Monday, April 4, 2016

Easter Ornament

Hi there,

I would like to show you this little Easter Ornament over at the Karten-Kunst Blog:


Come and get it Challenge - Tag you're it

Fun with Shapes and more Challenge #197 - Hasen

Uniko Challenge #30


Simon Says Stamp Wednesday Challenge - Anything goes

A Bit More Time To Craft Challenge #17 - Anything goes


I hope you got inspired.

Yours,


Saturday, March 12, 2016

Hoppy Easter Tag

Hi there,

it's time for The Stamp Tramps March Hop and on my project I will show you some ombre stamping and how to use your border dies and felt to embellish your tags:


Fun with Shapes and More Challenge #197 - Hasen

Craft Rocket Challenge #10 - Feathers and/or Fur

Challenge up your Life #36 - Die Cutting


Animal Friends Challenge #36 - Happy Easter

Time Out Challenge #51 - Easter and/or Spring


I hope that you enjoy the rest of the hop:

Tanja - you are here!

Thanks for stopping by.

Yours,