Tuesday, March 31, 2020

Hope your Easter is Hoppy

Hi there,

today I would like to show you how to create this sweet Easter Reveal Wheel Card:

  • stamp the two adorable bunnies from the Gerda Steiner Designs Chicks and Bunnies set with Lawn Fawn Crunchy Leaf 
  • color the images with Spectrum Noir Triblend Markers
  • create the Reveal Wheel using Lawn Fawn dies
  • the sentiments are from the Lawn Fawn Reveal Wheel Spring Sentiments set and are stamped with Versafine Clair Morning Mist
  • add some glittery hearts as final embellishments


Have a hoppy day.

Hugs,


Monday, March 30, 2020

Be strong!

Hi there,

you can find the step by step tutorial for this Mixed Media Card over on the Elizabeth Craft Designs Blog:


Hugs,


Sunday, March 29, 2020

Girl with Bunny

Hi there,

I created this sweet little card using the Lili of the Valley Alice Ice Cream stamp:

  • stamp the Lili of the Valley Alice Ice Cream stamp with Versafine Clair Nocturne and color the image with Faber-Castell Polychromos pencils
  • add a pattern to her dress with a white gel pen
  • adhere two strips of patterned paper to both sides of the cardbase 


Have a wonderful day.

Hugs,


Wednesday, March 25, 2020

You are my Guiding Light

Hi there,

you can find the step by step tutorial for this card over on the Elizabeth Craft Designs Blog:


I hope you got inspired.

Hugs,


Tuesday, March 24, 2020

Hi Chick!

Hi there,

I used the Gerda Steiner Designs Chicks and Bunnies set to create this Welcome Baby Card with a neutral color combination:

  • stamp the hen, the hatching chick and the eggs from the Gerda Steiner Designs Chicks and Bunnies set with Lawn Fawn Crunchy Leaf 
  • color the images with Spectrum Noir Triblend Markers and add some speckles with a white gel pen and a grey and brown fineliner
  • cut out a stitched panel from Gmund Beer Paper Weizen 
  • add color through a circle mask with the help of Distress Oxide Ink (Candied Apple, Ripe Persimmon, Fossilized Amber)
  • cut out the Create a Smile Focal from that colored circle
  • stamp the sentiment from the same set with Versafine Clair Fallen Leaves
  • adhere the element and add a kraft-colored oval shadow underneath them
  • layer a piece of kraft cardstock behind the circle before adhering the panel to an off white cardbase


I hope you got inspired.

Hugs,

Sunday, March 22, 2020

May all your wishes come true

Hi there,

I created this sweet watercolor card using the Mama Elephant Dandelion Wishes stamp set:

  • stamp a woodland scene using the Mama Elephant Dandelion Wishes set and My Favorite Things Hybrid Ink Grout Gray
  • color the images with Derwent Inktense Pencils and a damp watercolor brush
  • stamp the sentiment from the same set with Versafine Clair Nocturne
  • layer the watercolor panel onto patterned paper from the Maja Design Walking in the Forest 6x6 paper pad before adhering it to a Neenah Desert Storm cardbase


I hope you got inspired to try some no-line coloring yourself.

Hugs,


Thursday, March 19, 2020

Happy Easter Flower

Hi there,

read the step by step tutorial for this lovely Easter Card over on the Stamping-Fairies Blog:


Have a wonderful day.

Hugs,


Wednesday, March 18, 2020

Happy Spring

Hi there,

today it is all about Spring over on the Elizabeth Craft Designs Blog and this is my creation:

  • cut out an Elizabeth Craft Designs Stitched Rounded Rectangle from watercolor cardstock
  • cut out one of the patterns from the Elizabeth Craft Designs Planner Patterns set and adhere it with gel medium - glue some torn tissue paper underneath
  • add color with watered-down Distress Paint (Squeezed Lemonade, Shaded Lilac, Bundled Sage) and splatters with watered-down black acrylic paint
  • cut out all the elements for the Elizabeth Craft Designs Cherry Blossom Branch from Elizabeth Craft Designs white Soft Finish Cardstock and add color with Delta, Touch Twin Brush and Copic Markers
  • grunge up the edges with a Distress Crayon Brushed Pewter
  • stamp the sentiment from the Elizabeth Craft Designs Spring Sentiments set with Versafine Clair Medieval Blue onto a piece of torn vellum and heat-emboss it with clear embossing powder
  • wrap the vellum around the panel before adhering it to an off-white cardbase


Now hop over to the Elizabeth Craft Designs Blog and get lots of additional inspiration.

Hugs,


Tuesday, March 17, 2020

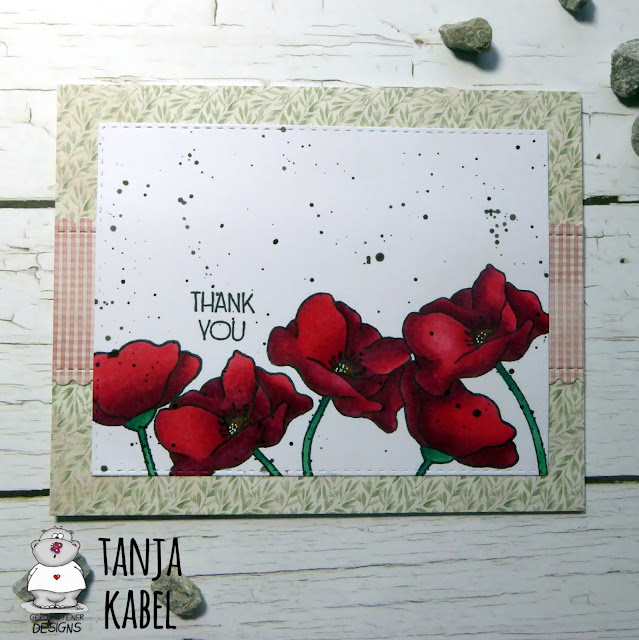
Thank you Poppies

Hi there,

today I would like to show you this card for Gerda Steiner Designs which has - can you believe it - not a single cute critter on it:

  • cut out a stitched panel from smooth white cardstock
  • stamp some poppies from the Gerda Steiner Designs Happy Bee-Day set with Memento Tuxedo Black - use the Masking Technique
  • color the flowers with Spectrum Noir Triblend Markers
  • stamp the sentiment from the same set with the same black ink
  • add some black splatters with watered-down acrylic paint
  • add some patterned paper from the Maja Design Summertime 6x6 paper pack to the cardbase before adhering the panel

Have a wonderful day.

Hugs,

Monday, March 16, 2020

Watercolor Mandala Card Duo

Hi there,

new stamps are available in the Karten-Kunst Shop and over the next few weeks I would like to show you some projects using some of the new products.

My first creation is this Watercolor Mandala Card Duo:

  • create a watercolor background on a strip of watercolor paper with the help of Mijello Misiion Gold watercolors
  • stamp the Mandala from the Karten-Kunst Mandala Leben set with Versamark and heat-emboss it with WOW! Metallic Gold Rich or Silver super fine embossing powder
  • add some splatters with Distress Stain Brushed Pewter and Tarnished Brass
  • stamp the sentiments from the Karten-Kunst Aus der Schreibmaschine set with Versamark onto a strip of black cardstock and heat-emboss them with WOW! Bright White super fine embossing powder
  • add a strip of black cardstock to the top and bottom of the watercolor panel before adhering it to a cardbase


I hope you got inspired.

Hugs,


Sunday, March 15, 2020

Enjoy it all

Hi there,

this is just a quick reminder of this month's Stencil Challenge over on the STAMPlorations Blog:

  • cut out the elements from CUTplorations Cupcake Builder #2 from white cardstock and add color and shading with Delta, Touch Twin Brush and Copic Markers
  • cover the cherry with Nuvo Crystal Glaze
  • add a little pink acrylic heart
  • create a background on a white cardbase by applying Distress Oxide Ink Peacock Feathers through the ARTplorations Clustered Hearts stencil and by adding some splatters with pearlized water
  • the sentiment is from the STAMPlorations Hey Sunshine sticker set


Don't forget to upload your project to the gallery.

Hugs,


Thursday, March 12, 2020

Du bist wunderbär

Hi there,

you can find the step by step tutorial for this sweet card over on the Stamping-Fairies Blog:


I hope you got inspired.

Hugs,


Thursday, March 5, 2020

Sending Hedgehugs

Hi there,

read the step by step tutorial for this cute card over on the Stamping-Fairies Blog:


Thanks for stopping by.

Hugs,


Tuesday, March 3, 2020

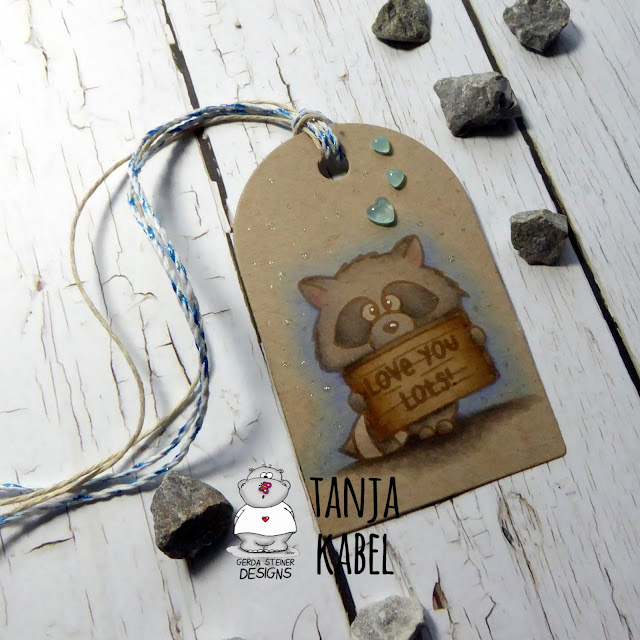
Love you lots!

Hi there,

take a look at this sweet racoon tag created with the Gerda Steiner Designs Sneaky Racoons stamp set:

  • stamp one of the Gerda Steiner Designs Sneaky Racoons and a matching sentiment with Lawn Fawn Crunchy Leaf ink onto a tag cut from Neenah Desert Storm kraft cardstock
  • color the image with Spectrum Noir Triblend Markers
  • add highlights with a white gel pen and extra shading with Faber-Castell Polychromos pencils
  • add glittery dots around the image and three little acrylic hearts as final embellishments
  • thread a strand of blue and a strand of natural twine through the hole of the tag


Have a wonderful day.

Hugs,


Sunday, March 1, 2020

All the Love

Hi there,

it is time for another Stencil Challenge over on the STAMPlorations Blog:

  • start on a rectangular panel cut from watercolor paper
  • apply Prima Marketing Heavy Gesso through the ARTplorations Flowers 2 stencil
  • add color with watered-down Dina Wakley Heavy Body acrylic Paints (Heather, Mineral, Carnation)
  • grunge up the edges with Art Graf Watercolor Graphite
  • add some more texture by stamping the script from the STAMPlorations Mixed Media Elements with Archival Ink Watering Can
  • dye a piece of cheesecloth with Distress Ink Spun Sugar and Heidi Swapp Color Shine Spray Tinsel
  • stamp the STAMPlorations Typografia Romantique All the Love with three different colors of Altenew Crisp Ink (Pink Diamond, Industrial Diamond, Lavender Fields) to match the background
  • adhere the sentiment panel with double-sided foam adhesive


You must use at least one stencil (any brand) in your project. The Linky closes at the end of the month.

Have fun creating.

Hugs,