Monday, December 31, 2018

Snow Flurry - Schneegestöber

Hi there,

I am wishing you a Happy New Year and I would like to show you this sweet snowman card that I created for the Karten-Kunst Blog:

  • stamp the Gerda Steiner Designs Happy Snowman with Memento London Fog and color the image with Delta, Touch Twin Brush and Copic Markers
  • add extra shading with Prismacolor colored pencils
  • stamp the sentiment from the Karten-Kunst Kalligraphie im Dezember using three different colors of Altenew Crisp Ink (Volcano Lake, Lagoon, Emerald) for an ombre look
  • stamp little snowflakes from the Karten-Kunst Spiral-Text Schnee with Altenew Crisp Ink Arctic


Thanks for stopping by ... hope to see you again in 2019.

Hugs,


Thursday, December 27, 2018

Surprise Slider Winter Card

Hi there,

I would like to show you this Winter Slider Card over on the Elizabeth Craft Designs Blog:


I hope you got inspired.

Hugs,


I hope you had a Magical Christmas

Hi there,

I created this fun Winter Pop-up Box Card for the Stamping-Fairies Facebook Group:

  • cut out all the elements needed for the Lawn Fawn Scalloped Box Card Pop-up from purple cardstock
  • add shading to the die cut pieces with Distress Ink Chipped Sapphire
  • stamp the images from the Lawn Fawn Snow Cool, Toboggan Together and Winter Skies set with My Favorite Things Extreme Black 
  • color the images with Delta, Touch Twin Brush and Copic Markers
  • add heat-embossed snowflakes and the sentiment to the panels using Versamark and WOW! Bright White Super Fine embossing powder
  • add snow to the trees with the help of Versamark and WOW White Puff embossing powder

I hope you had a magical Christmas.

Hugs,


Tuesday, December 25, 2018

Merry Christmas Surprise Slider Card

Hi there,

inspired by Jennifer McGuire I created this Surprise Christmas Slider card for Elizabeth Craft Designs:

  • cut out the Elizabeth Craft Designs Elegant Christmas Tree from patterned paper from the ModaScrap Christmas Holidays 6x6 paper pad
  • cut the outline of the tree from a piece of Elizabeth Craft Designs white Soft Finish Cardstock covered with Elizabeth Craft Designs clear double-sided adhesive
  • add Silk Microfine Glitter Ice Teal to the shape and glue the tree cut from patterned paper on top
  • cut out the Elizabeth Craft Designs Merry Christmas Small from silver foiled cardstock
  • create a background on a white panel using stamps from the Elizabeth Craft Designs Poinsettia set and Versafine Clair Morning Mist
  • cut out one of the Elizabeth Craft Designs Dotted Scallop Circles from that same patterned paper and stamp the sentiment from the Elizabeth Craft Designs Classic Christmas Sentiments with Versafine Clair Morning Mist
  • assemble the surprise slider as shown in Jennifer's video
  • stamp the "Pull Here" from the Lawn Fawn Push here set with that same grey ink

I hope you have a wonderful Christmas Time.

Hugs,


Monday, December 24, 2018

Merry Christmas Puppy

Hi there,

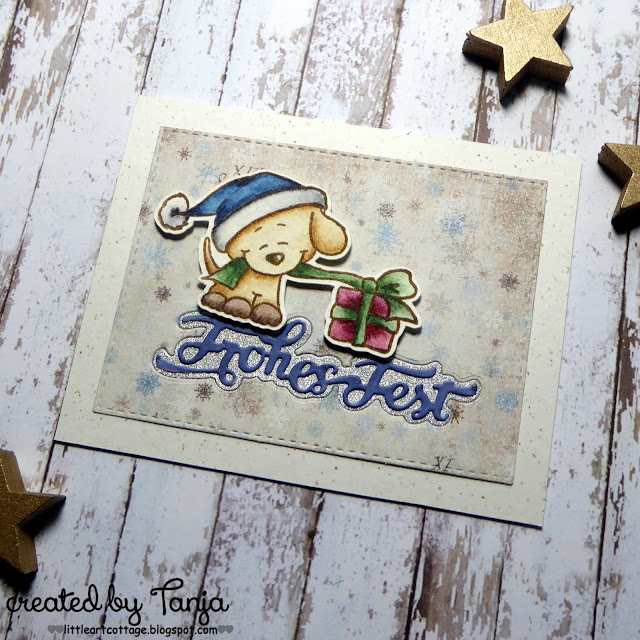
have a very Merry Christmas and enjoy my creation for the Karten-Kunst Blog:

  • stamp one of the puppies from the Gerda Steiner Designs Christmas Puppies set on a piece of watercolor paper with Versafine Vintage Sepia and color the image with Derwent Inktense pencils and a damp watercolor brush
  • cut out a stitched panel from patterned paper from the Maja Design Home for the Holidays 6x6 paper pad
  • cut out the Karten-Kunst Frohes Fest from the patterend paper panel and once again from silver glitter paper
  • lay the glitter paper into the patterned paper panel and put the sentiment cut from white cardstock and colored with Alcohol Markers on top
  • adhere all the layers to a cardbase cut from Gmund Beer Paper Weizen


Have a christmasy day.

Hugs,


Friday, December 21, 2018

Weihnachtsgrüße - Christmas Wishes

Hi there,

I created this Christmas Reveal Wheel Card for the Karten-Kunst Blog:

  • stamp the Karten-Kunst Braver Schneemann with Memento Tuxedo Black onto smooth white cardstock
  • color the image with Delta, Touch Twin Brush and Copic Markers
  • add highlights with a white gel pen
  • create a Reveal Wheel using dies from the Lawn Fawn Reveal Wheel set and a small circle die
  • stamp little toys from the Lawn Fawn Holiday Helpers set onto the Reveal Wheel and color them with Alcohol Markers as well
  • stamp the sentiment from the Karten-Kunst Viecher im Winter with Versafine Onyx Black onto a sentiment strip and add a little green strip underneath
  • cover a cardbase with patterned paper from the Doodlebug Design Frosty Friends 6x6 paper pad before adhering the Reveal Wheel


Have a christmasy day.

Hugs,


Thursday, December 20, 2018

Naughty or Nice?

Hi there,

I created this adorable Christmas Scene for the Stamping-Fairies Facebook Group:

  • cut out a stitched rectangle using one of the Tim Holtz Stitched Rectangles dies
  • stamp a Christmas scene with the help of the My Favorite Things Secret Santa set and Versafine Clair Morning Mist - use the Masking Technique
  • cut out a My Favorite Things Peek-a-Boo Circle Window from a white cardbase and add a strip of patterned paper from the My Favorite Things Candy Land 6x6 paper pad at the bottom
  • stamp the sentiment from the My Favorite Things Gift Tag Greetings with Versafine Clair Morning Mist
  • color the images with Faber-Castell Polychromos pencils
  • add little snowflakes to the pillow and the bag using Versamark, WOW! Bright White Super Fine embossing powder, the Lawn Fawn Snow Cool and the Lawn Fawn Making Frosty Friends set
  • add some more snowflakes to the background with Altenew Crisp Ink (Limestone, Dew Drops)

I hope you got inspired.

Hugs,


Tuesday, December 18, 2018

Merry & Bright

Hi there,

we are starting a new Challenge over on the Elizabeth Craft Designs Blog and this month it is all about the Frame it dies. I used the Frame it - Stitched Rectangles to create more dimension on my card project:

  • stamp two scenes from the adorable Elizabeth Craft Designs Christmas Kids set with Versafine Onyx Black and cut them out with the coordinating dies
  • color the images with Faber-Castell Polychromos pencils
  • cut out several frames using the Elizabeth Craft Designs Frame it - Stitched Rectangles and the Elizabeth Craft Designs Stitched Rectangles
  • adhere the frames on top of each other using double-sided foam adhesive
  • create a shaker element behind the last frame and fill it with sequins 
  • close the shaker element with patterned paper from the ModaScrap Christmas Holidays 6x6 paper pad
  • stamp the sentiment from the Elizabeth Craft Designs Classic Christmas Sentiments with Versafine Olympia Green onto a sentiment strip cut into a banner shape
  • adhere the frames onto a cardbase and the images onto the frames
  • embellish the tree with Nuvo Crystal Drops (Red Berry, Apple Green, Dandelion Yellow)


Our challenge question is: Which of the Garden Notes - Frame It/Stitched Die Sets would you use on a project and how would you use it?

Hugs,


Monday, December 17, 2018

Merry Christmas - Frohes Fest

Hi there,

I created this sequin background window card for the Karten-Kunst Blog:

  • cut out a stitched panel from smooth white cardstock and create a background using the little images from the Karten-Kunst Runde Siegel set and Versafine (Crimson Red, Toffee, Olympia Green)
  • cut out a window from the panel using the background from the Karten-Kunst Frohes Fest die set
  • cover the window with a piece of acetate and glue some Pretty Pink Posh Sequins Mossy Green onto the patterned paper background - the paper is from the Maja Designs Home for Christmas 6x6 paper pad
  • glue the sentiment cut from red glitter paper using the Karten-Kunst Frohes Fest die set on top of the acetate


Have a christmasy day.

Hugs,


Friday, December 14, 2018

Noel

Hi there,

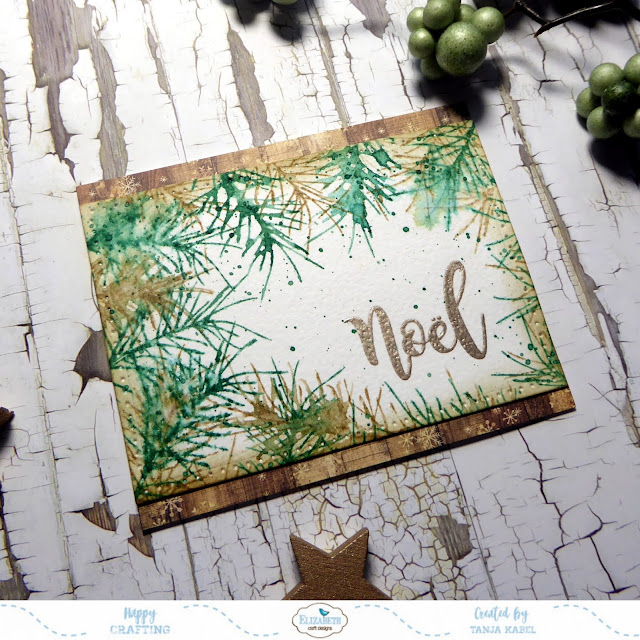
I created this faux-watercolor Christmas Card for Elizabeth Craft Designs:

  • cut out a stitched panel from watercolor paper using one of the Elizabeth Craft Designs Stitched Rectangles
  • stamp a sentiment from the Elizabeth Craft Designs Classic Christmas Sentiments with Versamark and heat-emboss it with Ranger Liquid Platinum embossing powder
  • stamp the pine twig from the Elizabeth Craft Designs Poinsettia set with Distress Ink (Pine Needles, Frayed Burlap) and mist the stamp with water after inking it
  • ink up the edges of the panel with Distress Ink Frayed Burlap and add some splatters with watered-down Distress Ink Pine Needles
  • add a strip of patterned paper from the ModaScrap Christmas Holidays 6x6 paper pad to the top and the bottom of the panel before adhering it to a cardbase


Have a christmasy day.

Hugs,


Thursday, December 13, 2018

Merry Christmas Snowflakes

Hi there,

I would like to show you how to create this emboss-resist Snowflake Card over on the Elizabeth Craft Designs Blog:


I hope you got inspired.

Hugs,


Wednesday, December 12, 2018

From our Home to yours

Hi there,

I created this Clean and Simple Christmas Shaker Card for the Stamping-Fairies Facebook Group:

  • stamp the cute little houses from the Lawn Fawn Winter Village set with Memento Tuxedo Black
  • color the image with Delta, Touch Twin Brush and Copic Markers and add extra shading with Faber-Castell Polychromos pencils
  • cut out one of the My Favorite Things Peek-a-Boo Circle Windows from a white cardbase
  • stamp the sentiment from the same set with Versafine Onyx Black
  • fill one of the My Favorite Things Circle Shaker Pouches with Nuvo Chrystal Cloud Circles and assemble the card


Have a christmasy day.

Hugs,


Tuesday, December 11, 2018

Merry Christmas Raccoon

Hi there,

I created this cute Raccoon Christmas Card for the Gerda Steiner Designs Blog:

  • color the Gerda Steiner Designs Raccoon with Derwent Inktense Pencils and a damp watercolor brush
  • cut out a stitched rectangle from watercolor paper and a hill shape from watercolor paper as well
  • add Nuvo Glitter Gloss to the hill shape
  • add color to the background with Distress Ink (Chipped Sapphire, Victorian Velvet, Stormy Sky) and a Mini Ink Blending Tool
  • cut out snowflakes from the background using a die from the Tim Holtz Winter Wonderland set
  • add some splatters with watered-down white acrylic paint for even more snowflakes
  • layer a piece of white glitter paper behind the watercolor panel
  • stamp the sentiment from the Lawn Fawn Say What Christmas Critters set with Versafine Clair Fallen Leaves
  • run a piece of kraft cardstock through your Big Shot inside the Tim Holtz Lumber embossing folder
  • adhere all the layers to an off-white cardbase


I hope you got inspired.

Hugs,


Monday, December 10, 2018

Merry Christmas Wood Panel

Hi there,

I would like to show you how to create this Christmas Decoration step by step over on the STAMPlorations Blog:


Have a christmasy day.

Hugs,


Frohes Fest - Merry Christmas

Hi there,

I created this watercolor Christmas Card with the brand new Karten-Kunst Zaubersterne stamp set:

  • cut out a stitched panel from watercolor paper
  • stamp the adorable little snowman from the Karten-Kunst Zaubersterne set with Distress Oxide Ink Weathered Wood and heat-emboss it with WOW! Silver Pearl embossing powder
  • color the image with Altenew Watercolors
  • add color to the background with watered-down Distress Re-Inkers (Pumice Stone, Chipped Sapphire)
  • add snowflakes with watered-down white acrylic paint and a white gel pen
  • cut the Karten-Kunst Nyala Script Frohes Fest from vellum and Nuvo Mirror Card Chrome Silver
  • layer the watercolor panel onto a piece of grey cardstock before adhering it to a cardbase


Have a christmasy day.

Hugs,