Showing posts with label My Mind's Eye. Show all posts

Saturday, December 21, 2019

Merry Christmas Cookies

Hi there,

I created this cute little Christmas Card using the Waffle Flower Cookie Time stamp set:

  • stamp the scene using stamps from the Waffle Flower Cookie Time set with Memento Tuxedo Black
  • color the images with Spectrum Noir Pencils
  • add a strip of patterned paper from the My Mind's Eye Sugar Plum 6x6 paper pad to the top and the bottom of the panel
  • create a background using some small images from the set, Neenah Desert Storm kraft cardstock and Versafine Vintage Sepia
  • stamp the sentiment from the Clearly Besotted Stamps Tiny Type set with Versamark and heat-emboss it with WOW! Bright Super Fine embossing powder


Have a wonderful day.

Hugs,


Sunday, January 13, 2019

Stamp Connection #45

Hi there,

connected through our love for card making, blogging and being from Germany we (Cornelia from Stempel Spass and I) decided to create a monthly project within predefined requirements. We are going to show you the result every 2nd Sunday of the month and this is our 45th transatlantic get-together!

Our requirement for this meet-up was:
"something new purchased a long time ago" 


  • stamp one of the monsters from the Create a Smile Beast Feast onto a stitched panel cut from watercolor cardstock and color the image with Derwent Inktense Pencils and a damp watercolor brush
  • add Nuvo Crystal Glaze to the eyes and Nuvo Glitter Accents Fresh Snowfall to the hill shape 
  • stamp the sentiment from the same set with Versafine Onyx Black
  • create a background on the cardbase using patterned paper from the My Mind's Eye Sugar Plum 6x6 paper pad and one of the My Favorite Things Stitched Scallop Edges
  • adhere the watercolor panel with double-sided foam adhesive


Now make sure to hop over to see Cornelia's Creation.


Thanks for stopping by. We hope to see you again at the ...


Hugs,

Friday, May 4, 2018

Merry Christmas Tree

Hi there,

we are starting a new Christmas Challenge over on the Happy Little Stampers Blog and this time it's all about stars:


  • stamp one of the trees from the Lili of the Valley Snowflakes and Christmas Trees set with Memento Tuxedo Black and color the image and the background with Delta, Touch Twin Brush and Copic Markers
  • add silver stars with a silver gel pen and snow flakes with a white paint marker
  • use the My Favorite Things Tag Builder Blueprints 5 set to cut out a tag from the main panel and a background from patterned paper from the My Mind's Eye Sugar Plum 6x6 paper pad
  • stamp the sentiment from the same Lili of the Valley set and layer a piece of glitter paper behind the sentiment strip
  • thread a piece of ribbon through the hole of the tag and add a cute little bow from natural twine


Have a christmasy day.

Yours,


Tuesday, December 26, 2017

Christmas Window

Hi there,

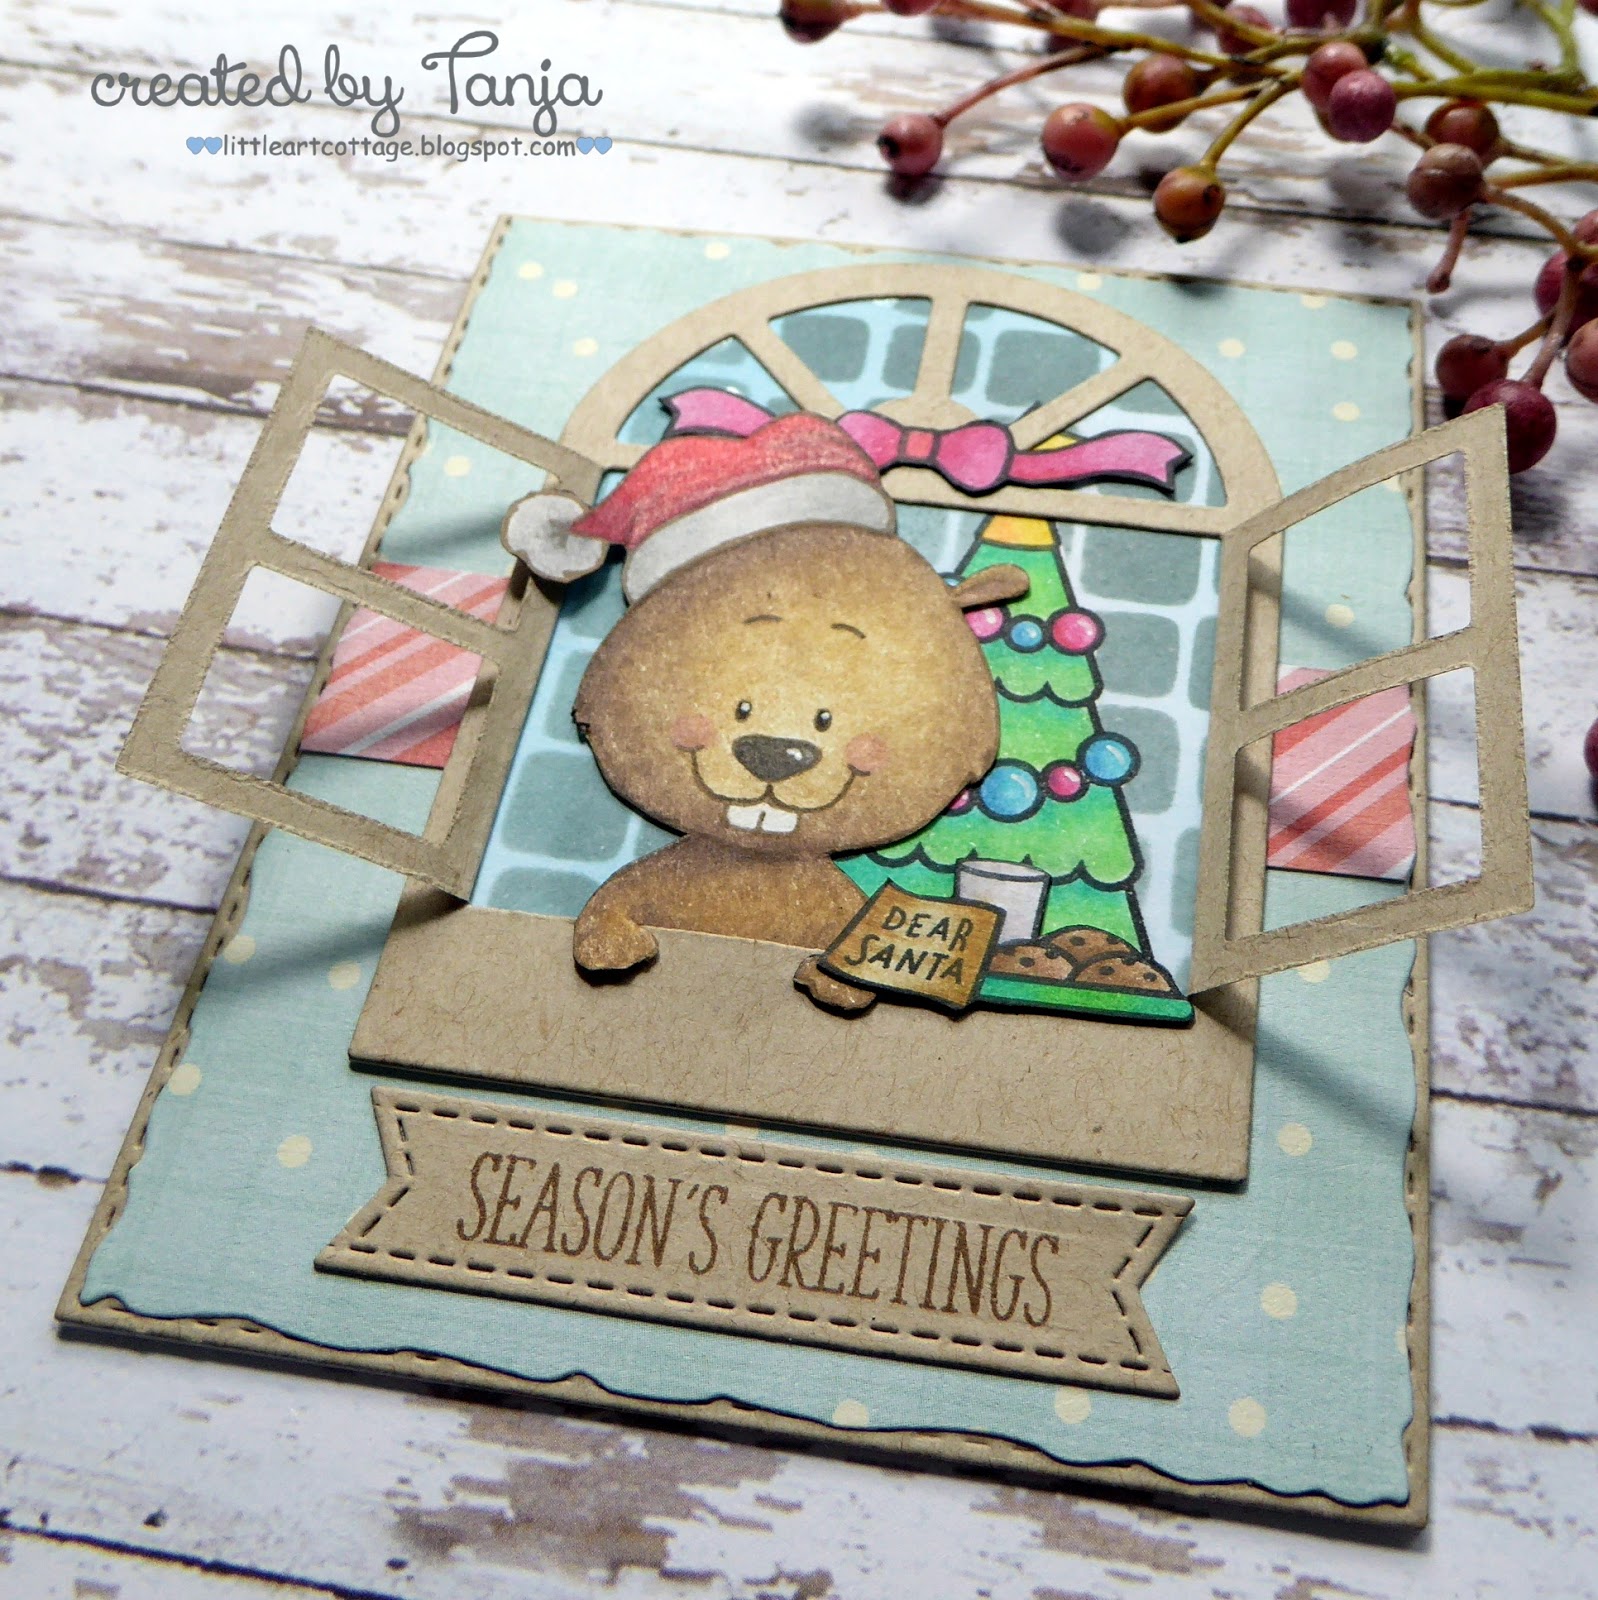
I created this cute little Christmas card with the help of the Gerda Steiner Designs Gopher it stamp set:

  • stamp the the cute little guy from the Gerda Steiner Designs Gopher it set and the Christmas Hat from the Gerda Steiner Designs Snow Angel set with Versafine Vintage Sepia - use the Masking Technique
  • color the image with Faber-Castell Polychromos pencils
  • add highlights with a white gel pen
  • cut out the Lawn Fawn Wonderful Window from Neenah Desert Storm kraft cardstock and cut out a piece of Bristol Smooth cardstock that fits right behind that window opening
  • stamp the Christmas Tree from the Lawn Fawn Christmas Dreams set and mask it
  • add color to the background with Distress Ink Tumbled Glass and create a pattern by applying Distress Oxide Ink Iced Spruce to the Tim Holtz Tiles Mini Layering Stencil
  • stamp a bow and the little cookie plate from the Lawn Fawn Christmas Dreams set
  • color these additional images with Faber-Castell Polychromos as well
  • create a backdrop using patterned paper from the My Mind's Eye Sugar Plum 6x6 paper pad and one of the Tattered Lace Torn Edge Rectangles dies
  • stamp the sentiment from the Clearly Besotted Stamps Many Mini Messages set with Versafine Vintage Sepia onto a sentiment strip cut with one of the My Favorite Things Stitched Sentiment Strips from Neenah Desert Storm kraft cardstock
  • layer all the elements onto a stitched rectangle cut from Neenah Desert Storm kraft cardstock and adhere it to a cardbase

Here is another picture of this adorable little Christmas critter:


Thanks for stopping by.

Yours,


Tuesday, June 6, 2017

Merry Christmas Watercolor Tags

Hi there,

we are starting a new Mixed Media Challenge over at Happy Little Stampers and I created this watercolor tag duo:


  • cut out two tags from watercolor paper and two more from patterned paper from the My Mind's Eye Sugar Plum 6x6 paper pad using the My Favorite Things Tag Builder Blueprints 5 die set
  • stamp images from the Rubber Dance Watercolor XMas set with Distress Inks (Fossilized Amber, Evergreen Bough)
  • color the images and the backgrounds with those same colors
  • heat-emboss the ornament embellishments on one tag with sparkly golden embossing powder and add splatters with watered-down Distress Ink (Evergreen Bough)
  • add golden and white splatters to the other tag
  • stamp the sentiment from the Clearly Besotted Many Mini Messages set with Versafine (Onyx Black)
  • add hole reinforcers cur from golden glitter paper and natural twine as finishing touches

Have a christmass day.

Yours,


Wednesday, February 8, 2017

Joy Reindeer Tag

Hi there,

we are starting a new Challenge over at Addicted to Stamps and More and I would like to show you this fun Christmas Tag:

  • cut out a round tag using the My Favorite Things Tag Builder Blueprints 6 die set and patterned paper from the My Mind's Eye Sugar Plum 6x6 paper pad
  • cut out "Joy" from watercolor paper - I created my own cutfile for the ScanNCut - and the antlers from the Miss Kate Cuttables Boy Reindeer
  • color the sentiment and the antlers with Distress Markers and blend the colors with a damp watercolor brush to create an ombre effect
  • cover both pieces with three layers of clear embossing powder
  • age the tag a bit by inking up the edges with Distress Ink (Vintage Photo) and by randomly stamping the Prima Marketing Salvage District 3x4 Clear Stamp (Item: 584726) with Versafine (Vintage Sepia)
  • thread natural twine through the hole of the tag

Have a christmassy day.

Yours,


Friday, February 12, 2016

Pink Stickhorse

Hi there,

we are starting a new Challenge over at the A Day for Daisies Blog and the we would like you to "add a Touch of Wood" to your project:


Uniko Challenge #28 - Anything goes


Have a day for daisies.

Yours,


Thursday, March 5, 2015

Speedy Recovery Turtle

Hi there,

today, I have a cute Get-Well-Card that I would like to show you:


Here is a close-up of that sweet little critter:


I would like to link this card up to the following challenges:

Lawnscaping Challenge No. 101 - Dots & Stripes


House of Cards - March Challenge: Use Enamel Dots


613 Avenue Create Challenge #113: Anything goes

Have a wonderful day.

Yours,
Tanja


Thursday, April 24, 2014

You're a Gem!

Hi there,

here is another card that I created today. I tried one of my new stamps from Sugar Pea Designs. You should check out their homepage - they have got some pretty cute images ...


Here is my list of supplies:
Sugar Pea Designs - Gopher-it
My Mind's Eye - Cut & Paste Adorbs Loved Stamp Set
Hero Arts Shadow Ink (Silver)
Stickles Glitter Glue - Aqua
black cardstock
glitter cardstock

I am going to link this card up to the following three challenges:

Freshly made Sketches Challenge #133


Keep it Simple! Challenge #38 - Bright Spark


Sugar Pea Designs 04 - CAS Challenge

Thanks for visiting.

Yours,
Tanja