Showing posts with label Tattered Lace. Show all posts

Monday, October 27, 2025

Whoohooo

Hi there,

I created this fall-themed card using the new Karten-Kunst Uhuuups, so alt schon stamp set:

  • cut out a rectangle from kraft cardstock using one of the Tattered Lace Torn Edge Rectangles
  • stamp the owl and the sentiment from the Karten-Kunst Uhuuups, so alt schon set with Versafine Clair Portobello
  • color the image with Derwent Drawing pencils and add highlights with a white gel pen
  • create a background with the help of another piece of kraft cardstock and the Spellbinders Oak Forest embossing folder
  • add splatters of watered-down Distress Ink Ground Espresso
  • ink up all the edges with that same brown Distress Ink

Thanks for stopping by.

Hugs,


Thursday, May 1, 2025

Vroom, Vroom - Part 1

Hi there,

I created this fun masculine card for Mennys Bastelshop using the Mama Elephant We Ride stamp set:

  • stamp one of the adorable images from the Mama Elephant We Ride set with no-line coloring ink onto a panel of watercolor paper cut with one of the Tattered Lace Torn Edge Rectangles
  • color the image and the background with Derwent Inktense pencils and a waterbrush
  • add highlights with a white gel pen
  • cut another panel and ink up all the edges with Distress Ink Pumice Stone
  • stamp the sentiment from the same set with Distress Oxide Ink Pumice Stone
  • add My Favorite Things Scribbles and Poppy Stamps Stitched Buttons cut from blue and grey colored cardstock as final embellishments - sew the buttons on with some thread

Thanks for stopping by today.

Hugs,


Monday, April 7, 2025

Wonderful Easter Time

Hi there,

I created this Easter Card using the beautiful Anjas Basteltraum Osternest stamp set:

  • stamp the willow branch from the Anjas Basteltraum Osternest set with VersaMagic Sahara Sand onto a piece of Neenah Desert Storm Kraft cardstock
  • color the image with Derwent Drawing pencils
  • add highlights with a white gel pen and Wink of Stella Clear glitter
  • stamp the sentiment from the Anjas Basteltraum Kleine Ostersprüche set with Versamark and heat-emboss it with WOW! Polished Gold Super Fine embossing powder
  • cut out a Tattered Lace Torn Edge Rectangle around the image and add another rectangle cut from darker kraft cardstock underneath before adhering it to a cardbase
  • add some Pinkfresh Studio Glitter Drops as final embellishments

Have a wonderful Easter Time.

Hugs,


Thursday, November 16, 2023

Merry little Christmas Bears

Hi there,

I created this lovely Christmas Card for Mennys Bastelshop:

  • stamp the sweet bear couple from the Mama Elephant Fuzzy Hugs set with Lawn Fawn Crunchy Leaf Ink
  • color the image with Delta, Touch Twin Brush and Copic Markers and add extra shading with Faber-Castell Polychromos pencils
  • cut out a heart from patterned paper and a slightly bigger one from red textured cardstock
  • cut out a panel from kraft cardstock using one of the Tattered Lace Torn Edge Rectangles and create a background with small stamps from the Lawn Fawn Deck the Halls set
  • add splatters with golden spray
  • run another kraft panel through your Big Shot together with a woodgrain embossing folder - mist the panel slightly with water to avoid cracking
  • stamp the sentiment from the Memory Box Merry little Christmas with Versamark and heat-emboss it with WOW! Bright White Super Fine embossing powder
  • adhere all the layers to a kraft cardbase

Have a wonderful day.

Hugs,


Tuesday, November 20, 2018

Hey Friend

Hi there,

I created another card using the adorable new Gerda Steiner Designs Foxes set:

  • color one of the foxes and some mushrooms from the Gerda Steiner Designs Foxes set with Faber-Castell Albrecht Dürer pencils and a damp watercolor brush
  • add highlights with a white gel pen
  • create a background using patterned paper from the Maja Design Walking in the Forest 6x6 paper pad
  • cut out some grass and a hill shape using the Elizabeth Craft Designs Adventure Edges 
  • use the sentiment from the same stamp set
  • adhere all the layers to a kraft cardbase
  • add Nuvo Crystal Drops Caramel Cream as final embellishment


I hope you got inspired.

Hugs,


Sunday, October 14, 2018

Stamp Connection #42

Hi there,

connected through our love for card making, blogging and being from Germany we (Cornelia from Stempel Spass and I) decided to create a monthly project within predefined requirements. We are going to show you the result every 2nd Sunday of the month and this is our 42nd transatlantic get-together!

Our requirement for this meet-up was:
"Halloween"

  • stamp two of the adorable little Halloween critters from the My Favorite Things Frightfully Sweet set with Versafine Clair Morning Mist
  • color the images with Prismacolor Colored Pencils
  • cut out a background panel from watercolor paper with the help of one of the Tattered Lace Torn Edge Rectangles dies
  • add color with a gradient wash of Altenew Watercolors Lavender Fields
  • cut out the Tim Holtz Cobweb from black cardstock
  • mist the cobweb and the background with Shimmer Spritz Sparkle
  • stamp the sentiment from the same stamp set with Delicata Black Shimmer
  • stamp some stars from the WPlus9 Little Bits set with that same shimmery ink color
  • add some dots with the Nuvo Crystal Drops Ebony Black as final embelishment before adhering the panel onto a black cardbase


Now make sure to hop over to see Cornelia's Creation.

Thanks for stopping by. We hope to see you again at the ...


Hugs,

Tuesday, December 26, 2017

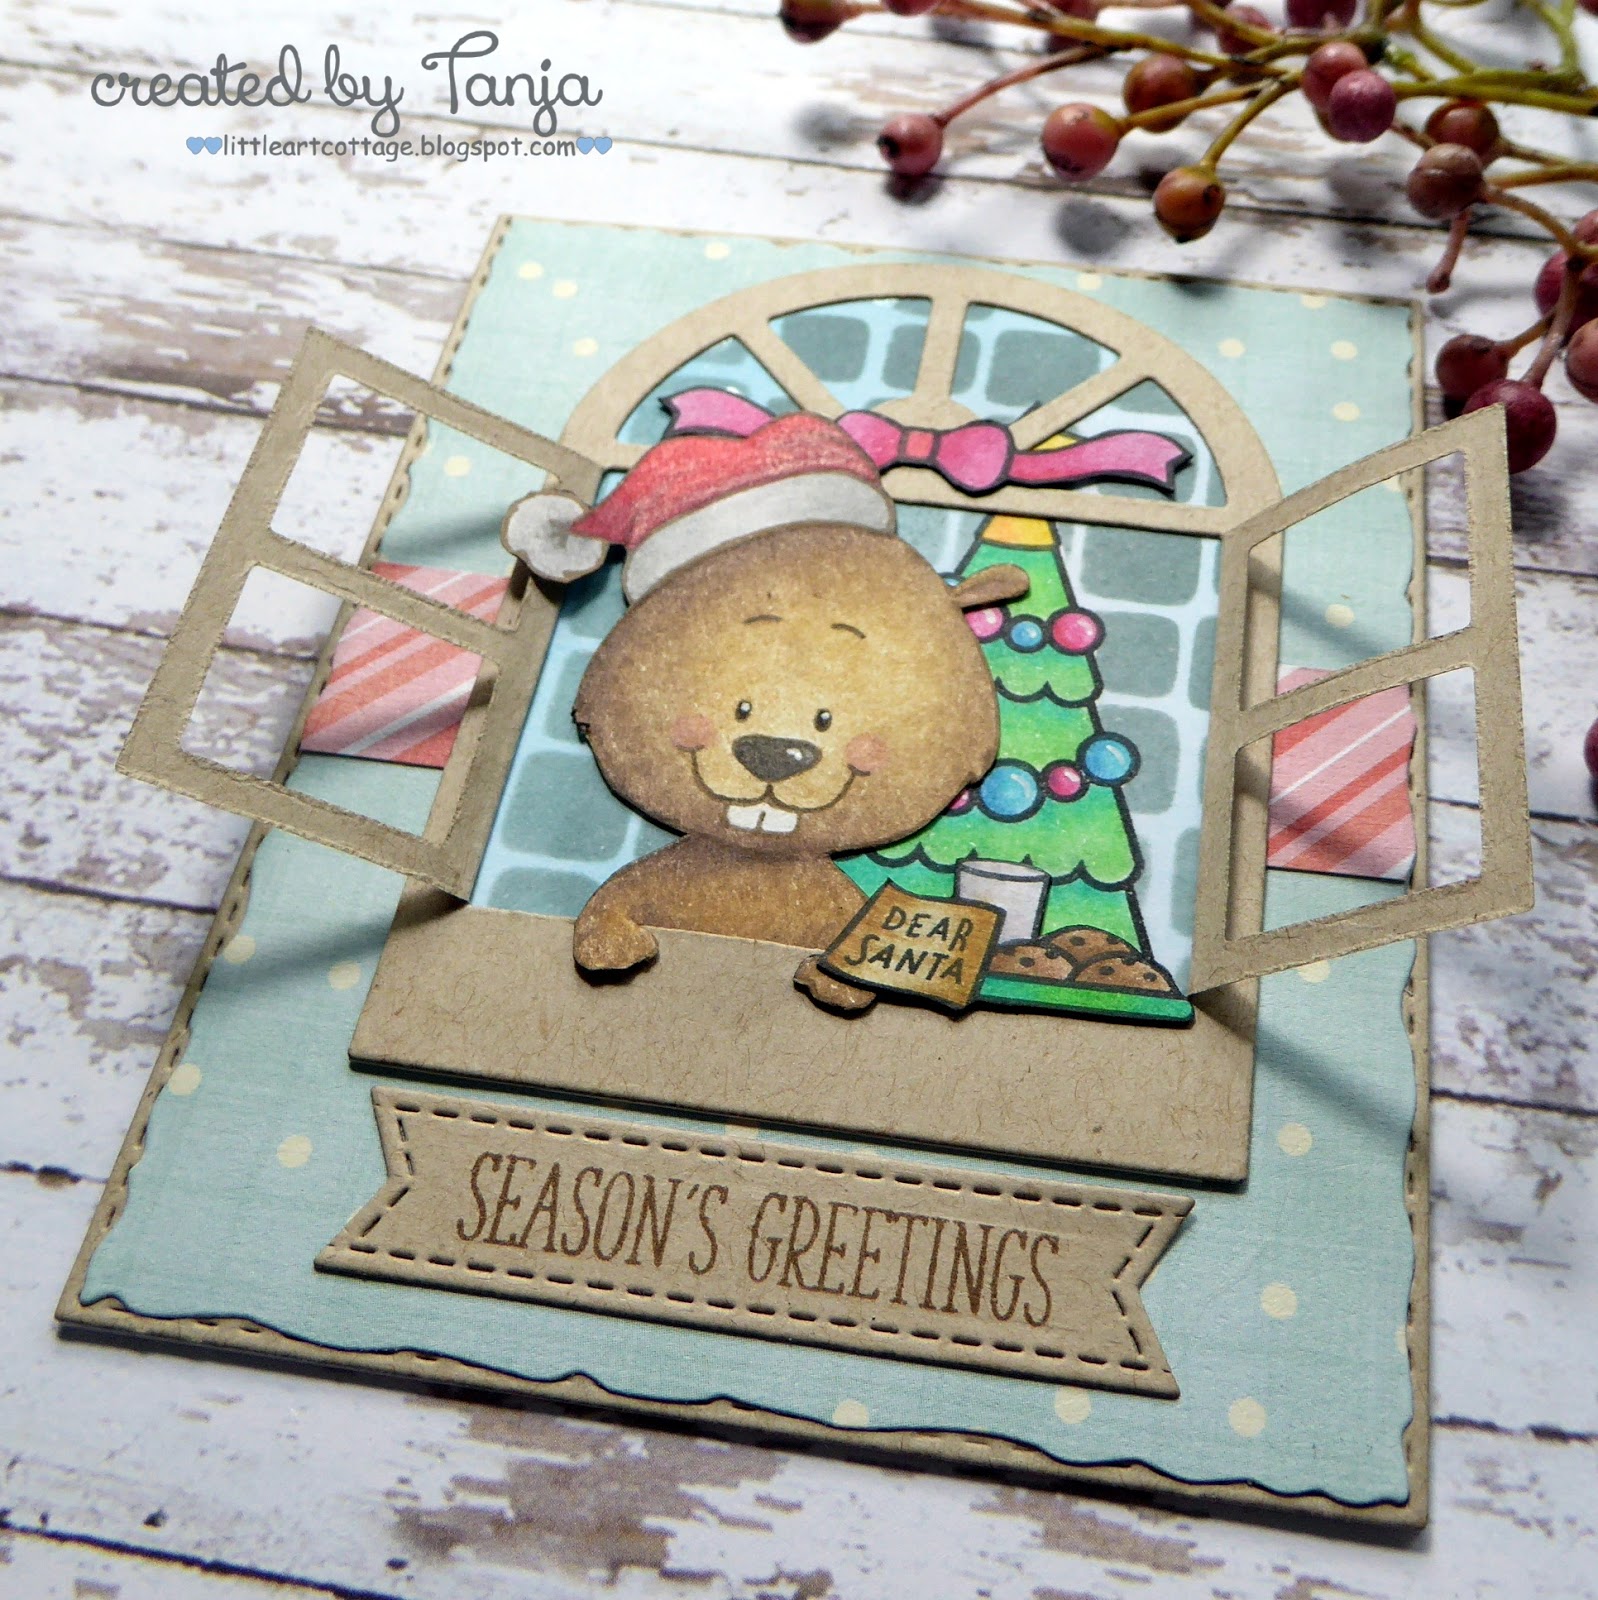
Christmas Window

Hi there,

I created this cute little Christmas card with the help of the Gerda Steiner Designs Gopher it stamp set:

  • stamp the the cute little guy from the Gerda Steiner Designs Gopher it set and the Christmas Hat from the Gerda Steiner Designs Snow Angel set with Versafine Vintage Sepia - use the Masking Technique
  • color the image with Faber-Castell Polychromos pencils
  • add highlights with a white gel pen
  • cut out the Lawn Fawn Wonderful Window from Neenah Desert Storm kraft cardstock and cut out a piece of Bristol Smooth cardstock that fits right behind that window opening
  • stamp the Christmas Tree from the Lawn Fawn Christmas Dreams set and mask it
  • add color to the background with Distress Ink Tumbled Glass and create a pattern by applying Distress Oxide Ink Iced Spruce to the Tim Holtz Tiles Mini Layering Stencil
  • stamp a bow and the little cookie plate from the Lawn Fawn Christmas Dreams set
  • color these additional images with Faber-Castell Polychromos as well
  • create a backdrop using patterned paper from the My Mind's Eye Sugar Plum 6x6 paper pad and one of the Tattered Lace Torn Edge Rectangles dies
  • stamp the sentiment from the Clearly Besotted Stamps Many Mini Messages set with Versafine Vintage Sepia onto a sentiment strip cut with one of the My Favorite Things Stitched Sentiment Strips from Neenah Desert Storm kraft cardstock
  • layer all the elements onto a stitched rectangle cut from Neenah Desert Storm kraft cardstock and adhere it to a cardbase

Here is another picture of this adorable little Christmas critter:


Thanks for stopping by.

Yours,


Sunday, August 20, 2017

Stamp Connection #28

Hi there,

connected through our love for card making, blogging and being from Germany we (Cornelia from Stempel Spass and I) decided to create a monthly project within predefined requirements. We are going to show you the result every 3rd Sunday of the month and this is our 28th transatlantic get-together!

Our requirement for this meet-up was:
Tropical

We also have a special guest for you - Maike from Maikreations is joining us for this summer challenge. I already took a peek at her project ... now it's your turn.

  • cut out a Tattered Lace Torn Edge Rectangle from watercolor paper and stamp several of the smaller images from the My Favorite Things Polynesian Paradise set with Versafine (Onyx Black)
  • color the images with Faber-Castell Albrecht-Dürer Pencils and a damp watercolor brush
  • stamp the sentiment from the Clearly Besotted Stamps Many Mini Messages set with Versamark onto a strip of vellum and heat-emboss it with WOW! Bright White Super Fine embossing powder
  • add a strip of burlap underneath and adhere the sentiment strip to the main panel
  • mount the panel onto a scalloped rectangle created using the My Favorite Things Blueprints 27 set and patterned paper from the Kaisercraft Island Escpape paper pad

Now make sure to hop over to see Cornelia's Creation.


Thanks for stopping by. We hope to see you again at the ...


Yours,

Friday, March 24, 2017

Spring Coffee Lovers Blog Hop

Hi there,

it's time for the Spring Coffee Lovers Blog Hop and I have two projects that I would like to show you.


My first project is an Artist Trading Card:

  • in one of my previous posts I explained how I created the background for several ATCs
  • choose two of them and stamp the STAMPlorations Framed Coffee for Two with Archival Ink (Black Soot)
  • cut out the image
  • stamp some circles from the STAMPlorations Art Marks set with Memento Luxe (Teal Zeal) and some stars with Archival Ink (Black Soot) onto some Tissue Paper
  • glue the tissue paper onto the image and cover the whole image with matte gel medium
  • color the image with PITT Artist Pens and use your fingers to blend the colors
  • use the second ATC as a background
  • apply Memento Luxe (Teal Zeal) through the ARTplorations Swirly Blooms stencil and ink up the edges of the background with that same ink
  • wrap some natural twine around the background and adhere the focal panel on top with double-sided foam tape

My second creation is a Greeting Card:

  • cut out a Tattered Lace Torn Edge Rectangle from watercolor paper
  • stamp the beautiful STAMPlorations A Cup of Roses off the left side with Versafine (Onyx Black) - I used my MISTI to stamp the image several times in order to get a crisp impression on the textured watercolor paper
  • color the image and the background with Faber-Castell Albrecht Dürer watercolor pencils and a damp watercolor brush
  • add grey splatters with watered-down grey watercolor pencil
  • mount the panel onto a grey cardbase
  • cut the CUTplorations Hugs word die from that same grey cardstock twice and glue the two layers on top of each other
  • add Wink of Stella Clear Glitter to sentiment

I hope you got inspired.

Enjoy the Spring Coffee Lovers Blog Hop.

Yours,


Sunday, March 12, 2017

Hugs Tag

Hi there,

it's Stencil Sunday Time over on the STAMPlorations Blog and I created this tag for you.

  • cut out a CUTplorations Luggage Tag from watercolor paper and cover it with gesso
  • apply Prima Marketing Modeling Paste through the ARTplorations Rows of Hearts stencil
  • add color using Dylusions Sprays (Bubblegum Pink, Funky Fuchsia)
  • add splatters with watered-down white gouache 
  • stamp the script from the STAMPlorations Mixed Media Elements set with Archival Ink (Black Soot) onto some of the raised areas
  • ink up the edges of the tag with Distress Ink (Black Soot)
  • dye some cheesecloth and a piece of seam binding with the same Dylusions Sprays used on the tag
  • cut out one of the Tattered Lace Tuck in Hearts and color them with Distress Ink (Wilted Violet, Black Soot) - mist the hearts with water to create some texture
  • cut out the CUTplorations Hugs from silver glitter cardstock
  • use the Tiny Attacher to secure the cheesecloth and the hearts and liquid glue to adhere the sentiment
  • thread the piece of seam binding through the hole of the tag

I hope you got inspired and don't forget to join us for our Mixed Media Challenge over at the STAMPlorations Blog. The theme is always anything mixed media except a card. You must use at least one stencil (any brand) in your project. The Linky closes at the end of the month.


Yours,


Tuesday, February 28, 2017

Warm Wishes Cup

Hi there,

I created this Winter Card using a non-Winter image for the Skipping Stones Design Blog:

  • stamp the beautiful flower cup from the Skipping Stones Design Coffee Volume #2 set with Versafine (Vintage Sepia) onto watercolor paper - I used my MISTI to stamp the image several times to get a crisp impression on the textured surface
  • color the image and the background with Jaxon Aquarelle watercolors
  • add splatters with gold from the same watercolor set
  • stamp the sentiment from the Klartext-Stempel Lasse & Peer set with Versafine (Onyx Black)
  • cut out a black stitched frame with the help of one of the Memory Box Stitched Rectangle Layers and one of the Tattered Lace Torn Edge Rectangles
  • cover the frame with Wink of Stella Clear Glitter for extra sparkle and shine

I hope you got inspired.

Yours,


Tuesday, January 24, 2017

Merry Christmas Butterfly

Hi there,

although the Skipping Stones Design Blog has been taking a time out in December, I still want to share this Christmas Card with you. I created it with a non-Christmas image - the beautiful butterfly from the Skipping Stones Design Let it be stamp set:

  • cut a circle from Neenah Desert Storm Kraft cardstock with the help of one of the Tattered Lace Torn Edge Circle dies
  • stamp one of the butterflies from the Skipping Stones Design Let it be set with Memento (Rich Cocoa) onto the circle
  • color the image with Delta and Touch Twin Brush Markers
  • ink up the edges of the circle with Altenew Crisp Ink (Evening Gray) and a Mini Ink Blending Tool
  • add splatters with Finetec Mica watercolors (Tibet Gold)
  • cover the entire stitched background panel with the Hero Arts Designer Woodgrain stamp and Avery Elle Pigment Ink (Kraft)
  • stamp the "Christmas!" sentiment from the Skipping Stones Design Holiday Cats set with Versamark onto a strip of Neenah Desert Storm Kraft cardstock and heat-emboss it with WOW! Bright White Super Fine embossing powder
  • add stitching to the sentiment strip with one of the Lawn Fawn Stitched Borders dies
  • cut out the Memory Box Small Blooming Poinsettia from sturdy white cardstock and color the elements with the same red and green markers used on the butterfly
  • add a little pearl to the center of the flower
  • cut out the Clearly Besotted Stamps Merry from white glitter cardstock and color it with the darkest green marker used on the butterfly
  • add a strip of gold glitter tape to the right side of the cardbase before adhering the panel and all the elements

Thanks for stopping by.

Yours,

Friday, May 6, 2016

Sunshine

Hi there,

join us over at the A Day for Daisies Blog for some lovely new images and the start of a new challenge:

  • color the adorable A Day for Daisies Little Dancer Rose with ZIG Clean Color Real Brush Pens, Distress Markers and a waterbrush
  • add highlights with a white gel pen
  • cut three Tattered Lace Tuck in Flowers from sturdy white cardstock and glue them onto a piece of Mixed Media paper using Multi Medium Matte and cover everything with gesso
  • color the background using Distress Paint (Picked Raspberry, Tumbled Glass, Peacock Feathers)
  • add Inka Gold (Graphite, Turquoise) to the raised areas
  • use the script stamp from the STAMPlorations Mixed Media Elements stamp set and VersaMagic (Eggplant) to add more interest 
  • cut out a stitched panel using the My Favorite Things Stitched Mini Scallop Square STAX and ink up the edges with Distress Ink (Black Soot)
  • stamp the sentiment from STAMPlorations Fond Expressions 2 with StazOn (Jet Black) onto a piece of tissue paper and glue it on with Multi Medium Matte - the tissue paper dries almost invisible and melts into the background - this is a great trick when your background doesn't allow a crisp stamped image