Wednesday, February 28, 2018

Sending you Hugs Bunny

Hi there,

I would like to show you another of my Art Impressions watercolor projects as inspiration for this month's Happy Little Stampers Watercolor Challenge:


  • stamp the little scene with the help of some Art Impressions Watercolor stamps, Distress Markers and ZIG Clean Color Real Brush Pens - use a damp brush to add that typical look
  • cut out a torn rectangle around the scene
  • create a background on a tag cut from watercolor paper using Distress Ink (Pumice Stone)
  • stamp the sentiment from the My Favorite Things Somebunny set with Versafine (Smokey Gray)
  • ink up the edges of the tag and the watercolor panel with Distress Ink (Pumice Stone)
  • thread some purple and natural twine through the hole of the tag

Have a wonderful day.

Yours,


Tuesday, February 27, 2018

Bee strong!

Hi there,

ever since I saw that cute little bee from the Gerda Steiner Designs Bee strong set I wanted to color her with rainbow colors:


  • stamp the little bee from the Gerda Steiner Designs Bee strong set with Memento Tuxedo Black and color her with Delta, Copic and Touch Twin Brush Markers and add extra shading with Faber-Castell Polychromos pencils
  • add highlights with a white gel pen and sparkle with Wink of Stella Clear Glitter
  • cut out a stitched panel from Bristol Smooth cardstock and create a background with Distress Oxide Inks (Abandoned Coral, Wild Honey, Salty Ocean, Lucky Clover, Wilted Violet)
  • apply some more Distress Oxide Ink Wild Honey through the ARTplorations Honeycomb Delight Mini stencil
  • cut out a spinner channel with the help of one of the My Favorite Things Circle Spinner Channels and complete the interactive set up with two layers of foam tape
  • stamp the sentiment from the Gerda Steiner Designs Bee strong set with Versamark and heat-emboss it with ZING! Butter embossing powder

I hope you got inspired.

Yours,


Monday, February 26, 2018

Explore the World

Hi there,

I created this cute outdoor card for Elizabeth Craft Designs:

  • stamp the adorable little bear from the Elizabeth Craft Designs Camping Out set with My Favorite Things Extreme Black and color the image with Delta, Touch Twin Brush and Copic Markers
  • add a highlight to the nose with a white gel pen
  • cut out a square panel using one of the ModaScrap Dashing Squares
  • create the background with the help of another stamp from the set, alcohol markers, stencils and Distress Ink (Bundled Sage, Tumbled Glass)
  • use the ModaScrap Dashing Rectangles to cut a panel from patterned paper from the Maja Design Walking in the Forest 6x6 paper pad
  • stamp the sentiment from the Technique Tuesday Perfectly Wonderful set on a strip cut from Neenah Desert Storm Kraft cardstock with Versamark and heat-emboss it with platinum embossing powder

Thanks for stopping by.

Yours,


Thursday, February 22, 2018

Hold on to your Dreams

Hi there,

I created this Mixed Media Burlap Panel for the Stamping-Fairies Blog:


Have a wonderful day.

Yours,


Wednesday, February 21, 2018

Stay you

Hi there,

we are starting a Photo Inspiration Challenge over on the Addicted to Stamps and More Blog and this is my creation:


  • stamp the medium-sized butterfly from the WPlus9 Flora & Fauna 2 set with Versamark onto a stitched panel of watercolor paper and heat-emboss them with WOW! Bright White Super Fine embossing powder
  • add color to the background with Distress Oxide Inks (Worn Lipstick, Spiced Marmalade, Cracked Pistachio)
  • use water droplets from a Mister Bottle to add some texture
  • cut out the Avery Elle Simply Said You from white cardstock and add some sparkle with Wink of Stella Clear Glitter
  • use a sticker from the Tim Holtz Small Talk sticker set for the first part of the sentiment


I hope you got inspired.

Yours,


Tuesday, February 20, 2018

Happy Easter

Hi there,

we are starting a new challenge over on the Elizabeth Craft Designs Blog and this time it is all about "Easter":

  • stamp the sweet little girl from the Elizabeth Craft Designs Garden Party set and the sentiment from the Elizabeth Craft Designs Spring Sentiments set with My Favorite Things Extreme Black 
  • partially die cut the girl with the matching dies 
  • color the image with Delta, Touch Twin Brush and Copic Markers
  • add a strip of patterned paper from the ModaScrap Thinking about Polinesia 12x12 paper pad before adhering the panel to the cardbase

For today's challenge Elizabeth Craft Designs is giving away a $20 Gift Card to use on our website to 3 winners

To enter simply leave a comment on the Elizabeth Craft Designs Challenge post and tell us "What Elizabeth Craft Designs dies or stamp sets would you use to create an Easter Card?

We will select 3 lucky winners in a random drawing.

The winners will be announced on Friday, March 2nd on the Elizabeth Craft Designs blog.

I can't wait to see your creations in the gallery.

Hugs,


Monday, February 19, 2018

There is Beauty in Simplicity

Hi there,

I would like to show you how to create this tag step by step over on the STAMPlorations Blog.


Thanks for stopping by.

Yours,


Sunday, February 18, 2018

Great Things take Time Art Journal Page

Hi there,

it's time for our Stencil Sunday over on the STAMPlorations Blog.

  • cover an art journal page cut from extra sturdy watercolor paper with white gesso
  • apply Prima Marketing Modeling Paste through the ARTplorations Just Flow stencil and let it dry thoroughly
  • color the background with Paper Artsy Infusions Raspberry
  • add some torn tissue tape at two random spots
  • use heavy gesso to blend the tissue tape a bit more into the background
  • glue the photo of the clownfish onto some old book paper
  • splatter the whole page with watered-down black acrylic paint
  • add the sentiment from the Tim Holtz Small Talk sticker set

I hope you got inspired.

Yours,


Friday, February 16, 2018

Winter Bear

Hi there,

this is my second individual post on the Elizabeth Craft Designs Blog and I created this beary winter card for you:


  • stamp one of the bears and some trees from the adorable Elizabeth Craft Designs Winter Bears set with Memento Tuxedo Black
  • color the images with Copic, Touch Twin Brush and Delta Markers 
  • add sparkle to the tree tops with Wink of Stella Clear Glitter
  • add patterns and highlights with a white gel pen
  • cut out three squares from watercolor paper using the Elizabeth Craft Designs Dashing Squares set
  • add a night sky to one of the squares using Distress Ink Chipped Sapphire and a Mini Ink Blending Tool
  • add texture with some water droplets
  • cut hill shapes from the two other squares and add Distress Ink Tumbled Glass and Elizabeth Craft Designs Silk Microfine Glitter Cool Diamond for a snowy look
  • draw in some snowflakes with a white paint marker
  • cut out a larger square using the same die set from patterned paper from the ModaScrap Let it snow 6x6 paper pad
  • add all the layers to a light grey cardbase
  • create a sentiment using a Dymo Label Maker

I hope you got inspired.

Yours,


Thursday, February 15, 2018

A Good Heart

Hi there,

I created this little home decor piece for the Stamping-Fairies Blog:


Have a wonderful day.

Yours,


Tuesday, February 13, 2018

You are so loved

Hi there,

I would like to share this Valentine's Day card that I created for the Gerda Steiner Designs Blog:


  • stamp one of the adorable Gerda Steiner Designs Valentine Penguins with Memento Tuxedo Black and color the image with Delta, Touch Twin Brush and Copic Markers
  • add highlights with a white gel pen and extra shine and dimension with Glossy Accents
  • cut out the Neat & Tangled Heart of Gold from watercolor paper and add color with Distress Inks (Spun Sugar, Worn Lipstick, Picked Raspberry)
  • stamp the sentiment from the same set with Versafine Onyx Black 
  • add clouds directly to the cardbase with the help of the My Favorite Things Cloud stencil and Distress Ink Tumbled Glass
  • add faux stitching to the bottom of the cardbase using one of the My Favorite Things Homespun Stitch Lines

I hope you got inspired.

Yours,


Monday, February 12, 2018

You complete me

Hi there,

I created this flowery Valentine's Card for Elizabeth Craft Designs:

  • cut out the Elizabeth Craft Designs Romantic Bouquet from white cardstock
  • color all the little pieces with Delta, Touch Twin Brush and Copic Markers
  • cut the Bouquet again and puzzle all the little colored pieces into the openings onto a stitched Rectangle cut with the help of the Elizabeth Craft Designs Stitched Rectangles
  • stamp the sentiment from the Elizabeth Craft Designs Love Sentiments set with Prima Marketing Resist Chalk Edger Vintage Pink

I hope you got inspired.

Hugs,


Sunday, February 11, 2018

Stamp Connection #34

Hi there,

connected through our love for card making, blogging and being from Germany we (Cornelia from Stempel Spass and I) decided to create a monthly project within predefined requirements. We are going to show you the result every 2nd Sunday of the month and this is our 34th transatlantic get-together!

Our requirement for this meet-up was:
"Inspired by Nature"

  • cut out a tag from watercolor paper using one of the CUTplorations Manila Tag dies
  • add color with the help of Distress Inks (Weathered Wood, Fossilized Amber, Stormy Sky, Weathered Wood)
  • add texture using water droplets from the Mini Mister
  • stamp some trees from the Stampers Anonymous Great Outdoors set and the sentiment from Scrapbook Werkstatt with Versafine Onyx Black 
  • add some stars using another stamp from the Stampers Anonymous set and Delicata Silver Shimmer
  • thread some purple linen ribbon through the hole of the tag

Now make sure to hop over to see Cornelia's Creation.

Thanks for stopping by. We hope to see you again at the ...


Yours,


Thursday, February 8, 2018

Smile

Hi there,

I created this lovely flower card for the Stamping-Fairies Blog:


Have a wonderful day.

Yours,


Wednesday, February 7, 2018

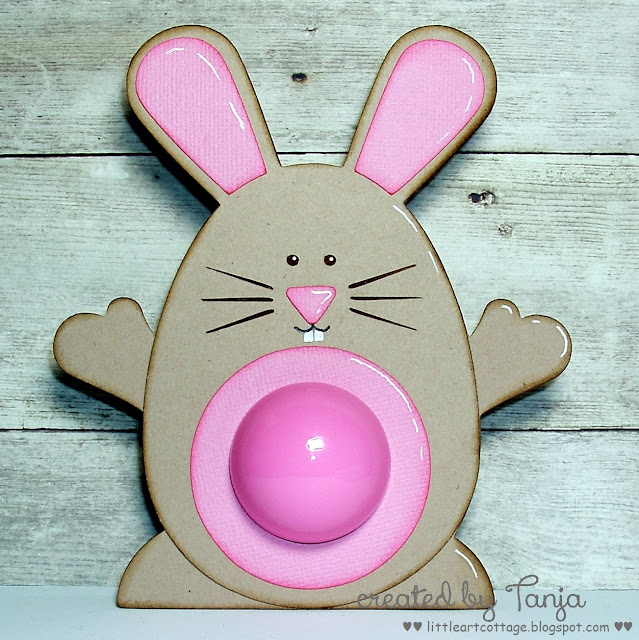
Easter Lip Balm Holders

Hi there,

today, I would like to show you two lip balm holders that I created for my daughter and son as Easter presents. I hope they inspire you to join the Addicted to Stamps and More Holiday Challenge:

  • cut out the Lori Whitlock EOS Lip Balm Bunny from light brown and pink cardstock and ink up the edges with Distress Ink (Gathered Twigs, Worn Lipstick)
  • add teeth and highlights with a white gel pen
  • cut out the Lori Whitlock EOS Lip Balm Chick from yellow cardstock
  • color some parts and ink up the edges with Distress Ink (Wild Honey, Spiced Marmalade)
  • add highlights with a white gel pen


Thanks for stopping by.

Yours,


Monday, February 5, 2018

Love Cupcake

Hi there,

we are starting a new challenge over on the STAMPlorations Blog and this month the topic is "Paint it Red":


  • cut out a CUTplorations Manila Tag from watercolor paper and stamp the STAMPlorations Sketched: Cupcake with Versafine (Onyx Black)
  • mask the cupcake and add color to the background with Altenew Crisp Ink (Pink Diamond, Pinkalicious) and a Mini Ink Blending Tool
  • add some water droplets for extra texture
  • stamp the Love from the STAMPlorations Trendy Butterflies set and some ink splatters from the STAMPlorations Art Marks set with Altenew Crisp Ink (Pinkalicious, Rubellite, Razzleberry)
  • ink up the edges with the darkest pink
  • color the cupcake with Faber-Castell Albrecht Dürer Pencils and a damp watercolor brush
  • thread a piece of beige Sari Silk Ribbon through the hole of the tag

I hope you got inspired.

Yours,


Sunday, February 4, 2018
Yeti Ornament

Hi there,

I created this tag/ornament for the Happy Little Stampers Christmas Challenge and isn't this Yeti simply adorable?


  • stamp one of the yetis from the Mama Elephant Me and my Yeti set with Versafine Onxy Black and use the ScanNCut to cut it out with a large border around it
  • I removed the watercolor paper from the cutting mat and positioned a piece of patterned paper on it and cut the shape of the yeti again in order to glue it to the backside for a nice finished look
  • color the image with Faber-Castell Albrecht-Dürer pencils and a damp watercolor brush
  • add highlights to the eyes and the horns with a white gel pen
  • cut out a heart from pink glitter paper and place into the yeti's hands
  • punch in a tiny hole above the yeti's head
  • thread a piece of teal twine through the hole of the ornament

Have a christmasy day.

Yours,