Showing posts with label Delicata. Show all posts

Monday, October 12, 2026

Fall is here

Hi there,

I created this fall card for the Karten-Kunst Blog:

  • cut out four squares from smooth white cardstock using one of the dies from the Karten-Kunst Square Card Designer set
  • create a background with the help of an embossing folder, kraft cardstock and Distress Ink Walnut Stain
  • stamp some greenery from the Karten-Kunst Circulus Blätterkranz set with Brilliance Pearlescent Crimson, Pearlescent Chocolate and Pearlescent Ivy
  • add some details with Delicata Golden Glitz
  • ink up the edges of the squares with Distress Ink Tea Dye
  • cut out "Herbst"/"Fall" using the Karten-Kunst Lucky Alphabet and ink up the edges with Distress Ink Gathered Twigs
  • add some details to the letters with a golden gel pen

Have a wonderful day.

Hugs,


Thursday, December 18, 2025

Joyful Wishes

Hi there,

I created this Christmas card for Mennys Bastelshop using the Impronte d'Autore Peace, Joy and Hope stamp set:

  • stamp one of the fairies from the Impronte d'Autore Peace, Joy and Hope set with Gina K. Designs Obsidian
  • color the image with Ohuhu Markers, add extra shading with Faber-Castell Polychromos pencils and highlights with a white gel pen
  • create a background on kraft cardstock with the help of the PaperNova Design Winter Stories Collection Trees set, Versamark, WOW! Bright White Super Fine embossing powder and Delicata Silvery Shimmer
  • stamp the sentiment from the Lawn Fawn Joy to the Woods set with Versamark onto a piece of vellum and heat-emboss it with Ranger Aqua Tinsel embossing powder
  • add strips of glitter paper to the left and right side of the panel before adhering it to a cardbase


Have a wonderful Christmas Time.

Hugs,


Monday, December 1, 2025

Merry Christmas Santa

Hi there,

I created another project using the adorable Karten-Kunst Post vom Weihnachtsmann stamp set:

  • cut out the Karten-Kunst Brückentext Frohes Fest from a piece of Neenah Desert Storm Kraft Cardstock
  • add a piece of patterned paper behind the opening
  • stamp the sweet little Santa from the Karten-Kunst Post vom Weihnachtsmann set with Inkon3 Fadeout Ink
  • color the image with Ohuhu Markers, add extra shading with Faber-Castell Polychromos pencils and highlights with a white gel pen
  • add the stars from the Karten-Kunst Weihnachten Modern set with Delicata White Shimmer

Have a wonderful day.

Hugs,


Monday, December 2, 2024

Merry Christmas Snowman

Hi there,

I created this Watercolor Card for the Karten-Kunst Blog:

  • stamp the snowman from the Karten-Kunst Weihnachten fällt aus set with Distress Oxide Ink Lost Shadow
  • color the image with watercolors and add extra shading with Faber-Castell Polychromos pencils 
  • stamp the smaller snowflake from the Karten-Kunst Mega Weihnachten set with Distress Oxide Ink Tumbled Glass and Delicata Silvery Shimmer - use second generation stamping
  • add the Karten-Kunst Nyala Script Frohes Fest cut from vellum and grey cardstock
  • adhere the watercolor panel to a grey cardbase

Thanks for stopping by.

Hugs,


Monday, November 4, 2024

Oh, Christmas Tree

Hi there,

I created this blue Christmas Card using the Karten-Kunst Circulus8 Stamping Tool:

  • stamp the Oh Tannenbaum from the Karten-Kunst Circulus Runde Weihnachtssprüche set with Lawn Fawn Jet Black using the Karten-Kunst Circulus8 stamping tool
  • add a tree from the Karten-Kunst Abstrakte Tannen set underneath each of the small sentiments
  • stamp a row of trees in the center of the panel
  • color all the trees with Spectrum Noir Triblend Markers
  • stamp the sentiment from the Karten-Kunst Zauberhafte Schneeflocken set with Delicata Silvery Shimmer
  • add a strip of patterned paper to the left and right side of the panel before adhering it to the cardbase

Have a wonderful Christmas Time.

Hugs,


Tuesday, November 7, 2023

Fluffy Fall Squirrel

Hi there,

I created this fluffy squirrel card using the Anjas Basteltraum Herbstfreunde stamp set:

  • stamp the squirrel from the Anjas Basteltraum Herbstfreunde set with Distress Oxide Ink Antique Linen onto a piece of watercolor paper, cut it out and color it with Frau von Bommel Boho watercolors
  • add extra shading with Pitt Pastel pencils and highlights with a white gel pen
  • create a background using stamps from the Karten-Kunst Capri Herbstgruesse set, Avery Elle Kraft pigment ink and Delicata Champagne
  • add splatters with watered-down Distress Ink Peeled Paint
  • wrap a piece of torn vellum around the panel
  • add the squirrel, some leaves from the Lawn Fawn Acorn House die set and the heat-embossed sentiment from the Anjas Basteltraum Kleine Sprüche Schokolade stamp set
  • mat the panel with dark brown cardstock before adhering it to a cardbase

Thanks for stopping by.

Hugs,


Saturday, December 17, 2022

Classic Christmas

Hi there,

I created this classic Christmas Card for the Karten-Kunst Blog:

  • ink up a panel of smooth white cardstock with Distress Ink (Rustic Wilderness, Festive Berries)
  • stamp some snowflakes from the Karten-Kunst Riesige Schneeflocken und Karten-Kunst Zauberhafte Schneeflocken sets with Versamark and heat-emboss them with WOW! Bright White Super Fine embossing powder
  • cut the panel apart 
  • stamp a plaid background using Distress Oxide Ink (Rustic Wilderness, Festive Berries) and Delicata Golden Glitz
  • adhere all the layers to a kraft cardbase
  • cut out the Karten-Kunst Elegant Script Frohe Weihnachten from vellum and kraft cardstock
  • add some splatters with watered-down Finetec Mica Watercolor Arabic Gold and a little gemstone on the "i" as final embellishment


I hope you got inspired.

Hugs,


Tuesday, October 8, 2019

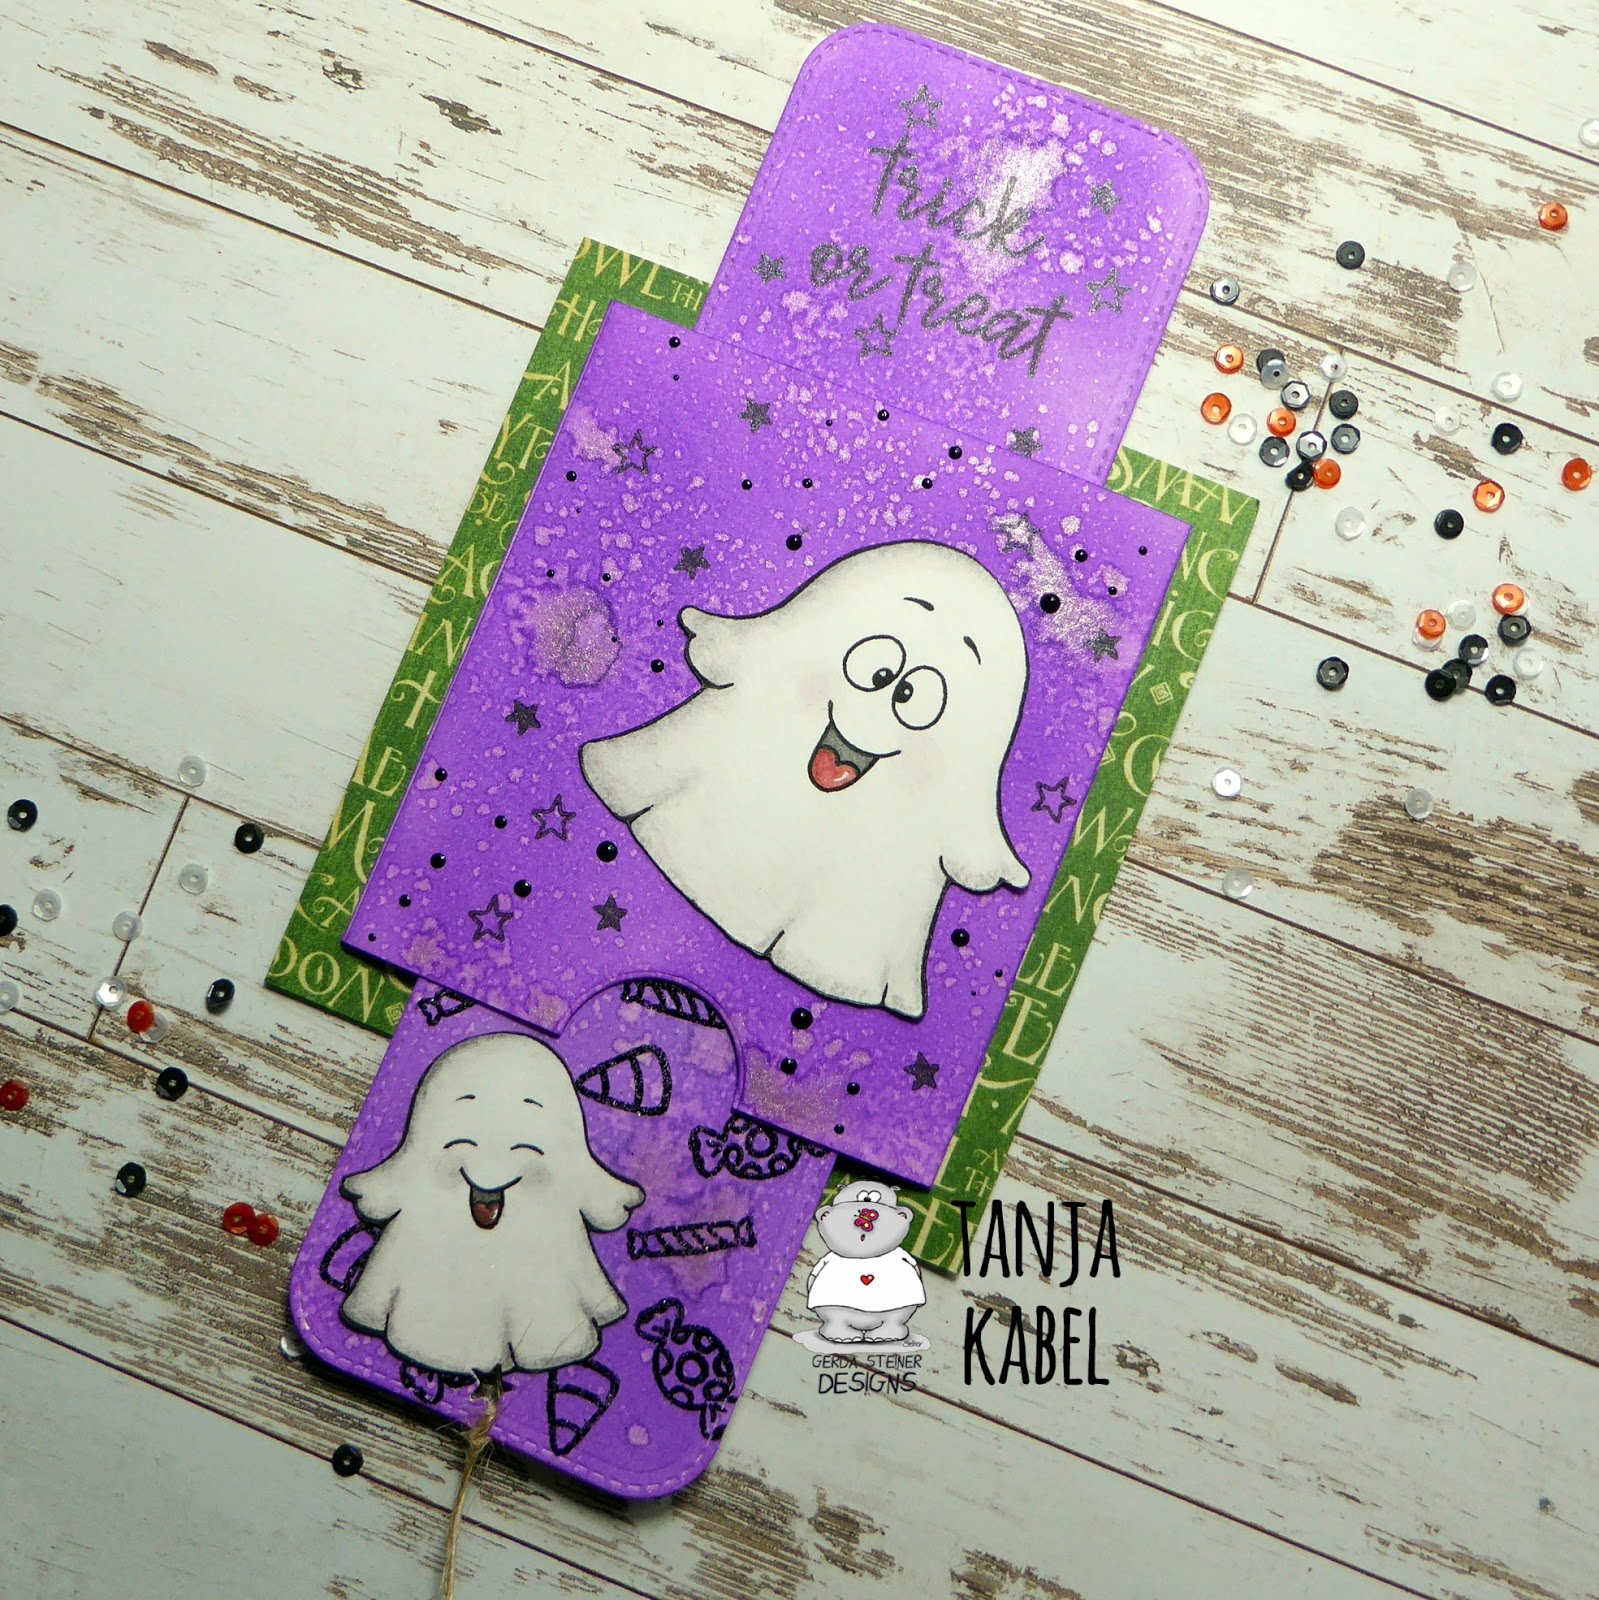
Trick or Treat Ghosts

Hi there,

I created this double slider card using the new Gerda Steiner Designs Boo for you stamp set:

  • create a double slider mechanism using the My Favorite Things Stitched Rounded Rectangle STAX, watercolor paper, one of the Kesi'Art Encoches and a piece of plastic
  • add color with Distress Oxide Ink Wilted Violet and a Mini Ink Blending Tool
  • mist the panels with Pearlized Water for extra texture and shimmer
  • color the adorable little ghosts from the Gerda Steiner Designs A Boo for you set with Derwent Graphitint pencils and a damp watercolor brush
  • add highlights with a white gel pen
  • decorate the bottom panel with candy from the Gerda Steiner Designs Where is the Candy? set using Versamark and WOW! Black Twinkle embossing glitter
  • stamp the sentiment from the same set with Delicata Black Shimmer onto the top panel
  • add some stars from the Gerda Steiner Designs Alien Invasion set with that same black ink 
  • Nuvo Crystal Drops in Ebony Black are the final embellishment on the front and top panel
  • punch a star-shaped hole into the bottom panel and thread a piece of natural twine through it
  • cover a cardbase with patterned paper from the Graphic 45 An eerie Tale 6x6 paper pad before adhering the slider panel


I hope you got inspired.

Hugs,


Monday, January 28, 2019

Huuiii!

Hi there,

I created this fun winter slider card for the Karten-Kunst Blog:

  • stamp the adorable Karten-Kunst Barney der Eisläufer with Versafine Onyx Black and color the image with Derwent Inktense pencils and a damp watercolor brush
  • add Wink of Stella Clear Glitter to the mane and the tail and Wink of Stella Silver Glitter to the horn
  • create a slider background using watercolor paper, the Memory Box Stitched Rectangles Layers, the My Favorite Things Stitched Snow Drifts, double-sided foam adhesive and some plastic
  • add color with Distress Inks (Chipped Sapphire, Tumbled Glass) and a Mini Ink Blending Tool
  • stamp the sentiment from the same set with Versafine Onyx Black onto the snow drift
  • add a trail onto the snow drift with Finetec Mica Watercolor Dragon Silver
  • stamp some stars from the same set into the evening sky with Delicata Silvery Shimmer
  • stamp the Pull Here from the Lawn Fawn Push Here set onto he pull tap
  • adhere a piece of patterned paper from the Maja Design Home for the Holidays 6x6 paper pad to the cardbase before adding the slider panel


I hope you got inspired.

Hugs,


Thursday, January 24, 2019

Let it Snow Fox

Hi there.

I created this snowy watercolor card for the Stamping-Fairies Facebook Group:

  • create this adorable little scene using several of the Art Impressions Watercolor stamp sets, Distress Markers and a damp watercolor brush
  • add some sparkle with Pearlized Water
  • stamp the sentiment from the Lawn Fawn Winter Big Scripty Words with Delicata Silvery Shimmer
  • cover the cardbase with patterned paper from the Maja Design Vintage Winter 6x6 paper pad before adhering the watercolor panel on top


Thanks for stopping by.

Hugs,


Friday, October 19, 2018

Reach for the Stars Owl

Hi there,

I created this owl card for Elizabeth Craft Designs:

  • cut out a stitched rectangle from watercolor paper using one of the Elizabeth Craft Designs Stitched Rectangles
  • mask off a strip and add color with Distress Inks (Black Soot, Chipped Sapphire, Faded Jeans)
  • mist the panel with water for more texture
  • add two strip of Elizabeth Craft Designs clear double-sided adhesive in the 3 mm version and cover it with Elizabeth Craft Designs Silk Microfine Glitter Brushed Pewter
  • stamp the sentiment from the Elizabeth Craft Designs Dream Sentiments set with Versafine Clair Nocturne and add some stars from the Elizabeth Craft Designs Give a Hoot set with Delicata Silvery Shimmer
  • stamp the owl from the Elizabeth Craft Designs Give a Hoot set with Memento Tuxedo Black
  • color the image with Delta, Touch Twin Brush and Copic Markers and add extra shading with Prismacolor Colored Pencils


I hope you got inspired.

Hugs,


Sunday, October 14, 2018

Stamp Connection #42

Hi there,

connected through our love for card making, blogging and being from Germany we (Cornelia from Stempel Spass and I) decided to create a monthly project within predefined requirements. We are going to show you the result every 2nd Sunday of the month and this is our 42nd transatlantic get-together!

Our requirement for this meet-up was:
"Halloween"

  • stamp two of the adorable little Halloween critters from the My Favorite Things Frightfully Sweet set with Versafine Clair Morning Mist
  • color the images with Prismacolor Colored Pencils
  • cut out a background panel from watercolor paper with the help of one of the Tattered Lace Torn Edge Rectangles dies
  • add color with a gradient wash of Altenew Watercolors Lavender Fields
  • cut out the Tim Holtz Cobweb from black cardstock
  • mist the cobweb and the background with Shimmer Spritz Sparkle
  • stamp the sentiment from the same stamp set with Delicata Black Shimmer
  • stamp some stars from the WPlus9 Little Bits set with that same shimmery ink color
  • add some dots with the Nuvo Crystal Drops Ebony Black as final embelishment before adhering the panel onto a black cardbase


Now make sure to hop over to see Cornelia's Creation.

Thanks for stopping by. We hope to see you again at the ...


Hugs,

Sunday, February 11, 2018

Stamp Connection #34

Hi there,

connected through our love for card making, blogging and being from Germany we (Cornelia from Stempel Spass and I) decided to create a monthly project within predefined requirements. We are going to show you the result every 2nd Sunday of the month and this is our 34th transatlantic get-together!

Our requirement for this meet-up was:
"Inspired by Nature"

  • cut out a tag from watercolor paper using one of the CUTplorations Manila Tag dies
  • add color with the help of Distress Inks (Weathered Wood, Fossilized Amber, Stormy Sky, Weathered Wood)
  • add texture using water droplets from the Mini Mister
  • stamp some trees from the Stampers Anonymous Great Outdoors set and the sentiment from Scrapbook Werkstatt with Versafine Onyx Black 
  • add some stars using another stamp from the Stampers Anonymous set and Delicata Silver Shimmer
  • thread some purple linen ribbon through the hole of the tag

Now make sure to hop over to see Cornelia's Creation.

Thanks for stopping by. We hope to see you again at the ...


Yours,


Sunday, December 3, 2017

Fixstern - Fixed Star Tag

Hi there,

it is time for another Stencil Sunday and the start of a new Mixed Media Challenge over on the STAMPlorations Blog.

  • cut out a tag using dies from the CUTplorations ATC/Tag Builder set and apply heavy white gesso through the ARTplorations Oh my Stars! Mini stencil - let this layer dry thoroughly
  • add color to the tag with the help of watered-down Distress Paint (Evergreen Bough, Weathered Wood, Iced Spruce)
  • draw a line around the edges with a black Stabilo All pencil and activate the color with a wet watercolor brush
  • add more texture to the background by stamping the numbers and the script from the STAMPlorations Mixed Media Elements set with Archival Ink (Black Soot)
  • let some Daler-Rowney Pearlescent Liquid Acrylic (Moon Violet) drip down the tag
  • stamp some stars from the STAMPlorations Art Marks set with Delicata (Silvery Shimmer)
  • create the word "Fixstern" (fixed star) with a Dymo Label Maker and adhere it to the tag on top of a piece of corrugated cardboard and a piece of sari silk ribbon
  • dye a piece of seam binding with that same violet liquid acrylic paint and rip it in half before threading it through the hole of the tag

I hope you got inspired and don't forget to join us for our Mixed Media Challenge over at the STAMPlorations Blog. The theme is always anything mixed media except a card. You must use at least one stencil (any brand) in your project. The Linky closes at the end of the month.

Yours,


Sunday, October 1, 2017

A Glimpse of Heaven

Hi there,

it is time for another Stencil Sunday and the start of a new Mixed Media Challenge over on the STAMPlorations Blog.

  • I created some new ATC backgrounds and I explain the process in this previous post
  • apply Distress Ink Walnut Stain through the ARTplorations Tribal Weave stencil
  • stamp some of the STAMPlorations Trendy Leaves with Distress Oxide Ink Walnut Stain
  • add water droplets for more texture
  • color the edges with a brown Stabilo All pencil and activate the color with a wet watercolor brush
  • adhere purple linen ribbon with hot glue
  • stamp the script from the STAMPlorations Mixed Media Elements set with Delicata Golden Glitz and add golden splatters with Finetec Mica Watercolors
  • add a wooden leaf and wrap some natural twine around the ATC - glue a little bow on top
  • add a sentiment from the Ideaology Clippings sticker set

I hope you got inspired.

Yours,


Sunday, May 21, 2017

Stamp Connection #25

Hi there,

connected through our love for card making, blogging and being from Germany we (Cornelia from Stempel Spass and I) decided to create a monthly project within predefined requirements. We are going to show you the result every 3rd Sunday of the month and this is our 25th transatlantic get-together!

This time we have a special guest. Cornelia invited the wonderful Suchi from Suchi's Cardstock to share her creation with us. So make sure to visit her blog.

Our requirement for this meet-up was:
Fire


  • cut out a Tim Holtz Stitched Oval from watercolor paper 
  • create a background using Brushos (Light Brown) and Color Burst (Indigo)
  • sprinkle on some stars using Finetec Mica Watercolors (Silver Dragon, Arabic Gold)
  • stamp a squirrel, a bear, a stick, a marshmallow and the fire from the Lawn Fawn Love you s'more set with Versafine (Vintage Sepia) and color the images with a base coat of Delta, Touch Twin Brush and Copic Markers and add shadows with Derwent Drawing Pencils
  • cut out a Tim Holtz Stitched Rectangle from Kraft Cardstock and add some stars stamped with Delicata (Golden Glitz) to the background
  • cut out a sentiment strip with the help of the My Favorite Things Blueprints 20 set
  • stamp the sentiment from the same stamp set with Versamark and heat-emboss it with WOW! Bright White Super Fine embossing powder

Now make sure to hop over to see Cornelia's Creation.

Thanks for stopping by. We hope to see you again at the ...


I hope you got inspired.

Yours,