Showing posts with label Crackle Paste. Show all posts

Sunday, December 2, 2018

O Christmas Tree ...

Hi there,

we are starting a new Mixed Media Challenge over on the STAMPlorations Blog and this is my very christmasy creation:

  • color a wooden tree with teal acrylic paint
  • apply Prima Marketing Platinum Crackle Paste through the ARTplorations Oh my Stars! stencil and Texture Paste through the ARTplorations Holly Background stencil
  • let this dry thoroughly - I actually left it over night
  • add shading with Distress Ink Hickory Smoke and a Mini Ink Blending Tool
  • color the holly leaves and berries with Derwent Inktense Pencils and a damp watercolor brush
  • add snowflake splatters with watered-down white acrylic paint
  • now you can stick little fairy lights through the holes and have a wonderful Christmas decoration

I can't wait to see your creations in the gallery.

Hugs,


Monday, October 8, 2018

Fall in Love

Hi there,

I would like to show you how to create this Lavender Art Journal Page step by step over on the STAMPlorations Blog:


Thanks for stopping by.

Hugs,


Monday, August 13, 2018

Christmas in August

Hi there,

did you see the fabulous new Joset dies and stamps over on Elizabeth Craft Designs? If not, we prepared a blog hop full of ideas and inspiration for you:

  • cut out one of the brand new Elizabeth Craft Designs Winter Ornaments and the Elizabeth Craft Designs Small Poinsettia from Elizabeth Craft Designs white Soft Finish Cardstock
  • color all the elements with Delta, Touch Twin Brush and Copic Markers
  • add extra shading to the petals with PanPastels
  • use the Susan's Garden Tool Set to shape the flower
  • thread natural twine through the hole of the ornament
  • cut out a stitched panel from watercolor paper using one of the Elizabeth Craft Designs Stitched Rectangles
  • create a background using Distress Paints (Weathered Wood, Evergreen Bough) and Crackle Paste Platinum
  • stamp the sentiment from the Elizabeth Craft Designs Classic Christmas Sentiments with Archival Ink Watering Can
  • mat the panel onto a kraft cardbase


And this is my second project:

  • cut out the Elizabeth Craft Designs Santa Claus and the presents from the Elizabeth Craft Designs Santa's Sleigh die set from white Soft Finish Cardstock
  • color all the elements with Delta, Touch Twin Brush and Copic Markers
  • add the eyes with a black gel pen and highlights with a white gel pen
  • cut out one of the Elizabeth Craft Designs Frame it Stitched Circles from Neenah Desert Storm kraft cardstock
  • stamp the sentiment and some snowflakes form the Elizabeth Craft Designs Cute Winter Sentiments set with Versamark and heat-emboss them with WOW! Bright White Super Fine embossing powder
  • create a sky background on watercolor paper with the help of Distress Oxide Inks (Tumbled Glass, Stormy Sky) and a Mini Ink Blending Tool
  • add some water droplets for more texture
  • cut out a hill shape using one of the Elizabeth Craft Designs Adventure Edges
  • cover the opening with a piece of acetate and create a shaker element using a double layer of foam adhesive
  • fill the shaker element with sequins 
  • close the shaker with the background panel and adhere everything to a dark kraft cardbase


I hope you got inspired and enjoy the rest of the hop.

Hugs,


Monday, June 18, 2018

Collect beautiful Moments

Hi there,

I would like to show you how I created this Mixed Media Flower Tag over on the Elizabeth Craft Designs Blog:

  • cover a sturdy white tag with gesso
  • add color with Distress Paint (Spun Sugar, Dusty Concord)
  • create some texture by applying gesso through the ARTplorations Leaves 2 stencil and by stamping script from the STAMPlorations Mixed Media Elements set and a dot pattern from the STAMPlorations Mixed Media Grunge set with Archival Ink Watering Can
  • spread some crackle paste over random spots and let everything dry thoroughly
  • to create the Lilac use the Elizabeth Craft Designs Garden Notes Lilac 2 die set
  • cut the base once from very sturdy craft cardstock and once from 270gr Elizabeth Craft Designs white Soft Finish Cardstock
  • cut five leaves, the plate with the larger flowers four times and the smaller flowers twice - use the Elizabeth Craft Designs Soft Finish Cardstock as well
  • add color to the white cardstock using Alcohol Markers
  • shape the elements with the help of the fabulous Elizabeth Craft Designs Susan's Garden Tool Kit
  • create the flower right on the tag
  • add green prills to the center of the little flowers and shading using purple and green Pan Pastels
  • add two sentiment stickers and dye a piece of torn seam binding with Distress Ink Dusty Concord
  • cut out a ladybug from the Elizabeth Craft Designs Susan's Garden Bugs & Butterflies die set, color it, shape it and adhere it to one of the leaves - to achieve a shiny, more realistic look add a thick coat of Nuvo Crystal Glaze on top
Hugs,


Tuesday, March 20, 2018

Refuse to feel broken

Hi there,

we are starting a new Challenge over on the Elizabeth Craft Designs Blog and this time it is all about Frames:


  • cut the ModaScrap Happy Frame from sturdy white cardstock four times and use a bone folder to crease the parts
  • cut the pieces to size - I want to create a 5x3,5 rectangular frame so I need to 5'' pieces and two 3,5'' pieces
  • assemble the frame pieces using Elizabeth Craft Designs Clear Double Sided Adhesive 6mm
  • use some corner to make sure that you get it all straight
  • cover the frame with white gesso
  • apply white crackle paste and let it dry thoroughly
  • color the frame with Distress Paint Weathered Wood
  • ink up the edges with Distress Ink Black Soot and emphasize the cracks and the raised areas with Prima Marketing Metallique Wax Brushed Iron
  • cut a background panel from sturdy white cardstock and color the background with Distress Paint Weathered Wood as well
  • add drips with watered-down Distress Paint Broken China and Picket Fence
  • create some texture with the help of a script stamp from the STAMPlorations Mixed Media Elements set and Archival Ink Watering Cam
  • add splatters with watered-down Distress Paint Black Soot
  • use a lid and Distress Paint Picket Fence to create circular marks
  • stamp the sentiment on tissue paper and add it to the bottom right corner with matte medium
  • cut out the ModaScrap Pair of Leaves 2 from Elizabeth Craft Designs Soft Finish cardstock Rich Black and adhere them to the panel

For today's challenge Elizabeth Craft Designs are giving away a $20 Gift Card to use on our website to 3 winners

To enter simply leave a comment on the Elizabeth Craft Designs Challenge post and tell us What Elizabeth Craft Designs dies or stamp sets would you use to frame something on a card, scrapbook layout of home decor item?

We will select 3 lucky winners in a random drawing.

The winners will be announced on Friday, March 23rd on the Elizabeth Craft Designs blog.

I can't wait to see your creations in the gallery.

Hugs,


Wednesday, November 22, 2017

25 Days of Christmas Tags

Hi there,

STAMPlorations is joining the 25 Days of Christmas Tags Event and this is my creation:


  • stamp one of the STAMPlorations Sketchy Yule Trees with Memento Tuxedo Black and color the image with Delta, Touch Twin Brush and Copic Markers
  • add the baubles using different colors of Pearl Makers
  • cut out the largest and the smallest of the CUTplorations Manila Tags from watercolor paper
  • create a background using Distress Paints (Evergreen Bough, Salty Ocean, Peacock Feathers, Spun Sugar)
  • apply Prima Marketing Texture Paste Platinum Crackle through the ARTplorations Oh my Stars! Mini stencil and let the baubles and the stars dry thoroughly
  • stamp the "TO:" using the STAMPlorations Sketchy Alphabet set and Versafine Onyx Black
  • grunge up the edges of the tags with a black Stabilo All pencil and a wet watercolor brush
  • add splatters with Finetec Mica Watercolors Moon Gold
  • cut out a little star from glitter paper and add it to the top of the Christmas Tree
  • add some more texture by stamping the script from the STAMPlorations Mixed Media Elements set with Archival Ink Watering Can
  • dye a piece of torn seam binding with Distress Stains (Peacock Feathers, Broken China) and thread the strands through the holes of the tags

I hope you got inspired.

Yours,


Tuesday, November 21, 2017

Crackle Thanks

Hi there,

just a quick reminder of this month's TAGplorations Challenge - the Topic is All about Gratitude and the Optional Twist is Polka Dots:

  • cut a CUTplorations Manila Tag from an old gelli print and cover random areas with DecoArt Media white Crackle Paste - let this dry thoroughly
  • use a black Stabilo All Pencil around the edges and on the crackle to darken things up
  • cut the CUTplorations thanks from another piece of that gelli print and add some texture by stamping the STAMPlorations Bloomtangled #2 with Versafine (Onyx Black)
  • apply some Distress Oxide Ink (Peacock Feathers) through the ARTplorations Dots all over stencil
  • stamp some letters from the STAMPlorations Scribbly Splattery Grunge set with Distress Oxide Ink (Black Soot) onto the background
  • glue the thanks onto a piece of ripped corrugated board inked up with Distress Oxide Ink (Peacock Feathers)
  • thread some beige Sari Silk Ribbon through the hole of the tag

Be sure to join us.

Yours,


Sunday, October 15, 2017

Imagination ATC

Hi there,

this is just a quick reminder of this month's Mixed Media Challenge over on the STAMPlorations Blog.

  • create a background on a piece of watercolor paper using Daniel Smith and Schmincke Horadam watercolors
  • cut out an ATC from the part you like best using a die from the CUTplorations ATC/Tag Builder set 
  • glue down a piece of vintage book paper at the bottom of the page
  • add color to the edges with a black Stabilo All Pencil and a wet watercolor brush
  • apply Crackle Paste through the ARTplorations Honeycomb Delight Mini stencil  and let it dry thoroughly
  • add some texture to the background by stamping the dot pattern and the numbers from the STAMPlorations Mixed Media Grunge set and the tiny text from the STAMPlorations Scribbly Splattery Grunge set with Archival Ink (Black Soot)
  • color over the crackled ares with watered-down Distress Paint (Hickory Smoke)
  • glue down some corrugated cardboard, cheesecloth, cotton ribbon (altered with the smaller chevron stamp from the STAMPlorations Mixed Media Grunge set, Archival Ink Black Soot and Distress Paint Peacock Feathers) and a sentiment from the Tim Holtz Big Chat Sticker set

I hope you got inspired.

Yours,


Friday, October 6, 2017

Discover ATC

Hi there,

we are starting a new Mixed Media Challenge over on the Happy Little Stampers Blog and this time we would like to see some crackle on your project:


  • cut out an ATC from sturdy white cardstock with the help of the CUTplorations ATC/Tag Builder die
  • use matte medium to cover the ATC with a piece of gelli-printed tissue paper
  • add scraps of linen tape
  • cover the whole card with watered-down white gesso
  • apply Crackle Paste through the ARTplorations Leaf Prints Mini stencil and let it dry thoroughly
  • add black Stabilo All Pencil all round the edges and add water with a watercolor brush
  • apply Dylusions Paint (Calypso Teal) to the leaf shapes and spritz it with water
  • add black and white splatters
  • use hot glue in order to add cheesecloth, two torn strips of patterned paper, burlap and a sentiment sticker

Thanks for stopping by.

Yours,


Sunday, June 4, 2017

Altered Box

Hi there,

it is time for another Stencil Sunday and the start of the June Mixed Media Challenge over on the STAMPlorations Blog. This time I altered a round paper box and turned it into a desk organizer.

  • adhere Tissue Wrap to the whole box with gel medium and cover it with white gesso
  • add Crackle Paste at random spots and let it dry thoroughly
  • use Dylusions Paint (Vibrant Turquoise) to add color
  • apply Dylusions Paint (Black Marble) over the cracked areas and through the ARTplorations Bloom Silhouettes stencil
  • add white splatters with watered-down Dylusions Paint (White Linen)
  • use some Metallic Rub On Paste for a grungy finish

Here is another picture of the box:


I hope you got inspired.

Yours,


Sunday, May 7, 2017

Free Bird ATC

Hi there,

we are starting a new Mixed Media Challenge over on the STAMPlorations Blog.

  • in one of my previous posts I explained how I created the background for several ATCs
  • for this project I used the last one and since I thought it was too dark, I added a thin layer of white gesso over the whole card
  • add some additional color with Alcohol Inks (Clover, Eggplant, Gold)
  • stamp the letters from the STAMPlorations Scribbly Splattery Grunge set with Versamark and heat-emboss them with WOW! Silver Pearl embossing powder 
  • splatter the card with some watered-down white acrylic paint
  • apply black gesso over the ARTplorations Art happens stencil and on top of this layer Prima Marketing Crackle Paste Platinum through the ARTplorations Square Links stencil
  • use one of the birds from the ARTplorations Some Birds stencil as a template and cut it out from sturdy kraft cardstock
  • prime the bird with some white gesso and color it with Distress Paints (Wild Honey, Cracked Pistachio)
  • add shading with a black Stabilo All Pencil
  • stamp the newsprint from the STAMPlorations Mixed Media Grunge set with Archival Ink (Black Soot) right onto the bird's body
  • cut the Memory Box Woodland Branch from the same sturdy cardstock and color it with Distress Paint (Gathered Twigs)
  • dye two little piece of cheesecloth with Distress Ink (Tea Dye)  and use the Bosch GluePen to flue everything in place
  • as the final step add a sentiment sticker to the right side of the cluster

Thanks for stopping by.

Yours,


Monday, March 6, 2017

Room in your Heart Tag

Hi there,

we are starting a new Mixed Media Challenge over at Happy Little Stampers:

  • use Multi Medium Matte to cover a tag with an old book page
  • add gesso over the top
  • stamp the flowers from the Paper Artsy EKD03 set with Archival Ink (Black Soot)
  • add some more texture to the background with the little rectangles from the Paper Artsy EKD02 set
  • add DecoArt Media Crackle Paste to random spots and let it dry thoroughly
  • apply Prima Marketing Modeling Paste through the Tim Holtz Layering Stencil (Linen)
  • color the images with Derwent Inktese Pencils and a damp watercolor brush
  • add shading with a black Stabilo All pencil
  • add color to the edges using the Distress Crayon (Pumice Stone)
  • dye a piece of seam binding with Distress Ink (Pumice Stone) and thread it through the hole of the tag

I can't wait to see your creations in the gallery.

Yours,

Wednesday, February 15, 2017

Lacy Edges Tag and Card

Hi there,

there is a Mini Release Blog Hop over on the STAMPlorations Blog and I got the chance to work with the fabulous new Lacy Edges and Borders die set.


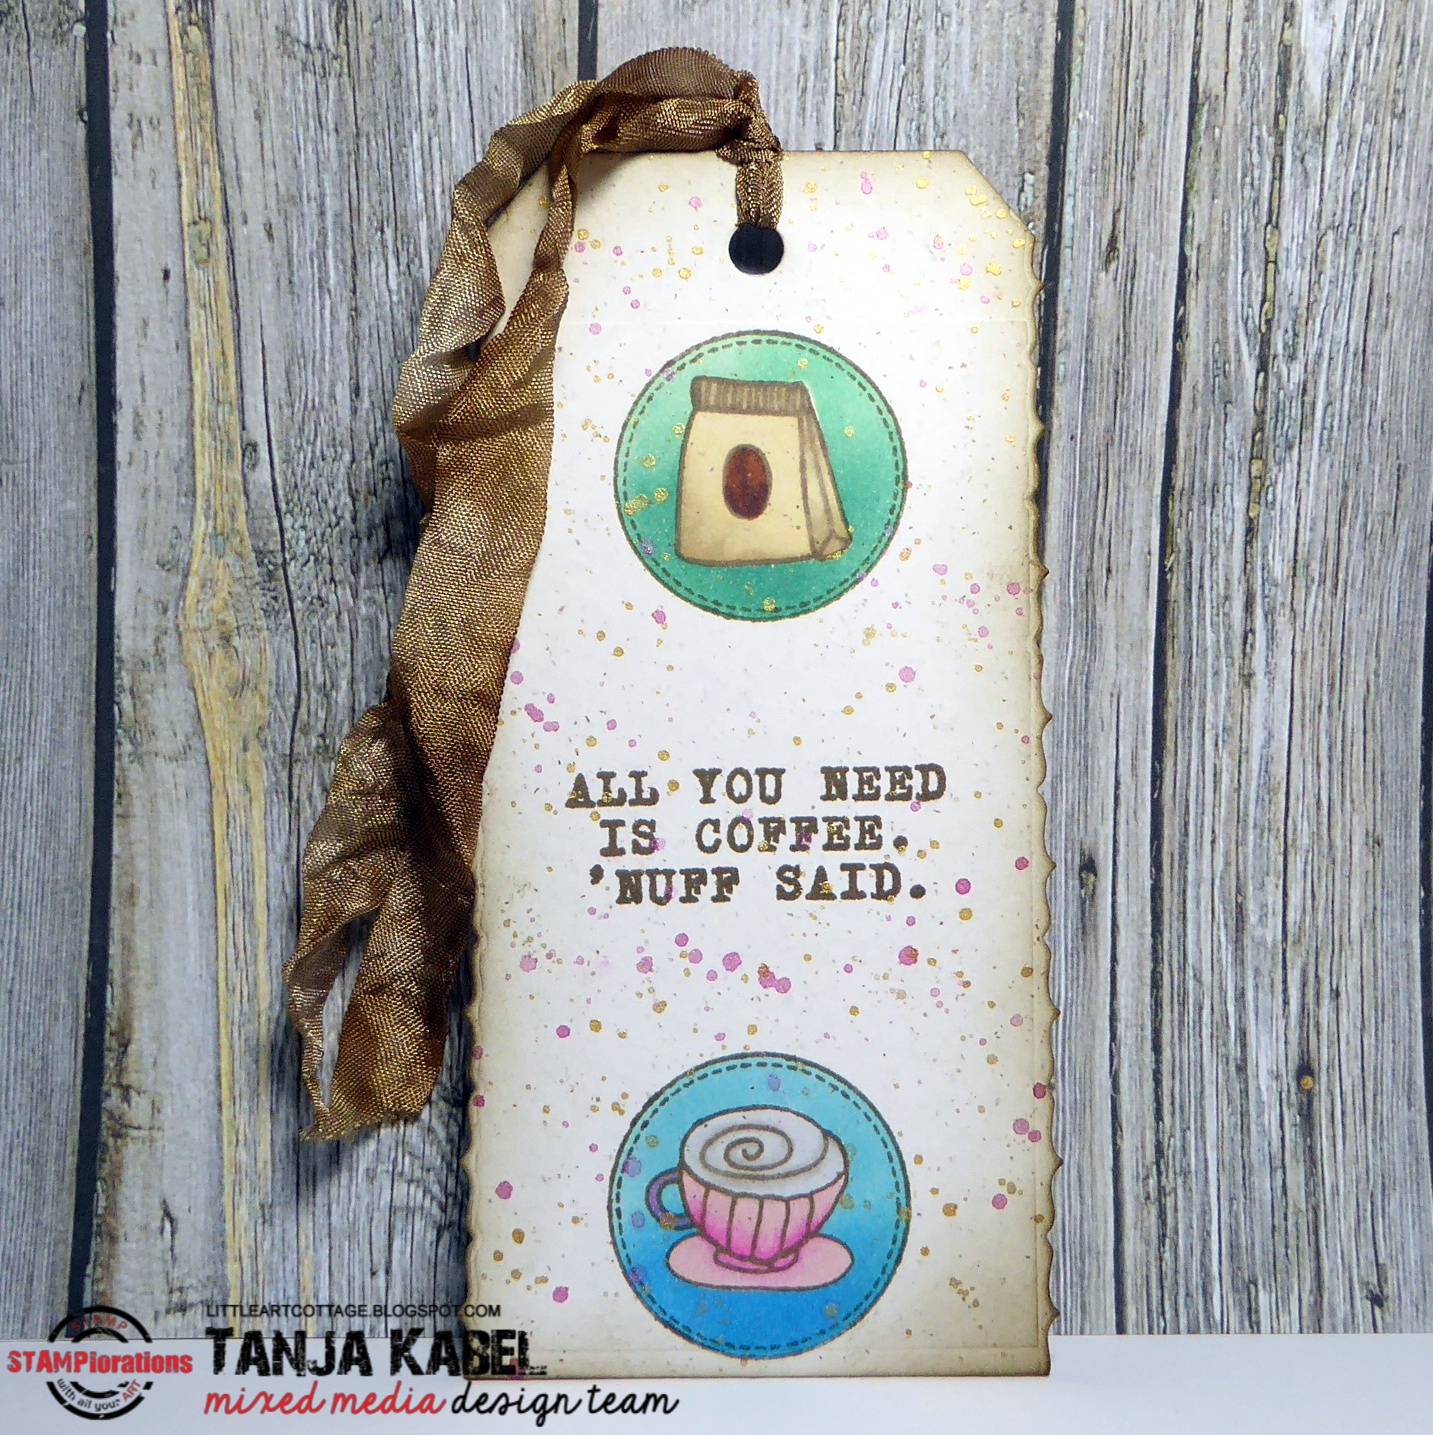
My first project is a Coffee Tag/Bookmark:

  • cut out a tag from Gmund Beer Paper
  • use one of the versatile CUTplorations Lacy Edges and Borders dies on both sides of the tag
  • stamp the circle and two cute little coffee icons from the STAMPlorations Coffee Petites set with Versafine (Vintage Sepia)
  • add the sentiment from the STAMPlorations All you need is Coffee set with that same brown ink
  • mask off the coffee icons and the space around the circles and add an ombre background using Distress Inks (Cracked Pistachio, Evergreen Bough, Tumbled Glass, Salty Ocean) and a Mini Ink Blending Tool
  • remove the masks and add some splatters with the Prima Marketing Metallic Accents
  • color the images with Copic, Delta and Touch Twin Brush Markers
  • ink up the edges of the tag and dye a piece of seam binding with Distress Ink (Ground Espresso)
  • thread the seam binding through the hole of the tag to finish it

My second project is a vibrant Mixed Media Card:

  • create a background on a piece of watercolor paper using watered-down Distress Re-Inkers (Picket Fence, Worn Lipstick, Picked Raspberry)
  • use one of the brand new CUTplorations Lacy Edges and Borders dies on the right side of the panel
  • mix some DecoArt Media Crackle Paste with Distress Re-Inker (Wilted Violet) and apply it through on of the hearts of the ARTplorations Zen Hearts stencil
  • let the crackle paste dry thoroughly
  • ink up the edges of the panel and the raised areas with Distress Ink (Black Soot)
  • cut out the CUTplorations Happy word die from black cardstock and cover the sentiment with Spectrum Noir Clear Glitter
  • use a sticker for the second part of the sentiment and a label from the Dymo Label Maker for the third part
  • stamp the script from the STAMPlorations Mixed Media Elements set with Delicata (Silvery Shimmer) for more texture
  • add splatters with black gouache
  • add a strip of silver glitter paper to the right side of the panel before adhering it to a cardbase

Don't forget to leave comments for there a prizes to be won:
1 winner of a $15 gift certificate and 1 winner of her choice of either the Lacy Edges or Winter & Spring Stitched Landscape dies.
Commenting closes on Tuesday, February 21st.
Winners will be announced on March 10th.
Enjoy the rest of the hop.

Yours,


Sunday, January 15, 2017

Stamp Connection #21

Hi there,

connected through our love for card making, blogging and being from Germany we (Cornelia from Stempel Spass and I) decided to create a monthly project within predefined requirements. We are going to show you the result every 3rd Sunday of the month and this is our 21st transatlantic get-together!

Our requirement for this meet-up was:
newsprint

  • cover a wood panel with white gesso
  • use Prima Marketing Soft Matte Gel to glue newsprint tissue paper onto selected areas
  • cover random spots with DecoArt Media Crackle Paste and let it dry thoroughly
  • tint the crackles with DecoArt Media Antiquing Cream (Patina Green)
  • add more color to the background with the help of Prima Marketing Metallique Acrylic Paint (Light Patina, Deep Waters)
  • stamp images from the Tim Holtz Nautical Blueprint set with Archival Ink (Watering Can) and heat-emboss them with clear embossing powder
  • add splatters with watered-down Golden Fluid Acrylic Paint (Titanium White)
  • dye a piece of seam-binding with left-over blue paint and adhere it to the back of the panel with hot glue

Now make sure to hop over to see Cornelia's Creation.

Thanks for stopping by. We hope to see you again at the ...


Yours,


Sunday, November 20, 2016

Timeless Nature Wood Panel

Hi there,

it is time for another Stencil Sunday over on the STAMPlorations Blog:

  • cover a wood panel with white gesso
  • apply Dreamweaver Crackle embossing paste through the ARTplorations Happy Flowers Large stencil and let it dry thoroughly
  • add Distress Paints (Shaded Lilac, Picked Raspberry, Evergreen Bough, Mermaid Lagoon, Spun Sugar) at the top of the panel and water it down until it drips - let it dry between colors and at the end
  • mix some Distress Paint (Hickory Smoke) with Golden Acrylic Glazing Liquid, paint it over the whole panel, let it sit for a minute and wipe some of it away with a baby wipe - repeat this process until you are happy with the result
  • ink up the edges with Distress Ink (Black Soot)
  • add some texture by stamping the script from the STAMPlorations Mixed Media Elements set with Archival Ink Watering Can
  • add a border with one stamp from the STAMPlorations Artsy Border Maker set and the dot pattern from the STAMPlorations Mixed Media Grunge set and the same grey ink 
  • apply some Remnant Rubs (Botanical) at random spots as final embellishment
  • dye a piece of seam binding with Distress Stains (Picked Raspberry, Shaded Lilac, Evergreen Bough) and thread it through the holes of the panel

I hope you got inspired and don't forget to join us for our Mixed Media Challenge over at the STAMPlorations Blog. The theme is always anything mixed media except a card. You must use at least one stencil (any brand) in your project. The Linky closes at the end of the month.

Until next time.

Yours,


Saturday, November 12, 2016

Espresso my Gratitude Tag

Hi there,

we are having the Stamp Tramps November Blog Hop over at Skipping Stones Design and I used some crackle paste on my autumn tag:

  • cut out a tag from watercolor paper
  • stamp the coffee cup from the Skipping Stones Design Funny Coffee Vol. #1 set with Versafine (Vintage Sepia)
  • cover the cup with Masking Fluid from the Molotow Masking Pen
  • apply Dreamweaver Crackle embossing paste through the ARTplorations Foiled again Mini stencil
  • create a background with Distress Inks (Fossilized Amber, Rusty Hinge, Peeled Paint) and a watercolor brush
  • ink up the edges of the tag with Distress Ink (Peeled Paint)
  • add splatters with Izink (Topaz)
  • remove the Masking Fluid
  • stamp a leaf grom the Stampendous Trees and Leaves set onto the cup with Versafine (Vintage Sepia)
  • color the cup with Distress Markers and ZIG Clean Color Real Brush Pens
  • color a piece of seam binding with left-over inks
  • cut out a tiny tag and one of the Lawn Fawn Stitched Leaves from watercolor paper
  • stamp the sentiment from the Skipping Stones Design Funny Coffee Vol. #1 set with Versamark and heat-emboss it with WOW! Bright White Super Fine embossing powder 
  • color the tag with Distress Markers and ZIG Clean Color Real Brush Pens - the embossing will act as a resist
  • color the stitched leaf with Distress Markers
  • attach the leaf and the tag to a piece of May Arts Natural Twine and thread the twine and the seam binding through the hole of the tag

Here are close-ups of the cup and the leaf/tag embellishment:


There is a giveaway, too. In order to win a Skipping Stones Design stamp set of your choice you  need to

  1. Subscribe to the Skipping Stones Designs Blog
  2. Like Skipping Stones Design on Facebook 
  3. Leave a comment on each blog along the way.
For an extra chance be sure to follow the Stamp Tramps blog and leave a comment you did so.

Enjoy the rest of the hop:

** Tanja **

I hope you got inspred.

Yours,