Tuesday, January 29, 2019

Miss you Puppy

Hi there,

I created this cute little card using the Gerda Steiner Designs Miss you Puppy Digital Stamp:

  • color the Gerda Steiner Designs Miss you Puppy with ZIG Clean Color Real Brush Pens and a damp watercolor brush
  • stamp some hearts from the WPlus9 Little Bits set with Versamark onto the dog bed and heat-emboss them with WOW! Bright White Super Fine embossing powder
  • add a strip of burlap as a carpet
  • and apply Distress Oxide Ink Weathered Wood through the Tim Holtz Slate Layering Stencil 
  • stamp some more little hearts with Altenew Crisp Ink Puffy Heart and add a white highlight with a glass dip pen
  • stamp the sentiment from the Gerda Steiner Designs Blast Off set with Versamark onto a strip of grey cardstock and heat-emboss it with platinum embossing powder
  • add some Nuvo Glitter Drops White Blizzard as final embellishment


Have a wonderful day.

Hugs,


Monday, January 28, 2019

Go Wild!

Hi there,

I created this adorable Zebra Birthday Card for Elizabeth Craft Designs:

  • cut out all the elements from the Elizabeth Craft Designs Zebra and some extras from the Elizabeth Craft Designs Party Accessories from white Soft Finish Cardstock and color them with Delta, Touch Twin Brush and Copic Markers
  • add highlights with a white gel pen, extra shading with Distress Ink Hickory Smoke and some shimmer with Wink of Stella Clear Glitter
  • cut out a stitched rectangle from watercolor paper using one of the Elizabeth Craft Designs Stitched Rectangles and a hill shape from the Elizabeth Craft Designs Adventure Edges 2 die set
  • add color with Distress Oxide Inks (Peeled Paint, Forest Moss, Blueprint Sketch, Salty Ocean)
  • mist the panels with water for extra texture
  • stamp the sentiment from the matching stamp set with Versamark and heat-emboss it with WOW! Bright White Super Fine embossing powder


Thanks for stopping by.

Hugs,


Huuiii!

Hi there,

I created this fun winter slider card for the Karten-Kunst Blog:

  • stamp the adorable Karten-Kunst Barney der Eisläufer with Versafine Onyx Black and color the image with Derwent Inktense pencils and a damp watercolor brush
  • add Wink of Stella Clear Glitter to the mane and the tail and Wink of Stella Silver Glitter to the horn
  • create a slider background using watercolor paper, the Memory Box Stitched Rectangles Layers, the My Favorite Things Stitched Snow Drifts, double-sided foam adhesive and some plastic
  • add color with Distress Inks (Chipped Sapphire, Tumbled Glass) and a Mini Ink Blending Tool
  • stamp the sentiment from the same set with Versafine Onyx Black onto the snow drift
  • add a trail onto the snow drift with Finetec Mica Watercolor Dragon Silver
  • stamp some stars from the same set into the evening sky with Delicata Silvery Shimmer
  • stamp the Pull Here from the Lawn Fawn Push Here set onto he pull tap
  • adhere a piece of patterned paper from the Maja Design Home for the Holidays 6x6 paper pad to the cardbase before adding the slider panel


I hope you got inspired.

Hugs,


Friday, January 25, 2019

Thanks Kitty

Hi there,

on this project for Elisabeth Craft Designs I simply turned a tiger into a tabby cat:

  • cut out all the elements from the Elisabeth Craft Designs Lion/Tiger die set from white Soft Finish Cardstock, add color with Delta, Touch Twin Brush and Copic Markers and shading with Distress Ink Black Soot
  • use a white gel pen and a black fineliner for the details in the cat's face
  • cut out a little flower from the Elisabeth Craft Designs Adventure Edges 2 die set and adhere it at the cat's right ear 
  • use Elisabeth Craft Designs clear double-sided adhesive to adhere a piece of ribbon to white cardstock and cut out the Elisabeth Craft Designs Thanks from this "ribbon paper"
  • set the die cuts aside and create the background on a stitched panel of watercolor cardstock
  • stamp the flowers from the Elisabeth Craft Designs Patterns 1 stamp set twice with Versamark and heat-emboss them with WOW! Bright White Super Fine embossing powder
  • add color using Distress Oxide Inks (Picked Raspberry, Dusty Concord) and a Blending Brush
  • add splatters with watered-down Distress Re-Inker Dusty Concord


I hope you like my creation.

Hugs,


Thursday, January 24, 2019

Let it Snow Fox

Hi there.

I created this snowy watercolor card for the Stamping-Fairies Facebook Group:

  • create this adorable little scene using several of the Art Impressions Watercolor stamp sets, Distress Markers and a damp watercolor brush
  • add some sparkle with Pearlized Water
  • stamp the sentiment from the Lawn Fawn Winter Big Scripty Words with Delicata Silvery Shimmer
  • cover the cardbase with patterned paper from the Maja Design Vintage Winter 6x6 paper pad before adhering the watercolor panel on top


Thanks for stopping by.

Hugs,


Monday, January 21, 2019

Wonderful Winter Time - Wunderschöne Winterzeit

Hi there,

here's another Winter Project for the Karten-Kunst Blog:

  • stamp the adorable little bunny from the Karten-Kunst Viecher im Winter set with Versafine Smokey Gray
  • color the image with Delta, Touch Twin Brush and Copic Markers and add extra shading with Prismacolor Colored Pencils and highlights with a white gel pen
  • stamp the sentiment from the Karten-Kunst Kalligraphie im Winter with Versafine Majestic Blue onto a panel of smooth white cardstock
  • stamp the Karten-Kunst Splatters Create with Altenew Crisp Ink Caribbean Sky 
  • mount the panel onto a dark grey cardbase and stamp the tiny snowflakes from the Karten-Kunst Spiral-Text Schnee around the border using Altenew Crisp Ink Silver Stone


Have a wonderful day.

Hugs,


Thursday, January 17, 2019

Have a really fabulous Birthday

Hi there,

I created this cute Winter Birthday Reveal Wheel for the Stamping-Fairies Facebook Group:

  • stamp the adorable little penguin and some trees from the My Favorite Things Ready, Set, Snow set with Memento Tuxedo Black
  • color the images with Delta, Touch Twin Brush and Copic Markers and Prismacolor Colored Pencils
  • add white Liquid Applique to the brim and the pompom of the hat
  • create a Reveal Wheel using the Lawn Fawn Reveal Wheel die set
  • add color to the background with Distress Oxide Ink (Weathered Wood, Milled Lavender, Tumbled Glass)
  • apply pearl white modeling paste through a snow stencil
  • stamp some of the Lawn Fawn Reveal Wheel Sentiments with Versafine Onyx Black
  • add splatters to the Reveal Wheel with Distress Stain Brushed Pewter
  • add snow drifts cut with the help of two of the My Favorite Things Stitched Snow Drifts dies
  • cut out the third part of the sentiment using a die form the My Favorite Things Brushstroke Birthday die set and add ombre colors with Alcohol Markers
  • stamp the first part of the sentiment fro the Lawn Fawn Reveal Wheel Sentiments set onto a piece of colored white cardstock with Versafine Onyx Black
  • cover a cardbase with patterned paper from the Maja Design Home for the Holidays 6x6 paper pad before adhering the Reveal Wheel panel


Hugs,


Wednesday, January 16, 2019

Milka's Thyroid Awareness Month Blog Hop

Hi there,

I am part of Milka's Thyroid Awareness Month Blog Hop and this is my creation:

  • cut out a CUTplorations Manila Tag from watercolor cardstock
  • add color with Distress Oxide Inks (Weathered Wood, Blueprint Sketch, Faded Jeans)
  • stamp some leaves from the STAMPlorations Leaves of Thanks set with Versamark and heat-emboss them with WOW! Bright White Superfine embossing powder
  • cut out the detailed butterfly from the CUTplorations Flutter Zen 1 die set from watercolor cardstock, cover the whole thing with Versamark and heat-emboss it with Stampendous Shabby Blue embossing powder
  • adhere cheesecloth, burlap, fabric, seam binding and punchinella with hot glue and place the butterfly on top pf all the layers
  • dye a piece of seam binding with the same colors of Distress Oxide Ink and thread it through the hole of the tag
  • use two of the Tim Holtz Clipping Stickers to create the sentiment


Enjoy the rest of the hop.

Hugs,


Monday, January 14, 2019

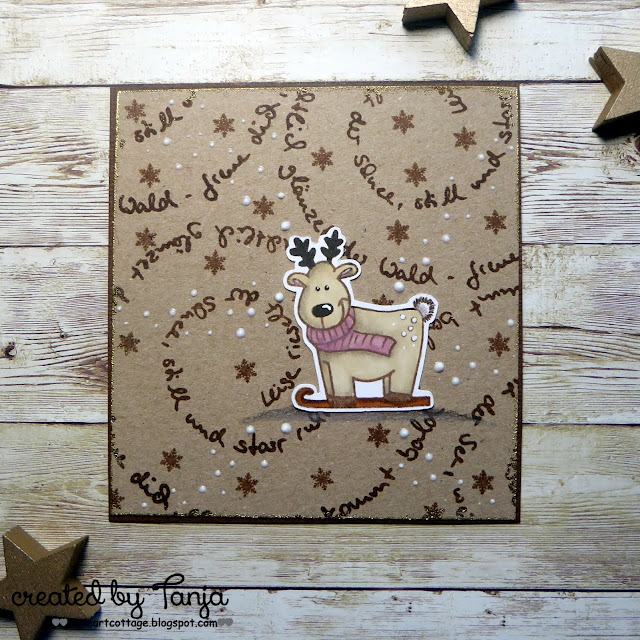
Winter Reindeer

Hi there,

I would like to show you another Winter Card that I created for the Karten-Kunst Blog:

  • stamp the sweet reindeer from the Karten-Kunst Viecher im Winter set with Versafine Vintage Sepia
  • color the image with Delta, Touch Twin Brush and Copic Markers and add extra shading with Prismacolor Colored Pencils and highlights with a white gel pen
  • create a backgroud on a piece of kraft cardstock using the Karten-Kunst Spiral-Text Schnee set and Versafine Vintage Sepia
  • cover the edges of the panel with Versamark and heat-emboss them with WOW! Metallic Gold Rich embossing powder
  • mat the panel onto a piece of brown cardstock before adhering it to the cardbase
  • add Nuvo Crystal Drops Gloss White as final embellishment


I hope you got inspired.

Hugs,


Sunday, January 13, 2019

Stamp Connection #45

Hi there,

connected through our love for card making, blogging and being from Germany we (Cornelia from Stempel Spass and I) decided to create a monthly project within predefined requirements. We are going to show you the result every 2nd Sunday of the month and this is our 45th transatlantic get-together!

Our requirement for this meet-up was:
"something new purchased a long time ago" 


  • stamp one of the monsters from the Create a Smile Beast Feast onto a stitched panel cut from watercolor cardstock and color the image with Derwent Inktense Pencils and a damp watercolor brush
  • add Nuvo Crystal Glaze to the eyes and Nuvo Glitter Accents Fresh Snowfall to the hill shape 
  • stamp the sentiment from the same set with Versafine Onyx Black
  • create a background on the cardbase using patterned paper from the My Mind's Eye Sugar Plum 6x6 paper pad and one of the My Favorite Things Stitched Scallop Edges
  • adhere the watercolor panel with double-sided foam adhesive


Now make sure to hop over to see Cornelia's Creation.


Thanks for stopping by. We hope to see you again at the ...


Hugs,

Friday, January 11, 2019

A Frosty Hello

Hi there,

I would like to show you how to create this Mixed Media Winter Card step by step over on the STAMPlorations Blog:


I hope you got inspired.

Hugs,