Wednesday, May 31, 2017

You inspire me Butterflies

Hi there,

I will be guest-designing for the wonderful Watercolour Challenge over at Happy Little Stampers. This month the optional twist is "Mask":

  • stamp all three sizes of butterflies from the WPlus9 Flora and Fauna 2 set with Versafine (Smokey Gray) ... mask off each one to create an overlapping effect
  • stamp the sentiment from the Altenew Painted Butterflies set with that same grey waterproof ink
  • color the butterflies with Daniel Smith watercolors and add extra shading to the wings with Faber-Castell Polychromos Pencils
  • add a subtle background with the same colors used on the butterflies and add some grey splatters
  • use natural charcoal for more shading around the butterflies
  • mount the watercolor panel onto a black cardbase and let two of the butterflies "fly off" the page

I can't wait to see your creations in the gallery.

Yours,


You are simply awesome

Hi there,

we are starting a new CAS Challenge over at Addicted to Stamps and More. I have to admit I always struggle with Clean and Simple Cards and maybe you do, too. Here are the guidelines to keep in mind:
  • one main focal point 
  • lots of open (no pattern) space
  • minimal layers 
  • minimal embellishments
And this is my project:

  • stamp the adorable little bird from the Gerda Steiner Designs Hoppiness set with Memento (Tuxedo Black), cut it out and color the image with Delta, Touch Twin Brush and Copic Markers
  • add extra shading with Faber-Castell Polychromos Pencils
  • cover the glasses with Pico Embellisher (Clear)
  • apply Distress Ink (Squeezed Lemonade, Mustard Seed) through a 7 Dots Studio stencil
  • stamp the sentiment from the Gerda Steiner Designs Happy Hoppy set with Versafine (Onyx Black)
  • glue the bird on top of the sentiment
  • round the top right corner with a 1'' corner rounder

I hope you got inspired.

Yours,


Tuesday, May 30, 2017

Summertime

Hi there,

this is my third creation using the fabulous Gerda Steiner Designs Pool Piggies:


  • color one of the adorable Gerda Steiner Designs Pool Piggies with ZIG Clean Color Real Brush Pens and a damp watercolor brush
  • cut out a stitched panel from watercolor paper and create a soft background using Distress Re-Inkers (Squeezed Lemonade, Scattered Straw, Tumbled Glass, Salty Ocean)
  • use the Taylored Expressions Rolling Waves dies to cut the bottom part of the background into waves and ink up the edges with Distress Ink (Salty Ocean)
  • at the top apply Distress Ink (Mustard Seed) through the Tim Holtz Layering Stencil (Rays)
  • add some water droplets in order to create more texture
  • stamp the sentiment from the Market Street Stamps Chillaxin' set with Versafine (Smokey Gray)
  • add some Nuvo Crystal Drops (Morning Dew) and some blue sequins as final embellishments

Until next week.

Yours,


Monday, May 29, 2017

Rainbow Sprinkle Tag

Hi there,

I would like to show you this colorful Mixed Media Tag over on the Karten-Kunst Blog:

  • cut out a tag from watercolor paper
  • use a dip pen and black ink to divide the tag into four sections
  • use watered-down Brushos (Rose Red, Cobalt Blue, Gamboge, Sea Green) and a watercolor brush to add some color to the tag
  • draw in some doodles with the dip pen
  • cut out the Karten-Kunst Dandelion Hearts from white cardstock and heat-emboss it with white embossing powder
  • dye a piece of seam binding with Brushos (Gamboge, Cobalt Blue) and thread it through the hole of the tag

Have a colorful day.

Yours,

Thursday, May 25, 2017

Kindness ATC

Hi there,

I created another ATC for the Stamping-Fairies Blog:

  • in one of my previous posts I explained how I created the background for several ATCs
  • choose one of them and add some droplets of Alcohol Ink (Patina, Slate)
  • stamp the butterflies/moths from the Stampers Anonymous Papillon set with Archival Ink (Black Soot)
  • color the edges with Distress Crayon Peacock Feathers
  • use white gouache to add some splatters and let some run down the right side of the ATC
  • add some Heidi Swapp Teal Silver Ombre Foil with the help of the Collage Glue Stick
  • create the sentiment using the Dymo Label Maker

Thanks for stopping by.

Yours,


Tuesday, May 23, 2017

Party!

Hi there,

here is another creation using the fun new Gerda Steiner Designs Pool Piggies stamp set:

  • color one of the adorable Gerda Steiner Designs Pool Piggies with Faber-Castell Albrecht Dürer Pencils and a damp watercolor brush
  • cut out a tag from watercolor paper and create a background with Distress Ink (Tumbled Glass) and Distress Oxide Ink (Broken China)
  • cut out a smaller piece with the same tag die and create a beach with the help of one of the My Favorite Things Stitched Snowdrifts dies - ink up the edges with Distress Ink (Gathered Twigs)
  • stamp the palm trees from the Paper Smooches Get outta Town set and the cocktail from the My Favorite Things Penguins in Paradise and color the images with watercolor pencils as well
  • stamp two sea gulls from the same Paper Smooches set with Versafine (Smokey Gray)
  • cut out a second tag from patterned paper from the Echo Park Summer Bliss 6x6 paper pad and layer it slightly offset behind the main tag
  • cut out a stitched panel from Neenah Desert Storm kraft cardstock and stamp a background with the help of the Judi Kins Papyrus stamp and Adirondack Dye Ink (Latte)
  • stamp the sentiment from the Market Street Stamps set Tikki Time with Versafine (Vintage Sepia)
  • thread blue and natural twine through the hole of the tag

Have a wonderful day.

Yours,


Elephant ATC

Hi there,

I would like to show you this fun ATC over on the Skipping Stones Design Blog:

  • in one of my previous posts I explained how I created the background for several ATCs
  • choose one of them
  • stamp the fabulous elephant from the Skipping Stones Design Elephant End set with Black India Ink onto a book page and mute the letters with some gesso
  • outline the image with a black PITT Artist Pen
  • color the image with Distress Markers (Hickory Smoke, Tattered Rose) and a damp watercolor brush
  • add some scribbly circles to the right side of the ATC with the Pico Embellisher (Electric Pink)
  • color the edges with Distress Crayon (Picked Raspberry)
  • add the sentiment using stickers

I hope you got inspired.

Yours,


Monday, May 22, 2017

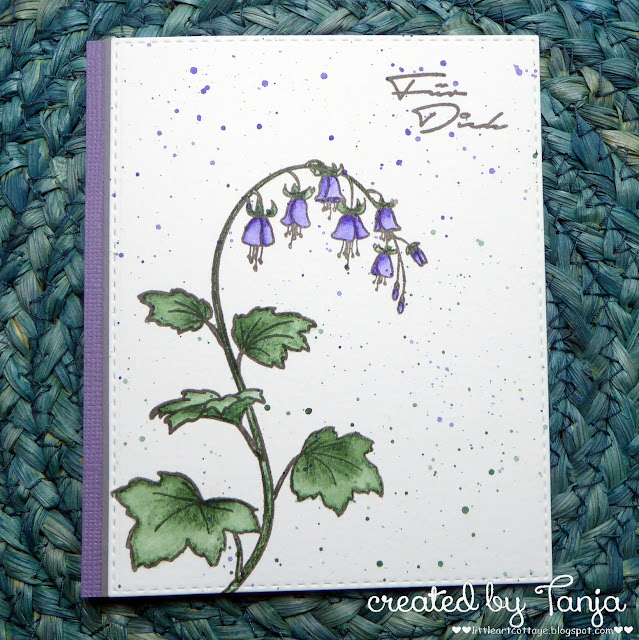
Bellflowers for you

Hi there,

I would like to show you this Watercolor Flower Card over on the Karten-Kunst Blog:

  • cut out a stitched panel from watercolor paper using one of the Memory Box Stitched Rectangle Layers dies
  • stamp the Karten-Kunst Glockenblumen-Grüße with Versafine (Smokey Gray) and color the image with Derwent Inktense Pencils and a damp watercolor brush
  • add some splatters with watered-down green and purple
  • stamp the sentiment from the same set with Versafine (Smokey Gray)
  • add a strip of grey and purple cardstock to the left side of the panel before adhering it to a white cardbase

Have a wonderful day.

Yours,


Sunday, May 21, 2017

Stamp Connection #25

Hi there,

connected through our love for card making, blogging and being from Germany we (Cornelia from Stempel Spass and I) decided to create a monthly project within predefined requirements. We are going to show you the result every 3rd Sunday of the month and this is our 25th transatlantic get-together!

This time we have a special guest. Cornelia invited the wonderful Suchi from Suchi's Cardstock to share her creation with us. So make sure to visit her blog.

Our requirement for this meet-up was:
Fire


  • cut out a Tim Holtz Stitched Oval from watercolor paper 
  • create a background using Brushos (Light Brown) and Color Burst (Indigo)
  • sprinkle on some stars using Finetec Mica Watercolors (Silver Dragon, Arabic Gold)
  • stamp a squirrel, a bear, a stick, a marshmallow and the fire from the Lawn Fawn Love you s'more set with Versafine (Vintage Sepia) and color the images with a base coat of Delta, Touch Twin Brush and Copic Markers and add shadows with Derwent Drawing Pencils
  • cut out a Tim Holtz Stitched Rectangle from Kraft Cardstock and add some stars stamped with Delicata (Golden Glitz) to the background
  • cut out a sentiment strip with the help of the My Favorite Things Blueprints 20 set
  • stamp the sentiment from the same stamp set with Versamark and heat-emboss it with WOW! Bright White Super Fine embossing powder

Now make sure to hop over to see Cornelia's Creation.

Thanks for stopping by. We hope to see you again at the ...


I hope you got inspired.

Yours,


Nib Box

Hi there,

it's time for another Stencil Sunday over on the STAMPlorations Blog and this time I created a matchbox for my Dip Pen Nibs.


Here are some more pictures:


I hope you got inspired and don't forget to join us for our Mixed Media Challenge over at the STAMPlorations Blog. The theme is always anything mixed media except a card. You must use at least one stencil (any brand) in your project. The Linky closes at the end of the month.

Yours,


Thursday, May 18, 2017

Circles Art Journal Page

Hi there,

you will find a Step-by-Step Tutorial for this Art Journal Page over on the Stamping-Fairies Blog:


I hope you got inspired.

Yours,


Wednesday, May 17, 2017

Get Well Critters

Hi there,

it's time for another Challenge over at Addicted to Stamps and More and I would like to share this cute Get-Well-Pop-Up-Card with you:


  • prepare a pop-up card from Neenah Desert Storm Kraft cardstock with three pop-up place holders
  • cover the front and back with patterned paper from the Prima Marketing All about me 6x6 paper pad
  • create the first part of the sentiment by cutting out the second part of the Karten-Kunst Große Texte Alles Gute once from patterned paper from the same paper pad and once from black cardstock for a shadow layer
  • create the second part of the sentiment with a Dymo Label Maker
  • stamp a background on the inside by using small images from the Clearly Besotted Stamps Under the Weather stamp set with Memento (Tuxedo Black)
  • stamp two of the sweet critters and the doctor's bag from the same stamp set with the same ink
  • color all the images with Delta and Touch Twin Brush Markers 
  • add highlights with a white gel pen
  • add the three cut out images to the pop up place holders
  • personalize the card by cutting out the recipients name frome patterned paper from the same paper pad with the help of the Lil' Inker Designs Mixed & Stitched Alphabet dies

I hope you got inspired.

Yours,


Tuesday, May 16, 2017

Enjoy the Summer

Hi there,

my next four posts on the Gerda Steiner Designs Blog will be all about the brand new Gerda Steiner Designs Pool Piggies:


  • color one of the adorable Gerda Steiner Designs Pool Piggies with ZIG Clean Color Real Brush Pens and a damp watercolor brush
  • cut out the Paper Smooches Palm Tree from watercolor paper and color it with Distress Inks (Mowed Lawn, Gathered Twigs)
  • cut out a tag from watercolor paper and create a background with Distress Ink (Tumbled Glass) and Distress Oxide Ink (Broken China)
  • cut out a smaller piece with the same tag die and create a beach with the help of one of the My Favorite Things Stitched Snowdrifts dies - ink up the edges with Distress Ink (Gathered Twigs)
  • use the sentiment from the same set
  • thread teal and natural twine through the hole of the tag

Thanks for stopping by today.

Yours,


Monday, May 15, 2017

A Gift for you

Hi there,

meet Daisy over on the Karten-Kunst Blog:

  • stamp Karten-Kunst Daisy mit Geschenk with Memento (Tuxedo Black) and color her with Delta, Touch Twin Brush and Copic Markers
  • add googly eyes
  • cut out a stitched panel using one of the Memory Box Stitched Rectangle Layers dies
  • cut out a circle from masking paper and create a background using Distress Inks (Chipped Sapphire, Black Soot) and a Mini Ink Blending Tool
  • stamp the stars from the same stamp set with Versamark and heat-emboss them with WOW! Metallic Gold Rich Super Fine embossing powder
  • cut out a frame from silver glitter cardstock using two dies from the Memory Box Stitched Circle Layers
  • stamp the sentiment from the same stamp set with Versafine (Majestic Blue)

I hope you got inspired.

Yours,


Thursday, May 11, 2017

Happy Birthday Racoon

Hi there,

I created this Birthday Card for the Stamping-Fairies Blog:


I hope that you like my project.

Yours,


Tuesday, May 9, 2017

A Letter for you

Hi there,

on this card I used the Surprise Bonus Image from the Gerda Steiner Designs Spring Stamp Bundle:

  • color the Bunny with Letter image which is available as part of the Gerda Steiner Designs Spring Digital Stamp Bundle with ZIG Clean Color Real Brush Pens and a damp watercolor brush
  • add highlights to the eyes with a white gel pen
  • cut out a panel from watercolor paper using one of the Tim Holtz Stitched Rectangles dies
  • stamp the flowers and the envelopes from the Unity Stamp Company Hashtag Kit with Versafine (Onyx Black) 
  • add color to the background with Distress Oxide Inks (Worn Lipstick, Broken China)
  • use some stripes of thin Washi Tape to add interest and to create a base for the bunny to stand on
  • adhere the panel to a kraft cardbase

Have a colorful day.

Yours,


Monday, May 8, 2017

Textured Butterfly Tag

Hi there,

I would like to show you how I created this Textured Butterfly Tag over on the STAMPlorations Blog.

 
I hope you got inspired and don't forget to join us for our Mixed Media Challenge over at the STAMPlorations Blog. The theme is always anything mixed media except a card. You must use at least one stencil (any brand) in your project. The Linky closes at the end of the month.

Yours,


Sunday, May 7, 2017

Free Bird ATC

Hi there,

we are starting a new Mixed Media Challenge over on the STAMPlorations Blog.

  • in one of my previous posts I explained how I created the background for several ATCs
  • for this project I used the last one and since I thought it was too dark, I added a thin layer of white gesso over the whole card
  • add some additional color with Alcohol Inks (Clover, Eggplant, Gold)
  • stamp the letters from the STAMPlorations Scribbly Splattery Grunge set with Versamark and heat-emboss them with WOW! Silver Pearl embossing powder 
  • splatter the card with some watered-down white acrylic paint
  • apply black gesso over the ARTplorations Art happens stencil and on top of this layer Prima Marketing Crackle Paste Platinum through the ARTplorations Square Links stencil
  • use one of the birds from the ARTplorations Some Birds stencil as a template and cut it out from sturdy kraft cardstock
  • prime the bird with some white gesso and color it with Distress Paints (Wild Honey, Cracked Pistachio)
  • add shading with a black Stabilo All Pencil
  • stamp the newsprint from the STAMPlorations Mixed Media Grunge set with Archival Ink (Black Soot) right onto the bird's body
  • cut the Memory Box Woodland Branch from the same sturdy cardstock and color it with Distress Paint (Gathered Twigs)
  • dye two little piece of cheesecloth with Distress Ink (Tea Dye)  and use the Bosch GluePen to flue everything in place
  • as the final step add a sentiment sticker to the right side of the cluster

Thanks for stopping by.

Yours,


Saturday, May 6, 2017

Sanddollar Canvas

Hi there,

I would like to show you this canvas that I created for our new Happy Little Stampers Mixed Media Challenge:


  • mix Liquitex Pouring Medium with three different colors of Dina Wakley Heavy Body Acrylic Paints (Ocean, Sky, Turquoise) and pour them onto a canvas - let this thick layer of paint dry overnight
  • apply Prima Marketing Modeling Paste through the ARTplorations Bloom Boldly stencil
  • mix Golden Acrylic Glazing Liquid with Golden Fluid Acrylic Paint (Payne's Gray) and add color to the raised areas, let dry for a bit and wipe it away with a baby wipe - repeat the process until you are happy with the result
  • stamp the sandollar from the Tim Holtz Nautical Blueprint set with Versafine (Smokey Gray) onto a piece of watercolor paper
  • color the image with Distress Markers
  • add Versamark to random spots on the sanddollar and heat-emboss it with Stampendous Frantage embossing enamel (Shabby Pink)
  • cut out the CUTplorations Holidays word die from sturdy white cardstock, cover the sentiment with Versamark and heat-emboss it with the same pink embossing enamel
  • adhere the sanddollar and the sentiment with Multi Medium Matte and add shading with a PITT Artist Pen (Cold Gray VI)
  • add splatters with watered-down Golden Fluid Acrylics (Titanium White, Carbon Black) and a Liquitex Splatter Brush 

Thanks for stopping by.

Yours,


Wednesday, May 3, 2017

Balloon Bunny

Hi there,

we are starting a Photo Inspiration Challenge over at Addicted to Stamps and More:

  • stamp the adorable little bunny from the Gerda Steiner Designs Happy Hoppy set with Lawn Fawn (Jet Black) and color the image with Delta, Touch Twin Brush and Copic Markers
  • add extra shading with Faber-Castell Polychromos Pencils
  • cut out a balloon from golden glitter cardstock with the help of one of the Lawn Fawn Party Balloons
  • knot a piece of natural twine around the end of the balloon, pierce a little hole underneath the bunny's hand and thread the twine through it
  • cut out a scalloped rectangle from Strathmore Bristol Smooth cardstock with one of the My Favorite Things Blueprints 20 dies
  • color the background with several layers of Distress Oxide Ink (Broken China)
  • cut out the largest oval from the My Favorite Things Stitched Oval Scallop Frame set from sturdy white cardstock
  • cut out the Memory Box Paintbrush Happy three times from black cardstock and layer them on top of each other
  • create the second part of the sentiment using the Dymo Label Maker

I hope you got inspired.

Yours,

Tuesday, May 2, 2017

Ewe are loved

Hi there,

on my fourth creation with an image from the Gerda Steiner Designs Spring Digital Stamp Bundle I used some Flocking Powder to give the sheep a real fluffy finish:

  • color the Sheep which are available as part of the Gerda Steiner Designs Spring Digital Stamp Bundle with Zig Clean Color Real Brush Pens and a damp watercolor brush
  • add glue to the fur parts and flocking powder in camel and sparkling flocking powder in white
  • set the sheep aside to dry thoroughly
  • cut out a base from sturdy white cardstock using the Tim Holtz Stitched Rectangles 
  • cut out one larger and one smaller Tim Holtz Stitched Oval from this panel
  • apply Distress Ink (Broken China, Mowed Lawn) to the smaller oval and add texture with some water droplets
  • stamp the sentiment from the My Favorite Things Ewe are the best set with Versafine (Onyx Black)
  • puzzle the pieces together ... add two layers of foam tape to the rectangle, one layer of foam tape to the larger oval and double-sided tape to the small oval and the sheep to adhere them to the cardbase

I hope you got inspired.

Yours,