Wednesday, November 30, 2016

Wishing you Joy

Hi there,

why don't you join us for our Make your Mark Challenge over at Addicted to Stamps and More?


  • stamp the Santa Hat from the Paper Smooches Chubby Chum Pals set with Versafine (Onyx Black) onto a stitched panel cut from watercolor paper and mask it 
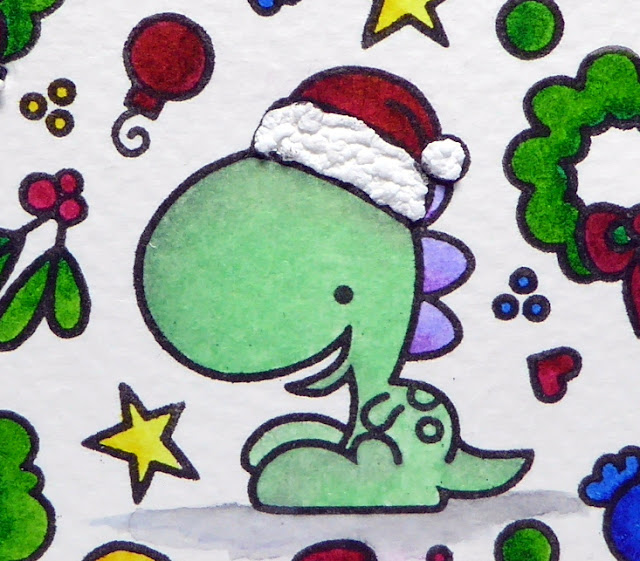
  • stamp the super adorable dragon from the Paper Smooches Party Posse set with the same black ink
  • create a background using little images from the Paper Smooches Sugar Rush, Hang ups and Promenade stamp sets
  • color all the images with ZIG Clean Color Real Brush Pens and a damp watercolor brush
  • cut out the Poppy Stamps Swirled Joy from the colorful background and four times from black cardstock
  • puzzle one black diecut into the panel and layer the other black die cuts on top of that
  • adhere the sentiment cut from the background slightly off-set
  • mat the panel onto black cardstock and use the Perfect Layers Mini Tool to create a thin black border around the panel
  • add some Radiant Neon Amplify (White) to the rim of the Santa Hat and its pompon

Here are close-ups of the cute little dragon and the sentiment:


I can't wait to see your creations in the gallery.

Yours,


Tuesday, November 29, 2016

Happy Fall Mice with Sign

Hi there,

on today's card I am using one of the fabulous new Gerda Steiner Designs Digital Stamps:

  • color the Gerda Steiner Designs Two Mice with Sign with Delta and Touch Twin Brush Markers
  • add Wink of Stella Clear Glitter to the sign and add highlights with a white gel pen
  • cut the Lawn Fawn Stitched Journaling Card from watercolor paper and create a background by stamping pumpkins from the Gerda Steiner Designs Fall Mice set and leaves from the Gerda Steiner Designs Happy Fall set with Versafine (Vintage Sepia)
  • color the pumpkins and leaves with Daniel Smith Watercolors
  • run a stitched panel of kraft cardstock through your Big Shot inside a leaf embossing folder
  • adhere the different layers with foam tape and double-sided adhesive to the cardbase

Thanks for stopping by.

Yours,


Meowy Christmas

Hi there,

today, I would like to show you this adorable Cat Christmas Card over on the Skipping Stones Design Blog:


Have a wonderful day.

Yours,


Monday, November 28, 2016

Christmas Tag #1 - No Peeking

Hi there,

I created four Christmas Tags using Gerda Steiner Designs Stamps for the Karten-Kunst Blog that I will show you on the next four Mondays. Here is the first one:

  • cut out a tag from Neenah Desert Storm kraft cardstock 
  • first stamp the Santa hat from the Gerda Steiner Designs Peeking Friends stamp set with Versafine (Onyx Black), mask it off and stamp the little fox and the sentiment from the same stamp set with that same black ink
  • color the image with Prismacolor Colored Pencils
  • add details and highlights with a white gel pen
  • thread red and natural twine through the hole of the tag

Thanks or stopping by today.

Yours,

Saturday, November 26, 2016

Christmas House Tag

Hi there,

STAMPlorations is joining the 25 Days of Christmas Tags Event and since 25 days weren't quite enough we are sharing our creations on November 26th:

 
  • cut out two CUTplorations Luggage Tags - one from watercolor paper and one from sturdy white cardstock
  • stamp one of the whimsical houses from the STAMPlorations Houses set with Versafine (Onyx Black) and color the image and the background with Daniel Smith Watercolors
  • add some Christmas sentiments from the STAMPlorations Joyful set and some stars from the STAMPlorations Art Marks set with the same black ink
  • draw in some snowy dots with a white paint marker
  • create a little parallel circuit on the background tag using copper tape and three LEDs to lighten up the three lower windows
  • adhere the tags to one another by using three layers of double-sided foam adhesive 
  • thread natural twine through the holes of the tags

Here are some more pictures showing how those little windows light up when you press on the black star at the top of the tag:


I hope you got inspired.

Yours,


Friday, November 25, 2016

Sending Love your Way Bird

Hi there,

I would like to show you a new clean and simple project over on the A Day for Dasisies Blog:

  • color the A Day for Daisies Birdie Bloom image and the background with ZIG Clean Color Real Brush Pens, Distress Markers and a damp watercolor brush
  • add random dots with a Distress Marker (Hickory Smoke) 
  • mat the stitched panel onto a piece of grey cardstock before adhering it to the cardbase
  • stamp the sentiment from the Altenew Sentiments & Quotes set with Versafine (Smokey Gray) onto a strip of that same grey cardstock and adhere it to the main panel using foam tape
  • add three Pretty Pink Posh sequins (6mm and 4mm Sparkling Clear) as final embellishments

Have a day for daisies.

Yours,

Wednesday, November 23, 2016

Happy Purr-thday

Hi there,

today, I would like to show you a cute card project over on the Stamping-Fairies Blog:

  • stamp one of the adorable cats and a little mouse from the My Favorite Things I knead you stamp set with Memento (Rich Cocoa) onto a stitched panel of Neenah Desert Storm Kraft cardstock 
  • apply a basecoat of color with Delta and Touch Twin Brush Markers
  • add shadows with Spectrum Noir Pencils and Zest-it
  • use a white paint pen to add random larger and smaller dots around the image
  • stamp the sentiment from the My Favorite Things Cool Cat stamp set with Versamark onto a strip of kraft cardstock and heat-emboss it with WOW! Bright White Super Fine embossing powder
  • color another strip of kraft cardstock with one of the turquoise markers used to color the images
  • cut a larger stitched panel from kraft cardstock and stamp a background using the My Favorite Things Swiss Dots Background and Avery Elle Pigment Ink (Aquamarine)
  • add some Pretty Pink Posh Sequins (4mm and 6mm Sparkling Clear and 4mm and 6mm Aquamarine) as final embellishments

Here is a close-up of the cute little cat:


I hope to see you again soon.

Yours,


Tuesday, November 22, 2016

Happy Halloween Elephant

Hi there,

I created this vibrant Halloween Card with one of the new Gerda Steiner Designs Digital Stamps:

  • color the Gerda Steiner Designs Halloween image with Delta and Touch Twin Brush Marker
  • add highlights with a white gel pen
  • cut out a stitched panel from watercolor paper and mask the whole panel leaving only a circle
  • create a Halloween background in that circle using Distress Inks (Mowed Lawn, Carved Pumpkin, Wilted Violet, Black Soot) and the Mini Ink Blending Tool
  • remove the mask and add splatters with black Kuretake Gansai Tambi Watercolors
  • stamp the sentiment from the Lawn Fawn Booyah! set with Versafine (Onyx Black)

Have a spooky day.

Yours,


Monday, November 21, 2016

Adventszeit Bunny

Hi there,

I would like to show you a watercolor Christmas Tag over on the Karten-Kunst Blog:

  • cut out a stitched tag form watercolor paper
  • stamp one of the adorable little bunnies from the Memory Box Bunny Wishes set with Versafine (Onyx Black) and mask it off
  • stamp the poinsettia and two leaves from the Poppy Stamps Poinsettia Peace set with Versamark and heat-emboss it with Judi Kins Egyptian Gold embossing powder
  • color the images and the background with Jaxon Aquarelle watercolors
  • stamp the sentiment from the Karten-Kunst Capri Weihnachtspost with Versafine (Onyx Black) and heat-emboss it with clear embossing powder
  • dye a piece of seam binding with Distress Ink (Mowed Lawn) and thread it through the hole of the tag


I hope you got inspired.

Yours,


Sunday, November 20, 2016

Stamp Connection #19

Hi there,

connected through our love for card making, blogging and being from Germany we (Cornelia from Stempel Spass and I) decided to create a monthly project within predefined requirements. We are going to show you the result every 3rd Sunday of the month and this is our 19th transatlantic get-together!

Our requirement for this meet-up was:
"foiling"

  • stamp one of the adorable Mama Elephant Page Huggers onto a piece of white cardstock with Memento (Tuxedo Black) and color the image with Delta and Touch Twin Brush Markers
  • add Glossy Accents to the glasses and set the bear aside to dry
  • cut out a bookmark from white cardstock using one of the Avery Elle Bookmark dies and spritz it with Heidi Swapp Minc Reactive Mist - this should also dry thoroughly
  • cover the bookmark with Heidi Swapp Minc Foil (Teal Silver Ombre) and run it through the Mini Minc with a heat setting of 3
  • ink up the white space of the bookmark with Distress Ink (Chipped Sapphire) and dye a piece of seam binding with that same blue ink
  • stamp the sentiment from the My Favorite Things Birthday Bears stamp set with Versamark onto a strip of vellum and heat-emboss it with WOW! Silver Bells embossing powder
  • wrap the vellum strip around the bookmark and use a piece of washi tape to secure it in the back
  • cut out another bookmark from kraft cardstock and use it to cover the backside 
  • adhere the little bear using foam tape
  • thread the seam binding through the hole of the tag

Now make sure to hop over to see Cornelia's Creation.

Thanks for stopping by. We hope to see you again at the ...


Yours,


Timeless Nature Wood Panel

Hi there,

it is time for another Stencil Sunday over on the STAMPlorations Blog:

  • cover a wood panel with white gesso
  • apply Dreamweaver Crackle embossing paste through the ARTplorations Happy Flowers Large stencil and let it dry thoroughly
  • add Distress Paints (Shaded Lilac, Picked Raspberry, Evergreen Bough, Mermaid Lagoon, Spun Sugar) at the top of the panel and water it down until it drips - let it dry between colors and at the end
  • mix some Distress Paint (Hickory Smoke) with Golden Acrylic Glazing Liquid, paint it over the whole panel, let it sit for a minute and wipe some of it away with a baby wipe - repeat this process until you are happy with the result
  • ink up the edges with Distress Ink (Black Soot)
  • add some texture by stamping the script from the STAMPlorations Mixed Media Elements set with Archival Ink Watering Can
  • add a border with one stamp from the STAMPlorations Artsy Border Maker set and the dot pattern from the STAMPlorations Mixed Media Grunge set and the same grey ink 
  • apply some Remnant Rubs (Botanical) at random spots as final embellishment
  • dye a piece of seam binding with Distress Stains (Picked Raspberry, Shaded Lilac, Evergreen Bough) and thread it through the holes of the panel

I hope you got inspired and don't forget to join us for our Mixed Media Challenge over at the STAMPlorations Blog. The theme is always anything mixed media except a card. You must use at least one stencil (any brand) in your project. The Linky closes at the end of the month.

Until next time.

Yours,


Friday, November 18, 2016

A Child's Prayer

Hi there,

join me on the A Day for Daisies Blog to learn more about this magical creation:

  • color the A Day for Daisies A Child's Prayer image with ZIG Clean Color Real Bursh Pens, Distress Markers and a damp watercolor brush
  • add splatters with Finetec Mica Watercolors (Dragon Silver)
  • cover the dress with Wink of Stella Clear Glitter for extra sparkle and shine
  • create an ombre background on a stitched panel of watercolor paper using Distress Inks (Chipped Sapphire, Dusty Concord, Shaded Lilac)
  • cut the My Favorite Things Stars in the Sky Vertical twice from this background panel and mat it onto a piece of golden glitter cardstock before adhering all the layers to the cardbase
  • cut the CUTplorations Magical word die from a piece of golden glitter cardstock and a piece of blue foam rubber; glue both pieces together and adhere the sentiment right above the focal image

Have a day for daisies.


Thursday, November 17, 2016

Merry Christmas Reindeer Tag

Hi there,

this year I have the great honor to be a Guest Designer for Loll's Twelve Tags of Christmas Event and this is my creation:


  • cut out a tag from watercolor paper and cover it with white gesso
  • create a background using Distress Paints (Mowed Lawn, Festive Berries, Iced Spruce)
  • stamp one of the Gingham patterns from the Waltzingmouse Stamps Gingham and Co. stamp set with Memento Luxe (Rich Cocoa) and cover the tag with clear embossing powder - otherwise the ink would take quite long to dry on the painted surface
  • paint around the ARTplorations Christmas Reindeer mask with Dylusions Paint (Melted Chocolate)
  • paint only a frame around that mask with Dylusions Paint (Ground Coffee) for a stronger contrast and let this color fade into the background
  • apply golden Texture Paste through the ARTplorations Oh my Stars! Mini stencil and let it dry thoroughly
  • ink up the edges with Versamark and heat-emboss them with WOW! Metallic Rich Gold embossing powder
  • stamp the script from the STAMPlorations Mixed Media Elements set with Delicata (Golden Glitz) for even more texture
  • cut out the CUTplorations Merry Christmas phrase die from golden glitter cardstock and brown foam rubber; adhere the pieces on top of each other and use Multi Medium Matte to glue the sentiment to the bottom of the tag
  • dye a piece of seam binding with matching Distress Inks (Mowed Lawn, Festive Berries) and thread it through the hole of the tag
  • add splatters with Finetec Mica Watercolors (Inca Gold) as finishing touch

I hope you got inspired.

Yours,


Wednesday, November 16, 2016

Blessings to you

Hi there,

it's time for our extra special Giving Thanks Fall Blog Hop over on the STAMPlorations Blog and this is my creation using the wonderful STAMPlorations Many Blessings stamp and die sets:

  • prepare a card base and an inside cover-up from Confetti White cardstock
  • cut the CUTplorations Many Blessings image die from the cardfront and from the inside cover-up
  • stamp the stitched sentiment from the STAMPlorations Many Blessings set with Versafine (Vintage Sepia) onto the cardfront
  • stamp the pumpkin and apple basket from the same set through the openings inside the card and add the "to you" sentiment below
  • sandwich a flat sequin shaker pouch created with the help of the Fuse Tool between the cardfront and the inside cover-up
  • color the image with Spectrum Noir Pencils and Zest-it
  • round the top right corner with a 1'' corner rounder

Here is a picture of the inside of the card:


Prize Info 
Giving Thanks Hop
  • ONE (1) winner randomly drawn from all comments left on the STAMPlorations blog and participating designers blogs will receive a $50 gift certificate.
  • THREE (3) winners randomly drawn from all comments left on the STAMPlorations blog and participating designers blogs will each receive a $20 gift certificate to the shop.
  • ONE (1) commenter randomly drawn from our Facebook page will win a $15 gift certificate for herself and a $15 gift certificate for one friend she tags in her comment.
  • ONE (1) commenter randomly drawn from our Instagram account will win her choice of Giving Thanks bundle (Be Thankful, Oh So Grateful, or Many Blessings)/
Commenting ends on November 30th at 11:55 p.m. Pacific

Giving Thanks Linky Party
  • ONE (1) winner randomly drawn from all entries linked up will receive the Be Thankful bundle (stamp set with coordinating die, word die, and stencil)
  • ONE (1) winner randomly drawn from all entries linked up will receive Oh So Grateful bundle (stamp set with coordinating die, word die, and stencil)
  • ONE (1) winner randomly drawn from all entries linked up will receive Many Blessings bundle (stamp set with coordinating die, word die, and stencil)
You have until November 30th to link up your projects to the linky party.

The Winners will be announced on December 9th in the November Challenges and Hops winners post.

Enjoy the rest of the hop:

I hope you got inspired.

Yours,


Merry Christmas Reindeer

Hi there,

it's time for a Photo Inspiration Challenge over on the Addicted to Stamps and More Blog. My creation was inspired by the vintage-looking font and the color combo:


  • stamp Whipper Snapper Designs Ringo & Starr onto a stitched panel of Neenah Desert Storm Kraft cardstock with Versafine (Vintage Sepia)
  • create a background with the help of the Lili of the Valley Grunge Christmas Postmarks and Versafine (Olympia Green, Crimson Red)
  • stamp the sentiment from the same stamp set with red and green ink as well, cut it out, cover it with Versamark and heat-emboss it with clear embossing powder for a shiny sticker look
  • color the animals with a basecoat of Delta and Touch Twin Brush Markers and add shadows with Prismacolor Colored Pencils and Zest-it
  • add details with a white and golden gel pen
  • stamp the Waltzingmouse Stamps Vintage Christmas Background with Versafine (Vtage Sepia) directly onto a kraft cardbase and adhere the panel with double-sided foam tape

I can't wait to see your creations in the gallery.

Yours,


Tuesday, November 15, 2016

Hello Cute Cat

Hi there,

I would like to show you this project using a super adorable cat Digital Stamp from Gerda Steiner Designs:

  • color the Gerda Steiner Designs Cat with Sign image with Delta and Touch Twin Brush Markers
  • create the Hello sentiment with the help of a Dymo Label Maker
  • adhere the cat to a piece of patterned paper from the Pebbles Special Delievery Boy 6x6 paper pad
  • round the right corners with a 1'' corner rounder and die cut a line of tiny hearts from the left side
  • cut a stitched panel from watercolor paper and cover it with white gesso
  • apply Prima Markerting Light Paste through the ARTplorations Retro Circles stencil and let it dry thoroughly
  • add color using Dylusions Ink Sprays (London Blue, Vibrant Turquoise)
  • spritz the backgroud with Pearlized Water for extra shimmer

Thanks for stopping by.

Yours,


Monday, November 14, 2016

Nikolaustag

Hi there,

I would like to share a Pop-up Christmas Card with you over at the Karten-Kunst Blog:

  • stamp the bunny, the cap and the little present from the Memory Box Holiday Bunnies set and the big present, the bag and the tree from the Poppy Stamps Christmas Delights set with Memento (Tuxedo Black)
  • color the images with Delta and Touch Twin Brush Markers
  • cut the Memory Box Country Landscape from grey cardstock - color the cardbase behind the windows with an Alcohol Marker
  • ink up the edges of the top of the card with Distress Ink (Tumbled Glass)
  • stamp some stars from the Memory Box Holiday Bunnies with Delicata (Golden Glitz)
  • prepare a pop-up panel from white cardstock - I used three of the Lawn Fawn Everyday Pop-ups and the My Favourite Things Stitched Snow Drifts to give a finished look to the edges
  • adhere the images to the pop-ups with liquid glue - this will give you a little wiggle room

And this is how the card looks from the outside:

  • cut a piece of patterned paper from the Maja Design Vintage Winter 6x6 paper pad into shape with one of the My Favourite Things Stitched Basic Edges
  • ink up the edges of the patterened paper piece and the cardbase with Distress Ink (Antique Linen)
  • stamp the sentiment from the Karten-Kunst Capri Weihanchtspost set with Versafine (Vintage Sepia)
  • add some splatters with Heidi Swapp Color Shine (Gold)

I hope you got inspired.

Yours,